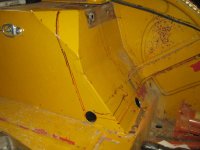
notch in fender for more leg (belly) room
IOPort51
NOT the voice of reason Jeep-CJ.com
- Posts
- 13,959
- Thanks
- 11
- Location
- Garland Texas
- Vehicle(s)
- 1977 cj-5
4.2 W/MC2100 carb, 4.0 head W/3 angle valves,SS Header,TFI ignition with MSB-6 offroad module,CS144 140 amp RPS alternator with remote regulator T-150,d-20,Dana 44 with OX lock and disk brakes. D-30 with Spartin locker,
skyjacker 2.5 lift?nitro shocks,31" BFG A/T off road.8000 lb Warn winch, original owner.=^)
2006 Toyota Tacoma
I am of the opinion that putting seats in a CJ of any other variety than what it came with is a major big PITA.
Seats from another vehicle most likely will need some sort of re engineered mount and will more than likely take up more of the room that was meant for you than is comfortable. They may look good but be of a material that may not be the best choice for an open vehicle and will sun fade and rot before you know it. If you do have the occasion to do some serious off road driving you may not find them capable of having your but dropped in them with considerable force and still having springs or passing. Worse yet you may find they do not cushion and support your favorite back side in a way that will allow you to walk normally for a day or two. Having a seat that will hold you in the proper position with out sliding around on off camber is a plus too.
I found some comfortable aftermarket seats in the master craft Nomad. coincidentally the least expensive seat Mastercraft sells.
now for the bad news, this seat like every other aftermarket seat that claims to "Bolt into your CJ" may, in fact bolt to the mounts but unless you are shorter than 5' 10" your head will stick above the roll bar and the stearing wheel may very possibly rub your stomach.
I made new seat mounts to drop the seat 3" and got my head out of the roof and back down where I can see out of the windshield rather than over it but it was still a bit cramped for and aft. With the seat in the full back position it is in contact with the rear wheel well and that is all there is.
unless you modify the body to gain more room which will mean stretching the body, I guess I should have bought a CJ7 but it a bit late to second guess that now or modifying the fender well. I think notching the wheel well will be much easier than stretching the whole body so that's the way to go.
I am quite proud of the fact that I have not cut,chopped or other wise changed the structural integrity of My CJ5 and to do this Modification required much thought and consideration and a plan to make this look sort of like this is the way it is supposed to be. You have heard the saying measure twice and cut once? well I measured, changed, thought through and measured again about 30 times before making a cut.
So, after this incredibly long winded, but hopefully entertaining, introduction I offer these pictures and captions.


Lines to be cut and 1 1/4" holes for the corners. I like the idea or round corners rather than square. they are stronger and they look a lot better.


This is the whole, more or less a case of connect the dots. Sawsall is not a precision tool and this required a bit of grinding to get everything in the right plane and tangent to the corners.

For those that have never seen/used one of these, this is a spot weld cutter. It cuts the part you want to remove and leaves the part you want to save. then you grind the weld that was left behind to smooth things up again.


this is the seat back in position to check the fit, no I have not covered the hole yet, I think it fits pretty well. the seat back angle is good and the seat slider clicks in just the right place and the seat slides back a whopping 2". Which is a pretty good ways when your talking about belly room.

some of you may be wondering why I only went back 2" and this is the answer. two inches is where the seat back hits the roll bar.
Now please watch for part two where I deal with a few small problems like braking and rolling 10ga galvanized sheet metal, yes that's right galvanized. I think I can do a passable spot weld on 10 ga but I have not tried to do it in a vertical position.
When all things are said and done this was the difficult part and the first cut was traumatic to be sure and so I am glad it is done.
Seats from another vehicle most likely will need some sort of re engineered mount and will more than likely take up more of the room that was meant for you than is comfortable. They may look good but be of a material that may not be the best choice for an open vehicle and will sun fade and rot before you know it. If you do have the occasion to do some serious off road driving you may not find them capable of having your but dropped in them with considerable force and still having springs or passing. Worse yet you may find they do not cushion and support your favorite back side in a way that will allow you to walk normally for a day or two. Having a seat that will hold you in the proper position with out sliding around on off camber is a plus too.
I found some comfortable aftermarket seats in the master craft Nomad. coincidentally the least expensive seat Mastercraft sells.
now for the bad news, this seat like every other aftermarket seat that claims to "Bolt into your CJ" may, in fact bolt to the mounts but unless you are shorter than 5' 10" your head will stick above the roll bar and the stearing wheel may very possibly rub your stomach.
I made new seat mounts to drop the seat 3" and got my head out of the roof and back down where I can see out of the windshield rather than over it but it was still a bit cramped for and aft. With the seat in the full back position it is in contact with the rear wheel well and that is all there is.
unless you modify the body to gain more room which will mean stretching the body, I guess I should have bought a CJ7 but it a bit late to second guess that now or modifying the fender well. I think notching the wheel well will be much easier than stretching the whole body so that's the way to go.
I am quite proud of the fact that I have not cut,chopped or other wise changed the structural integrity of My CJ5 and to do this Modification required much thought and consideration and a plan to make this look sort of like this is the way it is supposed to be. You have heard the saying measure twice and cut once? well I measured, changed, thought through and measured again about 30 times before making a cut.
So, after this incredibly long winded, but hopefully entertaining, introduction I offer these pictures and captions.
Lines to be cut and 1 1/4" holes for the corners. I like the idea or round corners rather than square. they are stronger and they look a lot better.
This is the whole, more or less a case of connect the dots. Sawsall is not a precision tool and this required a bit of grinding to get everything in the right plane and tangent to the corners.
For those that have never seen/used one of these, this is a spot weld cutter. It cuts the part you want to remove and leaves the part you want to save. then you grind the weld that was left behind to smooth things up again.
this is the seat back in position to check the fit, no I have not covered the hole yet, I think it fits pretty well. the seat back angle is good and the seat slider clicks in just the right place and the seat slides back a whopping 2". Which is a pretty good ways when your talking about belly room.
some of you may be wondering why I only went back 2" and this is the answer. two inches is where the seat back hits the roll bar.
Now please watch for part two where I deal with a few small problems like braking and rolling 10ga galvanized sheet metal, yes that's right galvanized. I think I can do a passable spot weld on 10 ga but I have not tried to do it in a vertical position.
When all things are said and done this was the difficult part and the first cut was traumatic to be sure and so I am glad it is done.