Build Thread “REBASELINEING” A CJ - A CJ5 Build Thread
titanjeep
Jeeper
- Posts
- 47
- Thanks
- 0
- Location
- Los Angeles
- Vehicle(s)
- 1981 CJ-5 w/ stock 258, T-176, D300, Dana 30, AMC 20
INTRODUCTION:
Hello fellow Jeep enthusiasts. Since the work on the CJ has finally begun in earnest, I decided it was time to start the build thread. I have two primary goals with this thread:
1. To document for posterity, hopefully in a somewhat entertaining and informative manner, the work performed on this on this Jeep. I cannot promise this thread will be as educational or enthralling as some of the others on this forum, but I hope it will be a value added addition.
2. To draw upon the knowledge and expertise of the members of the awesome forum. I am no expert, and this build will be a (sometimes painful) learning experience. Therefore, I welcome the inputs, advice, recommendations and criticisms from all.
THE PLAN:
The dictionary defines rebaselineing as the process of providing a project with a new baseline. And that is essentially what I want to with this project. I have been inspired by the different editions… like the Willys, Moab and Trailhawk… that have rolled of Jeep’s assembly line in the last decade. My plan is to create a modernized and more capable CJ with a military theme that looks like it rolled of the assembly line that way. Of course, this plan is just that… a plan. It will evolve after initial contact with the enemy (rust, age, breakdowns, etc.). There will also be the expected excursions down the “while I am in here, I should also fix…” rabbit hole. And while the specific details of the build may change as my knowledge and experience base grows, the vision has been locked in my head since I purchased the Jeep and I doubt it will change
As it stands, the plan is for the build to unfold in four phases:
Phase 1: I am trying to have this done before our second child arrives in June.
• Brakes
• Steering
• Driveline fluids and seals
• Oil change, radiator flush and tune up (if one is needed)
• Check out the electrical wiring
• Clean up the tub and frame and stop/slow down rust.
Phase 2: Modernization
• Rear disc brakes
• Junkyard TBI
• YJ Family Roll bar
• iPod stereo
• YJ leaf spring conversion
• HID Halo headlights
Phase 3: Upgrades/Customization
• AMC20 Rear axle upgrades (one piece shafts, welded tubes, TBD traction device)
• 4.10 Gears
• Recovery points
• Improved cooling
• Ignition upgrade
• Power distribution center
• Taillight replacement
• Winch
• Auxiliary lighting
• Rocker Protection
Phase 4: Restoration/Rebuild
• Teardown
• Sgt Rock Metallic Paint
• Decals
• O.D. Interior
THE PATIENT:
Here is our patient… a 1981 CJ5 that I purchased off the “lemon lot” on Kirtland AFB in July of 2007. This is what she looked like when I brought her home.
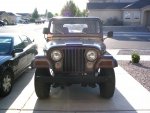
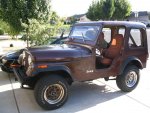
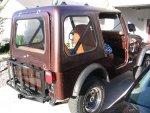
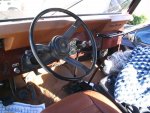
I sold the hard top a few months later to seed my Jeep fund. She is a solid foundation for a project with a solid drive train and almost no rust. The only real issue is the PO’s pension for welding things to the frame. Here is an example of some of his handiwork
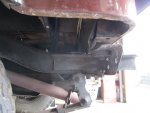
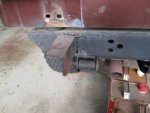
And here is how she looks today.
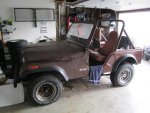
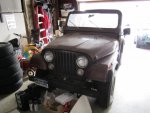
Shortly after we moved to California in 2010, the brakes started acting up again. Since I was in the middle of my masters and our first child was on the way, I didn't have time to fix the issue. So I parked her in the garage and started collecting parts for the eventual build. And with school finishing up in last December, I finally have time to work on the Jeep. I am really looking forward to getting her back on the road, so let’s get started.
Hello fellow Jeep enthusiasts. Since the work on the CJ has finally begun in earnest, I decided it was time to start the build thread. I have two primary goals with this thread:
1. To document for posterity, hopefully in a somewhat entertaining and informative manner, the work performed on this on this Jeep. I cannot promise this thread will be as educational or enthralling as some of the others on this forum, but I hope it will be a value added addition.
2. To draw upon the knowledge and expertise of the members of the awesome forum. I am no expert, and this build will be a (sometimes painful) learning experience. Therefore, I welcome the inputs, advice, recommendations and criticisms from all.
THE PLAN:
The dictionary defines rebaselineing as the process of providing a project with a new baseline. And that is essentially what I want to with this project. I have been inspired by the different editions… like the Willys, Moab and Trailhawk… that have rolled of Jeep’s assembly line in the last decade. My plan is to create a modernized and more capable CJ with a military theme that looks like it rolled of the assembly line that way. Of course, this plan is just that… a plan. It will evolve after initial contact with the enemy (rust, age, breakdowns, etc.). There will also be the expected excursions down the “while I am in here, I should also fix…” rabbit hole. And while the specific details of the build may change as my knowledge and experience base grows, the vision has been locked in my head since I purchased the Jeep and I doubt it will change
As it stands, the plan is for the build to unfold in four phases:
Phase 1: I am trying to have this done before our second child arrives in June.
• Brakes
• Steering
• Driveline fluids and seals
• Oil change, radiator flush and tune up (if one is needed)
• Check out the electrical wiring
• Clean up the tub and frame and stop/slow down rust.
Phase 2: Modernization
• Rear disc brakes
• Junkyard TBI
• YJ Family Roll bar
• iPod stereo
• YJ leaf spring conversion
• HID Halo headlights
Phase 3: Upgrades/Customization
• AMC20 Rear axle upgrades (one piece shafts, welded tubes, TBD traction device)
• 4.10 Gears
• Recovery points
• Improved cooling
• Ignition upgrade
• Power distribution center
• Taillight replacement
• Winch
• Auxiliary lighting
• Rocker Protection
Phase 4: Restoration/Rebuild
• Teardown
• Sgt Rock Metallic Paint
• Decals
• O.D. Interior
THE PATIENT:
Here is our patient… a 1981 CJ5 that I purchased off the “lemon lot” on Kirtland AFB in July of 2007. This is what she looked like when I brought her home.


I sold the hard top a few months later to seed my Jeep fund. She is a solid foundation for a project with a solid drive train and almost no rust. The only real issue is the PO’s pension for welding things to the frame. Here is an example of some of his handiwork


And here is how she looks today.


Shortly after we moved to California in 2010, the brakes started acting up again. Since I was in the middle of my masters and our first child was on the way, I didn't have time to fix the issue. So I parked her in the garage and started collecting parts for the eventual build. And with school finishing up in last December, I finally have time to work on the Jeep. I am really looking forward to getting her back on the road, so let’s get started.


 Please keep it coming.