• Hello Guest, we are proud to now have our Wiki online that is completely compiled and written by our members. Feel free to browse our Jeep-CJ Wiki or click on any orange keyword when looking at posts in the forum.
    To dismiss this notice
    click the top right X.

Build Thread 1981 CJ7 Base

Build Thread 1981 CJ7 Base

truk820

Jeeper
Posts
216
Media
2
Thanks
1
Location
Chicago
Vehicle(s)
1981 CJ7, Iron Duke 151, SR4 transmission
Well I (finally) pulled the trigger on an 81 CJ7 base. I'm a total newbie to this - as my few other posts/threads have indicated - but I'll start slow and ask questions as I go along.

The PO had the engine (Iron Duke) rebuilt, same with Transmission - T-176 I believe - so I guess some of the heavy lifting is already done. The engine was dropped in but it was never driven as there are random hoses disconnected, vacuum lines plugged with some bolts (PO told me this, I have no idea where to find them or how to fix them), and various 'electrical problems' I'll be left to iron out.

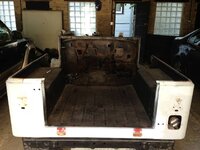
Rust-wise the body looks to be in decent shape but I did notice that it was hit in the rear driver side wheel well. The body is bent there as is the rear crossmember.

Since this is my first build and I'm on a budget I'm going to start small (I know, I know...not going to stay small on $ or build). My vision is to use this for some light off-road use and make it a dependable commuter to/from the lake.

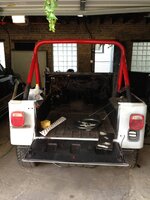
So that's where I am. First things first though - towed into the garage and took the top/doors off to get a feel for what I'm getting myself into. Next up will be removing everything to get the tub off. Will post pics and questions along the way!

In the garage...
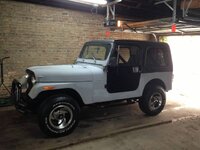
mVVfBxw.jpg

Top and doors off - looks like a native red
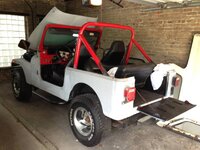
etEz8R1.jpg

Where it was hit - damage to body and cross member
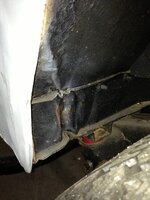
FOMxYiO.jpg
 
Looks like a good start! I started with the same year and setup(check out my build thread). I removed the iron duke but still have a bunch of parts from it for now and an S4 If your in need let me know. Looking forward to seeing the progress.
 
Since its an '81 I guess I have to watch as well. Ah , I was gonna watch either way. :D
 
Thanks everyone, looking forward to getting to work. I stumbled on the technical thread about what to do when you get your CJ home so I'm going to change fluids, brakes and steering (side note...not quite sure what I'm looking for steering-wise but that's for another thread).

Something I noticed quickly is that the charcoal canister isn't hooked up to anything. The PO also told me it has 'vacuum issues' that I'd like to iron out quickly if I can. I started a Misc thread on the topic 81CJ7 Charcoal Canister - ??. Probably something small that's going to take me too long to figure out but oh well.
 
I put fuel filters on the end of some of my vent lines
 
Thanks for the comments and tips so far...without this forum I'd be screwed.

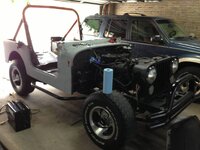
I'm going to put a lot of hours in this week (unless I hit a roadblock) so I'll be posting more frequently. For now I've taken the front clips, hood, dash, windshield, and seats out.

Here's how it looks:
L0Q8gaT.jpg

YuaATwI.jpg

GlfTemH.jpg

Next steps are figuring out how to take the steering column out, disconnecting and removing the pedal assembly, and then moving on to taking out the fan. Unless Chiltons tells me something groundbreaking I'll post to the forum shortly.
 
Long day and a half but the tub is about ready to come off. The damage on the driver side is going to be a bigger pain than I thought as I noticed there's a crease very close to rear roll bar mount on the driver side. I also have the usual under-roll-bar-mount rust that effectively left me missing 2 rectangles of steel.

I3aX6ZC.jpg

I have to remove some bolts on the fuel tank to reach the last 2 body mounts, then I'll slide it off to patch the body and dig in to see what I have.
 
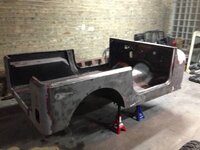
Tub's off! I took the paint / primer / whatever the PO sprayed along the passenger side to get down to bare metal. The plan is to patch the holes and remove the rust throughout. I'm also experimenting with the best way to remove the Rhino-liner.

8FMca7F.jpg
 
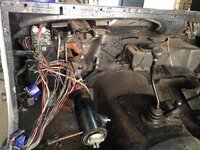
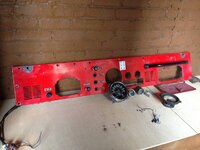
Meanwhile when I'm taking a break from the body I'm getting the dash ready for an overhaul

QTljieE.jpg
 
I wish youd move slower. Your making the rest of us ( actually me ) Look bad. :D Just joking , nice work. :chug:

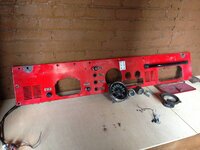
Meanwhile when I'm taking a break from the body I'm getting the dash ready for an overhaul

QTljieE.jpg
 
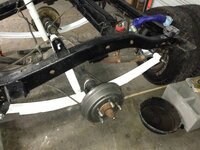
Over the last week or so I rehabbed some noisy leaf springs and replaced the rear brakes. After that it's been work on de-rusting the tub and welding in patches for the roll bar mounts and floor pans. I've also spent a lot (lot!) of time stripping the tub down to metal and removing a bunch of Bondo jobs.

The next big task will be replacing metal on the driver side to repair damage from an accident / tree. I'm buying my metal from C2C Fabrication (Auto Body Replacement Parts | Rust Repair Panels | Auto Body Panels) - so far so good and I've usually received orders within 2 days.

For now here's how the leaf springs / brake job turned out:

A8rn2Ms.jpg
 
I wish youd move slower. Your making the rest of us ( actually me ) Look bad. :D Just joking , nice work. :chug:

AMEN Pete Amen
 
It's been a while but since the last update I replaced the front brakes, finished the body work, and sprayed it.

First the body:

The metal on the body was a ton of work and at the end of the day a lot of fun. On the exterior I found a solid 3-4 holes the PO patched with fiberglass and filler. They looked terrible so I cut them out and replaced them with fresh metal. I also replaced most of the driver side metal; the rocker was mashed and the driver rear wheel well was mangled / rusted. Lining up the new metal and trimming the bad metal was a pain but I finally got to use my new welding skills (UGLY at first, eventually acceptable by the end!). I also replaced the floor pans and the roll bar mounts (that were so rusted they came up with the roll bar when I pulled it out).

After that it was grinding...and grinding...and grinding...and sanding...and grinding...with some filler at the very end. Suffice it to say this car is going to have some 'character' but I wouldn't have it any other way.

As far as the paint:

My plan is to line the interior with Monstaliner (arguably the best reviewed, happy to spend a few extra bucks on it) and paint the exterior to match. I’m going red with a matte finish. And here’s where things get interesting: I decided to use my 6 gallon pancake compressor and spray it in my garage. I knew I’d be very underpowered and likely wouldn’t get ideal atomization but if I could get it SOMEWHAT close, spend some hours sanding, then slap a matte finish on it and make it look half decent? Worst case scenario is it’s a learning experience. Did I mention my garage is hovering at 50 degrees? This is going to be interesting.

With that in mind I called the company that makes Monstaliner, Magnet Paints, and they recommended a color match and paint for me. I went with their 9000 Series Magnacryl (around $125 shipped with catalyst I believe) and their recommended primer. The HVLP gun I bought was recommended from a friend Tool Force A-C1 50 PSI 2-in-1 HVLP Spray Gun - Amazon.com and water separator was a few bucks at Menards.

So…I cranked up my compressor, masked off my garage (nothing special here – bought a huge roll of painters plastic for $30 and hung it via mini-S hooks that screwed into my garage joists. I used some leftover tarps I found in the basement as well)), screwed in the 2mm tip on the HVLP gun and got on with it. Temperature in the garage at painting was 52, which the Magnet Paints guy said was low but since it’s industrial paint would be fine. If I got in to the 40s he recommended I heat it up.

Here’s how it looked after priming:
sFF58mP.jpg

nZncbUs.jpg

You can see a bit of a shade on the passenger rocker – it was an area that was dented and bent in. Obviously I didn’t get it back to square but it’s close enough that you wouldn’t notice it unless you looked for it…unless you’re me, then it’s all I can see!

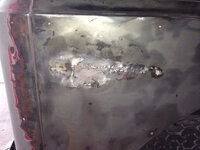
I welded a new section of metal above the rear wheel well that I think turned out well – I can’t see that one at all. Here's what it looked like before:

fIoUizF.jpg

I followed the primer up with a sanding job (600 grit I believe), a vacuum / wipe down, and change of plastic so I didn’t accumulate any dust. I repeated the process for the paint, which I reduced about 10% with thinner. I did 3-4 coats for the paint, waiting 15-20 minutes between coats for curing.

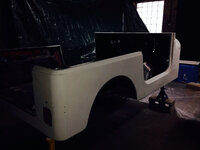
Here’s how it looks after it cured a bit:

6Eb6o6Z.png

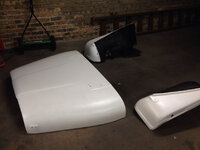
Once it cured (overnight) I took the fenders off and moved them to the basement where they’d dry in a warmer, drier environment. Same with the tail gate. The finish turned out a lot better than I anticipated. The paint really self leveled and considering all the factors there are only a few spots of minor orange peel, which I expected. I don’t anticipate a huge deal to sand them out.

To get around my mini-compressor problem I decided to paint piece by piece and in stages. I mixed smaller amounts of paint more often and waited in between coats – this meant I was only painting for a few minutes at a time and I actively monitored pressure at the gun. I started with the hood and gave it a light first coat, waited a few minutes, then again, waited, then again. When I got to the body I gave it very light coats so I could do a single coat over the entire thing before I lost pressure. Then I’d mix enough for another coat and spray that, which was usually enough time for the previous layer to cure.

All-in-all I knew the body work wasn’t perfect so I didn’t fret with giving it a not-perfect paint job. I saved a ton of time and money going this route and so far it looks better than I anticipated. I’ll post some new pictures after I get through with the wet sanding and have a better idea of how it really turned out.
 
6Eb6o6Z.png


looks good from here :chug: are you going to paint engine bay to match? I personally like them that way makes the engine paint stand out :chug: Good work definitely making us slackers look bad
 
Re: ventilation, it's a 3 car garage so I left the other door open a bit and put a pair of box fans in there. The problem was wind coming in and potentially rustling up dust so I ended up putting a plastic sheet on the ground and masked everything off
 

Jeep-CJ Donation Drive

Help support Jeep-CJ.com by making a contribution.

Help support Jeep-CJ.com by making a contribution.
Goal
$200.00
Earned
$25.00
This donation drive ends in
Back
Top Bottom