Another Dual Battery Install
TSB8C
Senior Jeeper
- Posts
- 867
- Media
- 20
- Resources
- 1
- Solutions
- 18
- Thanks
- 441
- Location
- Cut-n-Shoot, TX
- Vehicle(s)
- 1984 CJ7, 420 HP "ZZ6 EFI" Crate engine, 700R4, D300, Dana30 front, Dana489 rear, 4.56 gears, 4" lift
With a winch, front light bar or fog lights, rear spot lights, onboard air, fancy sound system, large inverter, electric fans, or towing a trailer that needs power from your CJ, you may find that you need more power that won't leave you unable to crank the engine later. A dual battery is simple and easy and provides for those needs, and fits easily into your CJ with off-the-shelf parts. My main uses are camp sites with the front and rear spot lights, the inverter, sound system, and occasional winch use. I may have the lights and inverter and sound system going for hours in the evening, and I still need to crank the engine the next morning. So two batteries, kept isolated from each other, is the perfect solution. Simply hooking two batteries together can give you more power, but if one drains down or fails, it will take the other with it also, leaving you needing a jump to get started back up later. With them isolated, you can drain one and the other is still fully charged and ready to go. Or if your main starting battery dies, you can jump start yourself without even lifting the hood. Here's what I did:
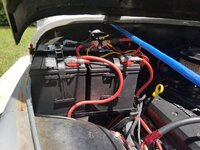
Purchased a dual battery mounting tray. I used the Rugged Ridge # 11214.50. This has all the needed hardware to bolt to your firewall in the stock location and also to the inner fender for additional support. Obviously you guys with a tilt front end would need to do something different. It also includes the hold down bracket with a place to mount the isolator solenoid as well.
Got a PAC # PAC-500 isolator solenoid. This is a 500 amp unit. It bolts perfectly to the mount on the Rugged Ridge bracket.
Install a toggle or push button switch in the cab (in or under the dash) to operate the isolator solenoid. You could opt for an automatic isolator that will switch itself on/off, but I preferred the manual approach.
Get two batteries of your choice. You will also need some battery cable wiring and some terminal ends to hook it all up.
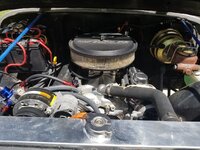
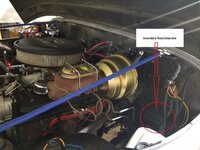
My two batteries are designated as "main" and "secondary". The main connects to all the stock stuff (junction block on the firewall, alternator output, ECM, etc). The secondary connects to the winch, inverter, front and rear spot lights, inside power outlets in the console, and my stereo system). I installed a secondary fuse/relay box on the firewall right below the main junction block on the driver side to handle connections and fuses for the secondary items. This is a 12-slot (6 fuses and 6 relays) unit from Online LED Store. The isolator then connects between the two batteries and is activated by the dash switch. Leaving the switch off means that the two batteries remain completely disconnected and isolated from each other. The main starts the engine and runs the stock items like headlights, ECM, wipers, heat/AC, etc. The secondary lets me winch, use the inverter, power the fridge on the trailer, run the stereo (without ignition on), and the spot lights. Even if I completely drained the secondary battery by leaving on the inverter or spot lights or other items, the primary remains untouched and lets me crank the engine back up safely. Then I can simply turn on the switch for the isolator and connect both batteries together for the alternator to recharge them both. Once fully charged, I simply turn the isolator switch back off. And conversely, if my primary battery were too low to start the engine, I can simply turn on the isolator, connecting the two batteries together, and jump start myself with no need to open the hood or connect any jumper cables.
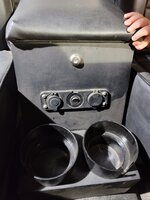
When I built my center console, I installed two 12V power plugs (one front and one back) and also a dual USB socket that has a built-in volt meter. So now my volt gauge in the dash reads the primary battery level and this volt gauge in the console reads the secondary battery level since the secondary battery power runs into the console to power these outlets and the inverter (mounted underneath). I used a Cllena Dual USB Socket Charger with Volt Meter from Amazon. It also included a toggle switch which I wired up to the volt meter so it wouldn't stay on all the time since this doesn't rely on the ignition to be on or not. So I can switch the toggle on anytime I want to use the USB plugs and/or read the voltage from the secondary battery.
Quick wiring notes:
1. Connect the negatives from both batteries to a good engine and frame ground.
2. Connect the positive from your "primary" battery to the stock location on the junction block on the firewall, your alternator output, and other add-ons you may have (ignition, etc) required to start and run the engine and main items (headlights, heat, wipers, etc).
3. Connect the positive from your "secondary" battery to a second fuse/relay box or panel or junction point to tie in your accessory items.
4. Now connect the two positive battery connections to the isolator. You will need to make up some short stubby battery cables (if your isolator is mounted right on top of the battery tray bracket like mine). These cables must be of the proper gauge wire to handle the current (500 amps) or at least use the same gauge wiring as your main battery cables are.
5. Now connect a small wire from the positive of one battery (I used the main) to the terminals on the isolator that activates it. I included a fuse here in case the isolator shorted out or something.
6. Now connect another small wire from the other activation terminal on the isolator to a switch in the cab you will use to turn the isolator on/off. Connect the other side of the switch to a ground source under the dash.


