Spring Shackle and Front Axle Move Sideways!

Spring Shackle and Front Axle Move Sideways!

dunebuggy18

Jeeper
Posts
248
Thanks
1
Location
San Leandro, CA
Vehicle(s)
1973 CJ5 "Project" Jeep - Frame Swap in Progress! 304 V8, Dana 30 front & Dana 44 rear (3.73 gears), T15 3 spd. & Dana 20 Transfer case, 4" lift and 33's. /

2008 JK - 3" lift, 35's, Sleeved Dana 30 front axle and Dana 44 rear with 4.88 Gears, HD tie rods & trackbar, and...
Ok, so I bought my CJ5 knowing that she needed some help, and I wasn't disappointed! After correcting some serious wiring issues, converting it back from a one-wire alternator to a 3 wire Delco, and replacing a few other electrical components , I fired it up last night and all the electrical basics work great now! Next, I knew that the ball joints needed replacing, and the drag link angle is all wrong, so I that was the project for the day. I thought to my self, I wonder what other surprises are in store? (thinking, axle u-joints, wheel bearings, etc.) - So before I started, I had the wife turn the wheels while I watched the front end components....

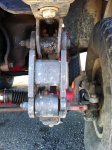
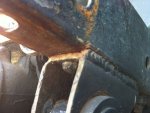
I did not expect to see the front springs (and as a result, the axle) move back and forth about 1-2 inches! :censored: The shackle mount is flexing, and looks like there is too much play for the spring??? Wrong shackle? Wrong springs?? Both????

I measured the lift: it's a 4" lift (without a drop pitman :eek:)

I know that I am going to have to fix the scary weld job on the front shackle mounts, and I am assuming that the front shackles are part of my problem, any other suggestions???
 

Attachments

  • Front Suspension 2.jpg
    Front Suspension 2.jpg
    50.8 KB · Views: 8,199
  • Front Spring Shackle.jpg
    Front Spring Shackle.jpg
    58.5 KB · Views: 3,196
It doesn't look like you have any shakle bushings.:confused:
 
Holy c$&p!!! Rookie move! I am learning about CJ suspension, but after my earlier post I was trying too figure out what bushings I would need when I came to the same conclusion... What bushings!!!!

I think I have my work cut out for me before this rig sees the trail!
R
Thanks guys!
 
It doesn't look like you have any shakle bushings.:confused:

Wow! If I was a betting man ... Oh :dung: lets get to the point , you need these. :)
 
The new bushings should have a metal sleeve that fit snug between the shackles when tightened.

The frame shackle mount looks pretty worn. . .
 
Looking closely there is some sign of red bushes prob nolaphane but they are definitely distorted and crushed

I would replace them but also look at replacing the spring hangers with an upgrade set as the huge cross bar in those shackles as only transferred the force from the shackle to the hanger and would brace the steering box

There is always some movement with a leaf spring setup but the aim to minimise as much as possible
 
The "Red" you are seeing is the axle behing the shackle - The PO painted the axle tube red. After crawling around under there somemore, I found the rear bushings are missing from the leaf connection at the rear, and the other rear bushings are pretty beat. Sounds like bushings all around! And yes, new mounts for front shackles. The drivers side is pretty wasted. Rear looks OK. I'll take a look at the steering box mount as well. No wonder this thing was all over the road!!

Any suggetions on bushing kits? I hear that the red polyurathane wear better, but are noisier?? :confused:

Was looking between the rhs of spring and the shackle on the bottom of the shackle in the 2nd pic it def appears to be a bush there different red and diameter to the axle tube but is in very poor condition

polyurathane/nolathane have a much higher compression property so are stiffer and transmit more ride harshness they do last longer as long as kept greased so greasable bolts are a must and allow for less movement but a rubber bush is better for ride and articulation but do not last as long and are more prone to damage from grease and oils

I run nolathane myself but its personal choice

These will all contribute to wandering but also dont forget castor and any play in the tie rod ends

Start with the basics, fix up the bushes inspect and replace as needed the tie rod ends brace the steering box if not already done (a known cj issue and well worth it upgrade), make sure all u-bolts are torqued to spec. Then get a full wheel alignment and concentrate on castor (shoot for -4 to 6 deg slightly more for big tyres and lift) and toe in shoot for between 1/16th and 1/8th, closer to 1/16th as possible. Then see how it steers, should be pretty good but if not then deeper investigation is needed
 
The "Red" you are seeing is the axle behing the shackle - The PO painted the axle tube red. After crawling around under there somemore, I found the rear bushings are missing from the leaf connection at the rear, and the other rear bushings are pretty beat. Sounds like bushings all around! And yes, new mounts for front shackles. The drivers side is pretty wasted. Rear looks OK. I'll take a look at the steering box mount as well. No wonder this thing was all over the road!!

Any suggetions on bushing kits? I hear that the red polyurathane wear better, but are noisier?? :confused:
You're lucky you stayed ON THE ROAD AT ALL.. !!
 
Was looking between the rhs of spring and the shackle on the bottom of the shackle in the 2nd pic it def appears to be a bush there different red and diameter to the axle tube but is in very poor condition

polyurathane/nolathane have a much higher compression property so are stiffer and transmit more ride harshness they do last longer as long as kept greased so greasable bolts are a must and allow for less movement but a rubber bush is better for ride and articulation but do not last as long and are more prone to damage from grease and oils

I run nolathane myself but its personal choice

These will all contribute to wandering but also dont forget castor and any play in the tie rod ends

Start with the basics, fix up the bushes inspect and replace as needed the tie rod ends brace the steering box if not already done (a known cj issue and well worth it upgrade), make sure all u-bolts are torqued to spec. Then get a full wheel alignment and concentrate on castor (shoot for -4 to 6 deg slightly more for big tyres and lift) and toe in shoot for between 1/16th and 1/8th, closer to 1/16th as possible. Then see how it steers, should be pretty good but if not then deeper investigation is needed


Great info, thanks! :notworthy: Yep, the steering box brace is a must after the abuse it's taken already, and there is a combination of rubber, red poly and no bushings across the front and year spring eyes and shackles. Scary! The upper ball joint on the drivers side needs replacing, so I have ball joints, wheel bearings and seals already. Tie rod ends appear tight, but if I'm goin in there, they are getting replaced as well. Ordering a Poly bushing set with greasable bolts tonight...
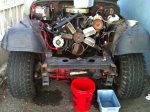
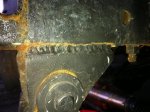
Got to wonder what other surprises are in store!


Broke, Happy and Wheelin' :chug:
 
Great info, thanks! :notworthy: Yep, the steering box brace is a must after the abuse it's taken already, and there is a combination of rubber, red poly and no bushings across the front and year spring eyes and shackles. Scary! The upper ball joint on the drivers side needs replacing, so I have ball joints, wheel bearings and seals already. Tie rod ends appear tight, but if I'm goin in there, they are getting replaced as well. Ordering a Poly bushing set with greasable bolts tonight...
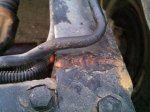
Got to wonder what other surprises are in store!


Broke, Happy and Wheelin' :chug:

Good luck make sure you let us know how you go, and dont feel alone poor steering is one of the biggest gripes of new CJ owners because lack of maint from previous owner
 
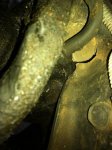
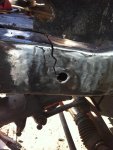
"Demolition" and inspection continues... Remember I said "I wonder what other surprises are in store???" See the attached pictures! The PO had welded the shackle mounts to the frame (good penetration on the mount, poor/no penetration on the frame) - And since they didn't fix the cause of the problem the frame has several stress cracks. On the drivers side one poor attempt at frame repair has failed. Looks like the current box of parts I have is going to wait a little longer!

I found frame reinforcement plates from M.O.R.E (FP300 1972-86 CJ's Frame Plates - Front Pair)

So it looks like some grinding and clean-up, some solid weld repairs, weld on some reinforcment plates, and some paint. THEN I can go back to installing the new shackles, bushings, steering box brace, ball joints, drag link, drop pitman arm and tie rods. The good news is I don't need a steering box! With the grille and radiator out, I found it was a cracked line that is causing my steering fluid leak. Oh yeah, the steering box mount? It was the only thing NOT cracked!

Question: Any words of wisdom on the shackle mounts? My general thought is the factory bolted them for a reason... Weld or bolt when I get the frame repairs done? I plan to put a backer plate in to reinforce where they mount.

Broke, Happy and Wheelin'! :chug:
 

Attachments

  • De-construction - Post.jpg
    De-construction - Post.jpg
    52.7 KB · Views: 883
  • Drvr side bad weld - post.jpg
    Drvr side bad weld - post.jpg
    50.6 KB · Views: 669
  • Drvr side frame repair failed - post.jpg
    Drvr side frame repair failed - post.jpg
    49.5 KB · Views: 1,947
  • poor weld - post.JPG
    poor weld - post.JPG
    96.4 KB · Views: 695
  • IMG_0900- post.jpg
    IMG_0900- post.jpg
    47 KB · Views: 426
they're bolted so you can adjust the at rest shackle angle.
 
Bolted in sheer with appropriate sized bolts is mechanically a better choice than welding as while a proper weld is stronger than a bolt the material around it will often fail from heat and forces case in point have a look at the cracks in your chassis

In Australia welds along the corner or top and bottom of the chassis are not permitted by the design rules due to this exact issue can only weld on the flat vertical section of the chassis

I would also get rid of those hangers something like these are a better choice

_1261202024.jpg


7686 FSH 2.5 YJ Front Shackle Hanger

they do both YJ 2.5" wide spring and CJ 2" wide front spring hanger depending on your spring choice
 
That is the shackle mount type I have ordered. Thanks for the advice, bolting the shackle mount made more sense to me than welding, just based on the outcome of the PO's work! :D

Hopefully I don't find any more major surprises! :chug:
 
Ok folks, time to resurrect this old project! After everything above, I ground off the PO's welds and yes, it got worse... More fatigue cracks, the patch plate that was holding the frame together had very little pentration and when I ground off the plate the frame bent into two pieces at the spring shackle. Scary S*&$ !! Soooo... I found another frame, bought a Skyjacker 4" lift suspension kit (I am not putting back suspension parts that have been that abused!) and the fun is about to begin. It's been a long time since I have done a body off restore, and it was a '49 Chevy. Fortunately the kids owe me a lot of under hood time from their Jeeps!
:chug:
(Hope the kids weren't planning on any inheritance other than the Jeep!)

More to follow...
 

Attachments

  • IMG_1163.jpg
    IMG_1163.jpg
    95.6 KB · Views: 1,450
mine were all welded when i got it and it sux cause they are off a tad a nd screw up my shackles/spring..and have no way to tweak them.
 

Jeep-CJ Donation Drive

Help support Jeep-CJ.com by making a contribution.

Help support Jeep-CJ.com by making a contribution.
Goal
$200.00
Earned
$25.00
This donation drive ends in
Back
Top Bottom