Troubleshooting & Correcting your Steering
TDHofstetter
Prefers carburetors & points
- Posts
- 1,003
- Thanks
- 4
- Location
- Bradford, Vermont
- Vehicle(s)
- '73 CJ5 232/T14/D20/D30/D44,
'74 CJ5 Renegade 304/T15/D20/D30/D44,
'85 CJ7 258/T5/D300/D30/AMC20,
(Not CJ: '68 M715 230/T98/NP200/D60/D70)
When you're not satisfied with the steering in your Jeep, these are the steps you need to take to find & correct the problem(s).
Step 1 - find and correct any worn or damaged parts.
Begin with the rear suspension. Rear suspension issues can cause nearly as many steering problems as front suspension issues, although they're not usually as dramatic as front suspension issues.
Closely examine all four rear spring bushings and both sets of rear spring shackles for wear or looseness. If you have two-leaf shackles instead of single-u-bolt shackles, be sure the shackles don't lean to either side. If they lean, they're too loose; when you're steering, they'll lean from side to side, allowing your Jeep to fishtail, sway, crabwalk, and oversteer. Correct any worn or loose bushings or shackles.
While you're under the rear, it's a good idea to inspect your rear shock mounts, too.
We can put the rear suspension fully out of our minds now and concentrate fully on the front, where we have much more to do.
Carefully inspect all four front spring bushings, both sets of spring shackles, and the front shock mounts. Correct any worn or loose parts.
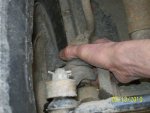
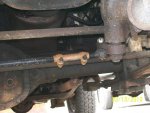
With all four wheels on the ground, wrap your hand around the connection between the drag link and the pitman arm on the steering gear. Have a helper turn the steering wheel vigorously from side to side while you feel for looseness in that joint. Your sense of touch is far more sensitive to movement than your eyes are, so it's important to use your hand. You're feeling for movement in the pitman arm that's not matched by an equal movement in the drag link. If you feel any discrepancy, replace the drag link end.

(Drag link to Pitman arm)
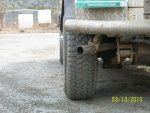
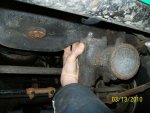
Check the other end of the drag link, where it connects to the steering arm on the knuckle, exactly the same way - by feeling the joint while a helper turns the steering wheel from side to side.

(Drag link and right tie rod end at steering arm)
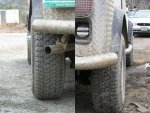
Repeat the test for both tie rod ends.

(Checking the right tie rod end)
With a jack under the right side of the axle, raise the right front wheel until it's clear of the ground. This permits the steering knuckle to hang loosely from the ball joints. Wrap your hand around each of the ball joints and feel for movement while a helper pries the wheel upwards with a length of 2x4 or any similar lever. You should feel the very slightest of play there, but only barely enough to feel. If you feel a noticeable amount of play, replace the loose ball joint(s).


(Checking ball joints)
While that wheel is in the air, place your hands at the top (12:00 position) and bottom (6:00 position) and tip the wheel in (towards the engine) and out (away from the engine) at the top and bottom, as if you were trying to pry the wheel off the hub. Here too you should feel a small amount of play - that's slack in the front wheel bearings - but if you feel any significant play, you may need to adjust or replace the wheel bearings.
Lower the right-front wheel, raise the left-front wheel, and repeat the ball-joint and wheel-bearing tests on that wheel.
Right now would be a good time to grease every greasable joint you've just tested with a high-quality grease - both ends of the drag link, both ends of the tie rod, and all four ball joints. Be sure to wipe each boot clean after greasing; abrasive dust can mix with the grease and badly wear the boots.
Last, check for looseness at the steering gear itself - with all four wheels on the ground, bridge the gap between your steering gear and the frame with your hand. While a helper turns the steering wheel vigorously from side to side, feel for flex in the steering gear. If you feel ANY flex, closely examine the steering gear mounts. Look for loose bolts, missing rivets, or cracking of the frame.

(Checking steering gear flex)
Step 2 - Adjustments
Note that NONE of the following adjustments can be properly made until ALL worn or loose suspension parts have been taken care of.
A complete wheel alignment includes three settings: Caster, camber, and toe-in.
Camber cannot be changed on a 4WD Jeep; it's built into the steering knuckles.
Caster is controlled by the "roll" of the front axle. If the driveshaft yoke doesn't point exactly toward the yoke in the rear axle, the caster won't be at the correct angle. A very common cause of incorrect yoke angle, and the consequent incorrect caster angle, is the use of lift shackles for the front springs without compensating with wedges on the spring perches.
Check your yoke angle with a small level, or with a cheap drafting protactor and a plumb bob. The best way I know to check the angle is to start with the Jeep parked on known-level ground. If you're not sure how level the ground is, lay two short lengths of 2x4 on the ground at the front and rear wheels. Lay a 10' length of 2x4 on the two short lengths, so it's suspended a little off the ground. Lay it vertically on edge instead of horizontally; it's much stiffer if it's on edge. Lay a framing level on the long 2x4.
If the ground isn't quite level, select the highest wheel and block the other three wheels up with small pieces of 1x4 or 2x4 until the wheels are all level with each other.
Now remove the front u-joint in the front axle. Wrap it with electrical tape to keep the bearing caps in place and set it off to the side. Turn the yoke in the differential until one u-joint journal is directly above the other; this provides you an excellent reference surface to measure against.
Lay a small (torpedo) level across the flat surfaces of the yoke. It should be completely plumb, with the bubble exactly in the center of its vial. If it's not, you'll need to either remove the long lift shackles (if you have them) or insert caster-correction wedges between the springs and the spring perches; you can buy them in several different angles of correction.

(Checking yoke angle)
Toe-In/Out, the third and last part of front wheel alignment (and the only part that some alignment shops will do), is controlled by the tie rod.
Raise both front wheels and support both ends of the axle on sturdy jack stands. They must not be on the ground while you're making any of the following adjustments.
Get two yardsticks (or two slender lengths of some material similar to yardsticks, each about three feet long) and some sort of clamp. Clamp them together to make one long stick roughly 48" long, with the two sticks overlapping in the middle. Touch one to the sidewall of the right-side tire, as high as you can get, ahead of the steering knuckle. Adjust the clamp(s) until the other stick can touch a similar part of the sidewall of the left-side tire, as high as possible, ahead of the steering knuckle. The two sticks should both barely touch the sidewalls, with very little pressure. Remove the stick and make a mark where they overlap.

(Toe-in stick)

(Toe in at front of tires)
Now do the same at the rear of both tires, again as high as possible, but behind the steering knuckles. Remove the stick and make another mark where they now overlap.

(Toe in at rear of tires)
The measurement at the rear (the distance between sidewalls behind the knuckle) should be just about 1/8" GREATER than the measurement at the front. If they're equal, you have "zero toe". If the front measurement is greater than the rear, you have a toe-out condition. If the rear measurement is more than 3/16" greater than the front, you have excessive toe-in. Zero toe, toe-out, or excessive toe-in can cause not only excessive tire wear, but also unpredictable steering.
Toe-in/out is corrected by loosening the clamps at both ends of the tie rod and rotating the body of the tie rod - one way to lengthen it (if toe-in is excessive) and the other way to shorten it (if you have zero toe or tow-out). Make any adjustments gradually; one full turn of the tie rod will give you about 1/4" of total toe-in/out adjustment. When you're finished adjusting and remeasuring, tighten the clamps at both ends of the tie rod again.

(Toe-out condition - WEARS TIRES FAST!)

(Toe-in, correct)
The drag link needs to be adjusted next - only after the toe-in has been checked & adjusted as necessary. You'll need the front wheels to still be raised for this adjustment.
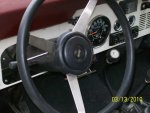
Turn the steering wheel as far to the left as it will go and note its position (1:00, 4:00, 9:00, etc). Now turn it as far to the right as it will go, counting complete turns and one partial turn at the end, and note its position again. Turn it back to the left exactly half as many full turns plus half of that last partial turn, stopping when it's pointing exactly halfway between the full-left position and the full-right position. Your steering gear is now exactly centered between the stops, and your front tires should be pointing straight ahead (disregarding toe-in). At this point, the steering wheel's position is totally meaningless - you'll adjust that next, after the drag link is adjusted.

(Example wheel ending left at 7:00)

(Example wheel ending right at 4:00)

(Example centered about 10:30)
From the front or rear of the Jeep, sight along the outside surfaces of the tires. If you're working from the rear as I like to, you'll be sighting along both sidewalls of the rear tires, looking at the rear of the front tires. You should not be able to see the front sidewall of either front tire (because of toe-in), only the rear sidewall. It's easy to see whether the wheels are pointing straight ahead or not - the two sides should look like exact mirror images of each other.
(Example drag link out of adjustment)
If your front wheels are not pointing straight ahead, adjust your drag link until they are. It's adjusted the same way as the tie rod is adjusted, although the adjusting sleeve is much shorter. Your adjusting sleeve may be at either end of the drag link - mine is next to the steering box. Loosen both clamps and rotate the adjusting sleeve one way to loosen it (steering both wheels further to the right) and the other way to tighten it (steering both wheels to the left). When the front wheels are pointing straight ahead with the steering gear centered, tighten both clamps again.

(Example correctly adjusted drag link, gear centered)
After the drag link is adjusted, you can adjust the steering wheel. It should still be in the "steering gear center" position. If the steering wheel isn't now pointing straight ahead, correct it by pulling it off the steering shaft with a steering wheel puller and reinstalling it in the new position, pointing straight ahead. DO NOT just "correct" the steering wheel's position by adjusting the drag link! If you do, the steering can't work correctly. By design, the steering gear is slightly tighter in the center position than it is to either side of center. If the drag link isn't adjusted correctly, your steering will tend to pull to one side or the other, and will be slightly harder to steer one way or the other. For your steering to be RIGHT, you MUST adjust both the drag link and the steering wheel's position until they're both in agreement with the steering gear.
Last, you'll adjust the steering gear itself. Two adjustments can be made to some Jeeps - worm bearing preload and the Pitman shaft (overcenter) preload - but some Jeeps don't have any worm bearing preload adjustment. Ideally, both these adjustments will be done with the Pitman arm removed.
At the end of the steering gear, exactly opposite the steering column, there may be a very large jamnut surrounding a very large screw or bolt head. If you have that nut and bolt head, you have adjustable worm bearing preload. If not, it's not adjustable... but it may not need adjustment anyway so don't loosen it unless it needs adjustment. If you do decide to adjust it, mark the exact orientation of the Pitman arm on its shaft and remove the Pitman arm.

(Adjustable worm bearing preload)

(Non-adjustable worm bearing preload)
Turn the steering wheel all the way either left or right as far as it will go without forcing it. Turn it back the other way 1/2 turn and stop. Remove the horn cover and fit a socket onto the steering wheel nut. Turn the wheel 1/4 turn either way with a small torque wrench. If the Pitman arm is removed, it should take 5 to 8 inch-pounds (NOT FOOT-POUNDS) of torque to turn the wheel that quarter-turn. If the Pitman arm isn't removed, it should take somewhat more - perhaps 16 to 20 inch-pounds - because you're also turning both front wheels. If in doubt, leave it as it is. If you decide to adjust it, and your Pitman arm has been removed, loosen the big locknut and turn the adjusting screw or bolt clockwise to tighten the preload or counterclockwise to loosen it. Tighten the locknut again, to 90 foot-pounds torque, and check the preload torque again.
Whether or not you've adjusted the worm bearing preload, you may now adjust the overcenter torque. If you adjusted the worm bearing torque, you MUST now adjust the overcenter torque. In the top of the steering gear, accessible through a hole in the front crossmember, is a jamnut surrounding a screw. That screw controls the preload pressure between the ball worm (on the steering column) and the ball nut internally attached to the sector gear (on the Pitman arm). Turning the screw inward (clockwise) tightens the lash and the steering. To check and adjust the overcenter torque, turn the steering wheel back to the steering gear center (so the wheels are pointing straight ahead, if the Pitman arm is still in place, or if it's not, find center by counting turns). Turn it 1/2-turn either direction of center. Use a small torque wrench on the steering wheel nut. Turning the steering wheel back past the center position should require between 9 and 18 inch-pounds of torque with the Pitman arm removed, and a bit more - perhaps 24 to 36 inch-pounds - with the Pitman arm in place. If an adjustment is needed, loosen the jamnut on the top of the steering gear and make the adjustment with the screw it holds in place. Turn the screw clockwise to tighten the overcenter torque, counterclockwise to loosen it. Tighten the jamnut to 25 foot-pounds of torque and doublecheck your overcenter torque.

(Overcenter adjustment screw and jamnut)
If you removed the Pitman arm, put it back now - in exactly the position you marked when you removed it - and tighten its nut to 185 foot-pounds of torque. Stake the shaft threads in one spot with a punch or chisel so the nut can't possibly work its way off accidentally. Put the horn button back on.
Step 3 - Tires
Finally, look to your tires. They should all be matched by brand, model, and size. At the very least, they should all be the same size and have exactly the same number of plies in the tread and sidewall, AND those plies should all be the same material (steel and polyester plies are NOT a good match) in all the tires. The tire pressure should be the same in all four wheels.
Other documents worth reading.
 jeep-cj.com
Step 1 - find and correct any worn or damaged parts.
Begin with the rear suspension. Rear suspension issues can cause nearly as many steering problems as front suspension issues, although they're not usually as dramatic as front suspension issues.
Closely examine all four rear spring bushings and both sets of rear spring shackles for wear or looseness. If you have two-leaf shackles instead of single-u-bolt shackles, be sure the shackles don't lean to either side. If they lean, they're too loose; when you're steering, they'll lean from side to side, allowing your Jeep to fishtail, sway, crabwalk, and oversteer. Correct any worn or loose bushings or shackles.
While you're under the rear, it's a good idea to inspect your rear shock mounts, too.
We can put the rear suspension fully out of our minds now and concentrate fully on the front, where we have much more to do.
Carefully inspect all four front spring bushings, both sets of spring shackles, and the front shock mounts. Correct any worn or loose parts.
With all four wheels on the ground, wrap your hand around the connection between the drag link and the pitman arm on the steering gear. Have a helper turn the steering wheel vigorously from side to side while you feel for looseness in that joint. Your sense of touch is far more sensitive to movement than your eyes are, so it's important to use your hand. You're feeling for movement in the pitman arm that's not matched by an equal movement in the drag link. If you feel any discrepancy, replace the drag link end.
(Drag link to Pitman arm)
Check the other end of the drag link, where it connects to the steering arm on the knuckle, exactly the same way - by feeling the joint while a helper turns the steering wheel from side to side.
(Drag link and right tie rod end at steering arm)
Repeat the test for both tie rod ends.
(Checking the right tie rod end)
With a jack under the right side of the axle, raise the right front wheel until it's clear of the ground. This permits the steering knuckle to hang loosely from the ball joints. Wrap your hand around each of the ball joints and feel for movement while a helper pries the wheel upwards with a length of 2x4 or any similar lever. You should feel the very slightest of play there, but only barely enough to feel. If you feel a noticeable amount of play, replace the loose ball joint(s).
(Checking ball joints)
While that wheel is in the air, place your hands at the top (12:00 position) and bottom (6:00 position) and tip the wheel in (towards the engine) and out (away from the engine) at the top and bottom, as if you were trying to pry the wheel off the hub. Here too you should feel a small amount of play - that's slack in the front wheel bearings - but if you feel any significant play, you may need to adjust or replace the wheel bearings.
Lower the right-front wheel, raise the left-front wheel, and repeat the ball-joint and wheel-bearing tests on that wheel.
Right now would be a good time to grease every greasable joint you've just tested with a high-quality grease - both ends of the drag link, both ends of the tie rod, and all four ball joints. Be sure to wipe each boot clean after greasing; abrasive dust can mix with the grease and badly wear the boots.
Last, check for looseness at the steering gear itself - with all four wheels on the ground, bridge the gap between your steering gear and the frame with your hand. While a helper turns the steering wheel vigorously from side to side, feel for flex in the steering gear. If you feel ANY flex, closely examine the steering gear mounts. Look for loose bolts, missing rivets, or cracking of the frame.
(Checking steering gear flex)
Step 2 - Adjustments
Note that NONE of the following adjustments can be properly made until ALL worn or loose suspension parts have been taken care of.
A complete wheel alignment includes three settings: Caster, camber, and toe-in.
Camber cannot be changed on a 4WD Jeep; it's built into the steering knuckles.
Caster is controlled by the "roll" of the front axle. If the driveshaft yoke doesn't point exactly toward the yoke in the rear axle, the caster won't be at the correct angle. A very common cause of incorrect yoke angle, and the consequent incorrect caster angle, is the use of lift shackles for the front springs without compensating with wedges on the spring perches.
Check your yoke angle with a small level, or with a cheap drafting protactor and a plumb bob. The best way I know to check the angle is to start with the Jeep parked on known-level ground. If you're not sure how level the ground is, lay two short lengths of 2x4 on the ground at the front and rear wheels. Lay a 10' length of 2x4 on the two short lengths, so it's suspended a little off the ground. Lay it vertically on edge instead of horizontally; it's much stiffer if it's on edge. Lay a framing level on the long 2x4.
If the ground isn't quite level, select the highest wheel and block the other three wheels up with small pieces of 1x4 or 2x4 until the wheels are all level with each other.
Now remove the front u-joint in the front axle. Wrap it with electrical tape to keep the bearing caps in place and set it off to the side. Turn the yoke in the differential until one u-joint journal is directly above the other; this provides you an excellent reference surface to measure against.
Lay a small (torpedo) level across the flat surfaces of the yoke. It should be completely plumb, with the bubble exactly in the center of its vial. If it's not, you'll need to either remove the long lift shackles (if you have them) or insert caster-correction wedges between the springs and the spring perches; you can buy them in several different angles of correction.
(Checking yoke angle)
Toe-In/Out, the third and last part of front wheel alignment (and the only part that some alignment shops will do), is controlled by the tie rod.
Raise both front wheels and support both ends of the axle on sturdy jack stands. They must not be on the ground while you're making any of the following adjustments.
Get two yardsticks (or two slender lengths of some material similar to yardsticks, each about three feet long) and some sort of clamp. Clamp them together to make one long stick roughly 48" long, with the two sticks overlapping in the middle. Touch one to the sidewall of the right-side tire, as high as you can get, ahead of the steering knuckle. Adjust the clamp(s) until the other stick can touch a similar part of the sidewall of the left-side tire, as high as possible, ahead of the steering knuckle. The two sticks should both barely touch the sidewalls, with very little pressure. Remove the stick and make a mark where they overlap.
(Toe-in stick)
(Toe in at front of tires)
Now do the same at the rear of both tires, again as high as possible, but behind the steering knuckles. Remove the stick and make another mark where they now overlap.
(Toe in at rear of tires)
The measurement at the rear (the distance between sidewalls behind the knuckle) should be just about 1/8" GREATER than the measurement at the front. If they're equal, you have "zero toe". If the front measurement is greater than the rear, you have a toe-out condition. If the rear measurement is more than 3/16" greater than the front, you have excessive toe-in. Zero toe, toe-out, or excessive toe-in can cause not only excessive tire wear, but also unpredictable steering.
Toe-in/out is corrected by loosening the clamps at both ends of the tie rod and rotating the body of the tie rod - one way to lengthen it (if toe-in is excessive) and the other way to shorten it (if you have zero toe or tow-out). Make any adjustments gradually; one full turn of the tie rod will give you about 1/4" of total toe-in/out adjustment. When you're finished adjusting and remeasuring, tighten the clamps at both ends of the tie rod again.
(Toe-out condition - WEARS TIRES FAST!)
(Toe-in, correct)
The drag link needs to be adjusted next - only after the toe-in has been checked & adjusted as necessary. You'll need the front wheels to still be raised for this adjustment.
Turn the steering wheel as far to the left as it will go and note its position (1:00, 4:00, 9:00, etc). Now turn it as far to the right as it will go, counting complete turns and one partial turn at the end, and note its position again. Turn it back to the left exactly half as many full turns plus half of that last partial turn, stopping when it's pointing exactly halfway between the full-left position and the full-right position. Your steering gear is now exactly centered between the stops, and your front tires should be pointing straight ahead (disregarding toe-in). At this point, the steering wheel's position is totally meaningless - you'll adjust that next, after the drag link is adjusted.
(Example wheel ending left at 7:00)
(Example wheel ending right at 4:00)
(Example centered about 10:30)
From the front or rear of the Jeep, sight along the outside surfaces of the tires. If you're working from the rear as I like to, you'll be sighting along both sidewalls of the rear tires, looking at the rear of the front tires. You should not be able to see the front sidewall of either front tire (because of toe-in), only the rear sidewall. It's easy to see whether the wheels are pointing straight ahead or not - the two sides should look like exact mirror images of each other.
(Example drag link out of adjustment)
If your front wheels are not pointing straight ahead, adjust your drag link until they are. It's adjusted the same way as the tie rod is adjusted, although the adjusting sleeve is much shorter. Your adjusting sleeve may be at either end of the drag link - mine is next to the steering box. Loosen both clamps and rotate the adjusting sleeve one way to loosen it (steering both wheels further to the right) and the other way to tighten it (steering both wheels to the left). When the front wheels are pointing straight ahead with the steering gear centered, tighten both clamps again.
(Example correctly adjusted drag link, gear centered)
After the drag link is adjusted, you can adjust the steering wheel. It should still be in the "steering gear center" position. If the steering wheel isn't now pointing straight ahead, correct it by pulling it off the steering shaft with a steering wheel puller and reinstalling it in the new position, pointing straight ahead. DO NOT just "correct" the steering wheel's position by adjusting the drag link! If you do, the steering can't work correctly. By design, the steering gear is slightly tighter in the center position than it is to either side of center. If the drag link isn't adjusted correctly, your steering will tend to pull to one side or the other, and will be slightly harder to steer one way or the other. For your steering to be RIGHT, you MUST adjust both the drag link and the steering wheel's position until they're both in agreement with the steering gear.
Last, you'll adjust the steering gear itself. Two adjustments can be made to some Jeeps - worm bearing preload and the Pitman shaft (overcenter) preload - but some Jeeps don't have any worm bearing preload adjustment. Ideally, both these adjustments will be done with the Pitman arm removed.
At the end of the steering gear, exactly opposite the steering column, there may be a very large jamnut surrounding a very large screw or bolt head. If you have that nut and bolt head, you have adjustable worm bearing preload. If not, it's not adjustable... but it may not need adjustment anyway so don't loosen it unless it needs adjustment. If you do decide to adjust it, mark the exact orientation of the Pitman arm on its shaft and remove the Pitman arm.
(Adjustable worm bearing preload)
(Non-adjustable worm bearing preload)
Turn the steering wheel all the way either left or right as far as it will go without forcing it. Turn it back the other way 1/2 turn and stop. Remove the horn cover and fit a socket onto the steering wheel nut. Turn the wheel 1/4 turn either way with a small torque wrench. If the Pitman arm is removed, it should take 5 to 8 inch-pounds (NOT FOOT-POUNDS) of torque to turn the wheel that quarter-turn. If the Pitman arm isn't removed, it should take somewhat more - perhaps 16 to 20 inch-pounds - because you're also turning both front wheels. If in doubt, leave it as it is. If you decide to adjust it, and your Pitman arm has been removed, loosen the big locknut and turn the adjusting screw or bolt clockwise to tighten the preload or counterclockwise to loosen it. Tighten the locknut again, to 90 foot-pounds torque, and check the preload torque again.
Whether or not you've adjusted the worm bearing preload, you may now adjust the overcenter torque. If you adjusted the worm bearing torque, you MUST now adjust the overcenter torque. In the top of the steering gear, accessible through a hole in the front crossmember, is a jamnut surrounding a screw. That screw controls the preload pressure between the ball worm (on the steering column) and the ball nut internally attached to the sector gear (on the Pitman arm). Turning the screw inward (clockwise) tightens the lash and the steering. To check and adjust the overcenter torque, turn the steering wheel back to the steering gear center (so the wheels are pointing straight ahead, if the Pitman arm is still in place, or if it's not, find center by counting turns). Turn it 1/2-turn either direction of center. Use a small torque wrench on the steering wheel nut. Turning the steering wheel back past the center position should require between 9 and 18 inch-pounds of torque with the Pitman arm removed, and a bit more - perhaps 24 to 36 inch-pounds - with the Pitman arm in place. If an adjustment is needed, loosen the jamnut on the top of the steering gear and make the adjustment with the screw it holds in place. Turn the screw clockwise to tighten the overcenter torque, counterclockwise to loosen it. Tighten the jamnut to 25 foot-pounds of torque and doublecheck your overcenter torque.
(Overcenter adjustment screw and jamnut)
If you removed the Pitman arm, put it back now - in exactly the position you marked when you removed it - and tighten its nut to 185 foot-pounds of torque. Stake the shaft threads in one spot with a punch or chisel so the nut can't possibly work its way off accidentally. Put the horn button back on.
Step 3 - Tires
Finally, look to your tires. They should all be matched by brand, model, and size. At the very least, they should all be the same size and have exactly the same number of plies in the tread and sidewall, AND those plies should all be the same material (steel and polyester plies are NOT a good match) in all the tires. The tire pressure should be the same in all four wheels.
Other documents worth reading.
Curse of the Death Wobble Returns to Strike Again
Curse of the Death Wobble Returns to Strike Again


")