Welding Projects

Welding Projects

BusaDave9

Always Off-Roading Jeeper
Posts
8,244
Thanks
81
Location
Durango, Crawlarado
Vehicle(s)
1979 Jeep CJ5 with 304 V8, T18 Transmission, Dana 20 Transfer case with TeraLow 3:1 gears, 4.88 axle gears, Detroit Locker up front and Ox Locker in back with 1 piece axle shafts, 36" SuperSwamper SX Tires, Shackle reversal, MileMarker Hydraulic winch, MSD 6A ignition.
I enjoy welding and would like some ideas for welding projects.
Show us your welding projects, whether it's a small trinket you made with a couple of spare scraps or a major project such as a frame built from steel tubing.
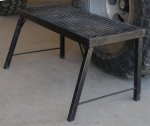
I have made this welding table.
13322d1362366666-build-welding-table-welding-table-done-medium-.jpg

I posted how I made it here: http://www.jeep-cj.com/forums/f73/build-welding-table-17788/

I know of several other members that weld. Show us what you have built. I'm looking for ideas.:D

:chug:
 
Step Stool
My CJ is lifted and hard to work on things under the hood. So I needed an easy way to raise myself. At first I was thinking of something that fit over the tire like this:
720620-20121005003507-larin-truck-tire-step.jpg

Then as I was thinking about it I decided it would be more versatile if it didn't need to hang it off the tire. I ended up making this:
attachment.php

As you can see I made one pair of legs vertical so I could put it right up against the tire. I made the other pair of legs angled so the thing wouldn't tip over when I leaned over my fender. I used expanded steel for the top so I could get traction.
 

Attachments

  • 08 Step (Medium).JPG
    08 Step (Medium).JPG
    59.4 KB · Views: 36,315
Last edited:
Grinder Stand
Another small project I made was to build a stand for my grinder. Here's how it ended up:
attachment.php

I put braces between the legs. The brace in the front is round and bigger than the one in the rear because I put my foot up there. The one in the rear doesn't need to be very big.
Every time I make anything with 4 or more legs I make at least one of the legs adjustable. I use a nut welded to the legs and a bolt screws into it like this.
13323d1362366666-build-welding-table-welding-table-foot-medium-.jpg

If the only issue is I don't want it to wobble I only make one foot adjustable. That's what I did for this grinder stand. When I made the welding table I made every foot adjustable. That way I could not only prevent it from wobbling but also make the whole thing level. When I made the grinder stand I didn't need it to be 100% level. My floor is level enough. I only wanted to prevent it from wobbling.

I made this grinder stand at the same time I made the foot stool in the last post. Notice how the top of the grinder stand is made from the angle iron.
attachment.php

You can see it is made the opposite of the step stool.
If I made the top of the step stool on it's own I would have had to cut out a 3 inch notch for every corner (it's 1.5 inch angle iron). Those notches would have been thrown out. Instead I made a bar for the top of the foot stool with an outer rim. Then the next cut was for top rim of the grinder stand. If I didn't alternate each piece I would have wasted two feet of angle iron (3 inches times a total of 8 corners).
Am I making sense? What I am saying is I didn't throw out any scrap when making the corners since I made both projects at the same time and I made inside corners on one project and outside corners on the other. Steel is expensive now-a-days. Every bit helps.
 

Attachments

  • 03 Grinder Stand (Medium).JPG
    03 Grinder Stand (Medium).JPG
    33.3 KB · Views: 21,876
  • 07 Grinder top (Medium).JPG
    07 Grinder top (Medium).JPG
    90.9 KB · Views: 11,163
Last edited:
Good thinking maximizing cuts and materials. I'll get some pics of a few of my projects.
 
Anyone have any welding projects they would like to share?
I look on Miller's web site for ideas. Someone posted this "Tool Table".
6192004323_4275cd62d8_o.jpg

I think that would be so cool to make for my patio. But the guy that posted it gave zero instructions but you can kind of tell how to make it. It should have a glass top.

Maybe I should start collecting antique tools :rolleyes:
 
Functional art, pretty cool. Looks like the frame is raised to form a lip, I'm thinking for a glass top. If you made the frame, then cut a piece of 1/4" plywood to fit inside, lay all your pieces out face side down and tack together. Flip it over and replace the plywood with glass.
 
getting this many small parts to lay flat when it is welded is going to be challenging.:D

I would think this was done with an acetylene torch. Just a guess.


Anyone have any welding projects they would like to share?
I look on Miller's web site for ideas. Someone posted this "Tool Table".
6192004323_4275cd62d8_o.jpg

I think that would be so cool to make for my patio. But the guy that posted it gave zero instructions but you can kind of tell how to make it. It should have a glass top.

Maybe I should start collecting antique tools :rolleyes:


A welding project?? gee Dave I don't know, is there something that you really need ?:D
 
getting this many small parts to lay flat when it is welded is going to be challenging.:D

I would think this was done with an acetylene torch. Just a guess.

I think I could lay the tools on cement or patio bricks. Then weld them together. Sure the top would not be flat but I would turn them over and that surface should be flat. I think I might give it a try.
 
001.jpg

Nice bumper IO. I could try to make or improve my bumper.
 
I made a tool table today. I actually started it a month ago but realized I needed more tools. It's not a work table. It's a table I made by welding a bunch of tools together. It is meant to be an outdoor table for the patio or deck.
I bought a 2 foot by 2 foot piece of glass for the top but here's a picture without the glass.

39864335651_ea7cedbc85_z.jpg

I collected up a bunch of old tools and hardware for this table. Some of the tools are old antiques almost 1oo years old.

I came up with this idea by looking at Miller's Welding web site. Someone made a tool table like this but didn't say how he did it. So here's how I made mine. I first made a square frame with one inch flat steel. I put this frame around 4 one foot square patio bricks. These patio bricks are slightly less than one foot so I put framing shims between each brick. This allowed the frame to sit down low enough that it would act as a ridge to hold the glass when I was done.

25990888628_de4d1b6033_z.jpg

I then laid out the tools and hardware on the patio bricks. This way I was building the table upside down. This way I could make a flat surface for the glass to fit on. It also hid the welds that would be hidden underneath.

I then welded on 4 legs and braced them.
 
Last edited:
I also welded on this nut/bolt to adjust one leg.

39831964482_ffa26fd554_z.jpg

I hate a table that wobbles. That's more common on outdoor tables that may sit on patio bricks or a deck. .
 
Last edited:
Here's some of the tools I collected for this table.
These first two tools are for a Ford Model T.

25990779948_b7f7a15447_z.jpg

The above tool is for working on the reverse gear and and brake band of a Ford Model T.

And this tool is for the head bolts and spark plugs on a Ford Model T. This tool was made by Ford. It's embossed "Ford".

24993145207_78e1815407_z.jpg

If you are interested here's some links on these Ford Model T tools.
The Story of Vlchek
Model T Ford Forum: #2335: not quite the same
Then I also used some miscellaneous old wrenches.

39864336801_45bd46454b_z.jpg

Here's an old Jaxon Lug Wrench 100 years old.

39154327904_a1a9dd7cdc_z.jpg

This next one is interesting. The bottom tool in the next picture is a Alligator wrench. The brand name is a Crocadile wrench. These things were good "one side fits all" wrenches when most nuts were square.

24993143177_2d4f70f620_z.jpg

Here's what I am talking about
Alligator_wrench_002.png
Then I also used some old barrel keys.

24993141877_f861caa2f5_z.jpg

I got these tools from garage sales or they were just laying around.

It's also got a connecting rod, a chain, gears, a railroad spike and lots of things I can't even identify.
 
Last edited:
One more pic for CJ.

25990780608_f6890e77c3_z.jpg

See, it works. It holds up my beer.
BTW that's a bottle opener I made from a railroad spike on the table.
 
Last edited:
I would hate to run into that in the dark!!:D

Good job pal.:cool:
 
That is pretty cool. My only problem would be Id need one of those tools 10 minutes after I was done. When you run into that cheap Model T project your gonna be kicking yourself. :laugh:
 
the table is AWESOME Busa
2 thumbs up
 
I was cleaning out my garage of old parts to haul to the scrap yard. I tried selling some of my old 2a parts but didn't have any takers even offered them up for free. After loading up the truck I stood there looking at the parts for awhile thinking how sad it was scrapping old Jeep parts so I decided to go a different route......


DSCN3239.png

DSCN3242.png

:)Posi,

Nice work!..........what do you feed them?

:D:D:D:D
 

Jeep-CJ Donation Drive

Help support Jeep-CJ.com by making a donation.

Help support Jeep-CJ.com by making a donation.
Goal
$200.00
Earned
$0.00
This donation drive ends in
Back
Top Bottom
AdBlock Detected

I get it, I'm a Jeep owner and ad-block detectors kinda stink but ads are needed on this site. This is a CJ site, all the ads are set for autos (some times others get through.) I cannot make them just for Jeeps but I try.

Please allow ads as they help keep this site running by offsetting the costs of software and server fees.
Clicking on No Thanks will temporarily disable this message.
I've Disabled AdBlock    No Thanks