Blazer Motor Upgrade

Blazer Motor Upgrade

Stodg73

Active Jeeper
Posts
385
Thanks
0
Location
Southern Colorado
Vehicle(s)
'79 CJ5, 258 ci, 4.2L, T-150, DANA 20, DANA 30, AMC 20, 3" body lift, 33's
If you have not done the blower motor upgrade, DO IT!

I found that out after I did it, the old motor was putting out the same amount of heat as the new one puts out on low.

Here are several part numbers for the motor:
NAPA 655-1039
Advanced Auto/Orielly's 35587
Siemens PM 102
Autozone PM 102


Just thought I would share these & this.:chug:

5414722066_d87f8fd116_b.jpg
 
just did my heater core too:( what else/mod did you have to do to fit it.
 
just did my heater core too:( what else/mod did you have to do to fit it.

its easy if you get the unit out ok , it bolts right on and plugs in,,you just have to make the hole bigger on the firewall so it goes thru properly , I did mine with an air gremil tool and did test fit several times so not to make the hole to big , and it does work much much better
 
I tack weld a piece of sheet metal over my old hole then marked center then used a hole saw .
 
:agree:If you live in cold country this is a must. :D
 
I did this same upgrade but thanks to a previous owner mine may have been a mis step. The stock blower motors are right small comparitively to the upgrade;

7986727479_a213b467b6_z.jpg

In my case since 'Black Betty' is 30 + years old as is yours, some previous owner had done this prior, although I was either dealing with a worn out moter or the wrong one as they appeared the same but output was vastly different;

5414113971_b9d007bcb3_z.jpg

The correct part number is PM102 (Siemens) for a '73 Chevy Blazer 4x4 with a 350 SBC without air conditioning. I struggled to find one not made in China, but ultimately I found one made in Canada that I had to order from NAPA.

If you have the original smaller motor you'll have to remove the heater box which entailed for me removal of the batteries, & battery tray to gain easier access to the motor and one of the nuts hidden under the battery tray that holds the heater box on. One of the other folks whom have done this reccomended to build a spinning jig to hog out the hole for the larger motor,

5416172056_62819753a1_z.jpg

...but I have a Dremel tool with a carbide cutting bit so the little clearance I needed was easily trimmed away.
Since I had to pull the heater box out, this was a perfect time to clean it up and repair the old dried out flapper door seals and I did a replacement brass and copper heater core, as it was such a hassle to pull the heater box. When pulling that heater box don't forget to first disconnect all of the cables and wiring, one cable you may miss will be hiding between the passenger side kick panel and the heater box itself. Take your time with this and if the heater box gets stuck, just walk away and sip a beer. If you try to force that box out the old brittle plasitc it's made of will crack and break. Certainly something you don't want to happen as a completely sealed heater box is your goal with these.
Also one of the available motors PM105 (Siemens) with a/c seem to have a longer shaft than you'll have to grind down, to the comparative length of the original shaft, so avoid it if you can, it'll save weat and tear on your file
wink.gif

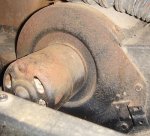
Here's what the box on mine looked like after I pulled it from 'BB'
5413564128_86c8a19bfe_z.jpg
after pulling the motor out.

5412952447_02ef76f3ff_z.jpg

5412947875_5a90c2a5c7_z.jpg

....and as you can see, the seals were pretty dried out and funky. I redid them with weatherstripping I got from the hardware store.
'Black Betty' isn't my primary vehicle so I took my time with this upgrade taking four days to do it, once I got the right fan motor from NAPA (took two tries). I think one could easily do this over a weekend if there's no distractions. The primary difference since I did this upgradeis that the defrosters finally work!
I may be missing a couple of things here as I did this upgrade a few years ago, but it is a common upgrade and I'm sure others in this forum will chime in as this is the very best forum for Jeeps on the web in my opinion. Above all, take your time and be patient especially when pulling that heater box.
 
I did all the same on wifes 78 CJ7 . was'nt that fun. it was worth it
 
Does this mod retain the original squirrel cage? The blowers I see at AutoZone and Advanced don't include fans although they're available separately.
 
If your squirrel cage is kaput, you're likely going to have to visit the boneyard, sorry to say.
 
Wait a sec--what years does this fit? My blower looks different than yours.
 

Attachments

  • DSC03531.JPG
    DSC03531.JPG
    72.9 KB · Views: 272
Yours does not look like mine. Mine looks like the one in the pics above. And I have an 84. Don't know what other years though. i thought it would fit all Scramblers at least so 81-85. What year is your CJ? Nevermind. I just saw yours is from the 70s. Don't know if it will fit that decade or not. Good luck.
 
I tack weld a piece of sheet metal over my old hole then marked center then used a hole saw .
I wonder if paparooster has the solution. What do you guys think?
 
I wonder if paparooster has the solution. What do you guys think?

I just used a titanium grinder attachment on my Dremel and hogged out the hole, then finished/deburred with a half round metal file.
 
I'm in the middle of my upgrade today, have the new motor in the box and ready to mount the box but i notice that the hole for the electrical connection in the firewall will have to be cut through, leaving the wiring connector in a new location. ??? Need a new hole for the connection?
I don't see anyone addressing this issue. Obviously i'll cut a new hole as i need to but thought it interesting that no one in the many posts I've researched mentions this issue. Am I missing something?
 
On my '78 'Black Betty' the hole was existing in the stock firewall, and located on the fan flange in the same location,

5414722066_d87f8fd116_b.jpg
 
I just today completed this upgrade. A couple of things...
The motor from Auto Zone was $37.00 and made in China, brand name is ADVO. You might find a Siemans' somewhere but that is all AZ offered.
Heater core is now aluminum instead of copper. Copper not offered here.
I had to also slightly enlarge the hole for the electrical connector to avoid shorting against the firewall.
In draining the rad I removed the plastic plug and went to 3 parts stores and a radiator shop to find a brass petcock or bleeder valve to replace the plastic plug but no luck, so I re-installed the plastic plug.
The air this thing blows in very nice, much better than the stock.
Thanks to this and all other forums for offering your experience on this. It was very helpful.:)
 

Jeep-CJ Donation Drive

Help support Jeep-CJ.com by making a donation.

Help support Jeep-CJ.com by making a donation.
Goal
$200.00
Earned
$0.00
This donation drive ends in
Back
Top Bottom