Heater Relay Upgrade Wiring install for cj7

Heater Relay Upgrade Wiring install for cj7

76cj7chick

Old Time Jeeper
Posts
1,235
Solutions
1
Thanks
8
Location
WA
Vehicle(s)
1976 CJ7 Jeep with a engine/tranny/wiring harness out of a 1988 s10 blazer 4.3l v6 with th700r4 automatic tranny and a cj7 Dana 300 transfer case with Novak adapter.
Complete wiring harness from the s10 blazer. Painted with HOT PINK Pearl paint with standard sized metallic halographic pink flakes. Painted by me -a newb. New rear, front and side three wire LED lights, New parts, new custom dash-by me And a lot of guidance from fellow jeepers and lots of prayers etc.... :p
Hi all,
I've upgraded my CJ7 jeep heater blower motor (pm105) and resistor (ru915) ... But I hope to install the relay (part # 3989214)

Does anyone have a diagram on how the wires from the resistor will attach the relay? I found a diagram for the wires going to the resistor but not to the relay..
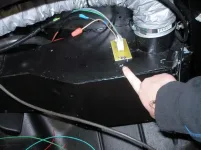
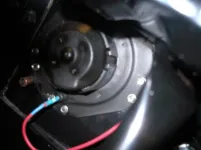
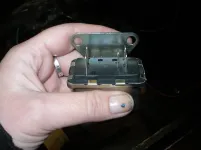
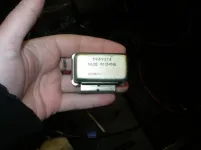
I've posted some pics of the resistor and relay..

:confused:
 

Attachments

  • P1010006.jpg
    P1010006.jpg
    86.7 KB · Views: 11,293
  • P1010002.JPG
    P1010002.JPG
    88.8 KB · Views: 5,864
  • P1010011.jpg
    P1010011.jpg
    53.3 KB · Views: 3,589
  • P1010009.jpg
    P1010009.jpg
    42.5 KB · Views: 3,443
You kind of lost me on this one, you upgraded to a relay? is this something to do with a different from original motor??
The relay is a switch with, very possibly, one set of normally closed and one set of normally open contacts. Is the object of your upgrade to eliminate the high current through the accessory switch and take motor power directly from the battery using the accessory circuit to power the relay coil?:confused:
 
I've heard of the "Blazer blower motor swap", in later model CJ's, (3-wire) but not the resistor/relay upgrade.

Your CJ has a two wires plug, and all power comes from the two wires, fed from the switch. High/low, that's it.

I think you need a three wire, resistance capable switch, and running some extra wires, to boot. never touched a Pre 78 CJ so... here's some of what you need.


The relay lugs are 1 hot /2 Motor 3Motor/ 4coil 5coil. Is it a 5 lug shaped in an "H" 2.1.2 or an "h" 3.2? Either way the lugs should be labeled with those numbers. The case should be grounded, too.

Energizing through lugs 4+5 (polarity doesn't matter) will allow you to switch between 2 and 3 as sources of current (low/high). (no current through coil is position 2 hot. With current is position 3 hot instead) Lug 1 should be powered separately.


Hopefully the motor has terminals laid out for you already. if not, post pics. Hope that helped.
 
Last edited:
I've heard of the "Blazer blower motor swap", in later model CJ's, (3-wire) but not the resistor/relay upgrade.

Your CJ has a two wires plug, and all power comes from the two wires, fed from the switch. High/low, that's it.

I think you need a three wire, resistance capable switch, and running some extra wires, to boot. never touched a Pre 78 CJ so... here's some of what you need.


The relay lugs are 1 hot /2 Motor 3Motor/ 4coil 5coil. Is it a 5 lug shaped in an "H" 2.1.2 or an "h" 3.2? Either way the lugs should be labeled with those numbers. The case should be grounded, too.

Energizing through lugs 4+5 (polarity doesn't matter) will allow you to switch between 2 and 3 as sources of current (low/high). (no current through coil is position 2 hot. With current is position 3 hot instead) Lug 1 should be powered separately.


Hopefully the motor has terminals laid out for you already. if not, post pics. Hope that helped.

Hi bondo258,

(Wish you had pics of the wiring. But, I will get it soon...:D
Also, I already upgraded the 2 speed switch (that was stock in my cj) to the 3 speed switch.
My question is: Do I wire the 3 speed switch to the relay, and then the relay to the resistor, and finally the single wire to the blower motor.. Is that crazy,--but workable, unheard of and unnecessary or good?
Can it be done? Will the relay and resistor protect the blower motor and my wiring from any bursts of power?? -I'm very NEW to wires and can use all the help anyone is willing to give me. :cool:

PS. Since I only have 3 speeds on my switch that leaves one on the relay and resistor out. (nu). I was thinking of Not hooking up #1 (low)..... Is this going to work? :p

When it comes to wiring:
(Let me quote Barbie "Don't ask me, I'm just a girl");)
 
You kind of lost me on this one, you upgraded to a relay? is this something to do with a different from original motor??
The relay is a switch with, very possibly, one set of normally closed and one set of normally open contacts. Is the object of your upgrade to eliminate the high current through the accessory switch and take motor power directly from the battery using the accessory circuit to power the relay coil?:confused:
Hi I0Port51,

Humm. Perhaps I need to clarify my "upgrade"

I've installed a 3speed heater switch, have the wires go to a relay, then to a resistor, and one wire leading to the blower motor...
I would love to hear from people who have wiring experience and to let me know if this is standard, can be done, not necessary, or shouldn't be done....
Will the relay and resistor Protect my harness, blower motor and/or switch or just add more pain? (in the wallet and my head?) :laugh: (me losing it)

So, does the switch already act like a relay? (i am assuming, yes..?) But can I put the other relay in too? It is going to be in the engine bay, so if it dies, I can easily get to it, unlike the one in the dash.. What ya think?:poke:
 
I've heard of the "Blazer blower motor swap", in later model CJ's, (3-wire) but not the resistor/relay upgrade.

Your CJ has a two wires plug, and all power comes from the two wires, fed from the switch. High/low, that's it.

I think you need a three wire, resistance capable switch, and running some extra wires, to boot. never touched a Pre 78 CJ so... here's some of what you need.


The relay lugs are 1 hot /2 Motor 3Motor/ 4coil 5coil. Is it a 5 lug shaped in an "H" 2.1.2 or an "h" 3.2? Either way the lugs should be labeled with those numbers. The case should be grounded, too.

Energizing through lugs 4+5 (polarity doesn't matter) will allow you to switch between 2 and 3 as sources of current (low/high). (no current through coil is position 2 hot. With current is position 3 hot instead) Lug 1 should be powered separately.


Hopefully the motor has terminals laid out for you already. if not, post pics. Hope that helped.

Do you have pictures? Or can you write on the pic with the lugs which terminals they go to.. (I'm a visual learner) :D

You sound like you know what you're talking about... So, Just wondering what you think...
I am considering running the 3 speed heater switch (took out the 2 speed), run those wires to the Relay (that is above) --ONly it has 5 terminals/lugs and I am planning on only using Med 1, Med 2, & High speed. First of all, Can it be done? Do Ineed to cover Terminal/lug 1? If yes, Pics help me a LOT! There are NO # or words indicating the terminals... (Scary):eek::confused:
 
I forgot to mention that I did upgrade to the blazer blower motor.. :)
And,
I also used an Ohmmeter... (I found out that 4 and 5 terminals/lugs had zero resistance (so they were connecting) And terminals 1&2 had a slight connection approximately 083 ohms (I can't remember the # exactly)..


Would anyone know what this means?
 
OK, so first question: is your heater motor on the inside or the engine side of the fire wall?

Did the blazer use a relay??:)


you didn't mention terminal #3.
 
Last edited:
The forum hardware squished the text diagram I made for you. Sorry no pics.
 
What you have is a 5 pin relay. or a single pole double throw relay. This is as good a tutorial on relays as I have seen. They look a bit different from yours but only because yours is built to handle more current, I think but it works the same and it has the same contacts and coil. :cool:
Relays

I really don't see how this will control a 3 speed fan.
 
The forum hardware squished the text diagram I made for you. Sorry no pics.
:( (regarding no pics)
Thanks for trying though..
 
OK, so first question: is your heater motor on the inside or the engine side of the fire wall?

Did the blazer use a relay??:)


you didn't mention terminal #3.

I cut the firewall to have the blower motor out of the "home made" heater box. However, on the inside of the cab, the heater assembly also has a front door, where I can pull out the heater "cage" and heater core for easy replacement. :p

I thought I heard that the blazer did have a relay but, its been a while since I've researched it and can't say for certain at this point. :rolleyes:
 
What you have is a 5 pin relay. or a single pole double throw relay. This is as good a tutorial on relays as I have seen. They look a bit different from yours but only because yours is built to handle more current, I think but it works the same and it has the same contacts and coil. :cool:
Relays

I really don't see how this will control a 3 speed fan.
:doh:


As you can see, I'm a newbee... :( would you know what relay will work with my 3 speed switch and blazer (single wire) heater motor? Or should I even put one in?

:poke:
 
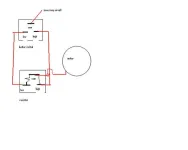
I am going to guess that your three speed switch is a three position switch and that one of those positions is OFF. On the back of this switch are three terminals, One is common, one is low and one is high. when the switch is in the off position there will be no continuity between any of the terminals, when in the second position here will be a circuit between the common terminal and one of the other two (low), in the third position there will be continuity between the common and the last terminal (high). Your first picture, I believe is the resistor, I suspect that there are three terminals on this as well. A common terminal, a terminal with a resistance in the circuit between the terminal and the common terminal and a terminal that goes straight to the common terminal. The switch common terminal is powered from the accessory circuit preferably from a 20 + amp fuse the low switch terminal is connected to the terminal with the resistor at the heater and the high switch is connected to the terminal that goes straight to the common terminal on the resistor board. The common terminal on the resistor board is connected to the wire from the heater.

The sequence of operation is that the ignition switch supplies accessory power to the heater switch, the switch, in the low position, supplies the resistor circuit with power to the common terminal and to the motor for low speed. When the heater switch is placed in the high position the power is changed from the resistor to the straight to the common circuit terminal and to the motor:cool: for high speed.


Now if you can get your head around this and get the two speeds to work we can talk about using the relay you have to do away with the high amperage that is now going through the ignition switch when the heater is on.:D If the drawing works please don't laugh too hard it is my first use of paint, Auto cad it isn't!!:D


:doh:


As you can see, I'm a newbee... :( would you know what relay will work with my 3 speed switch and blazer (single wire) heater motor? Or should I even put one in?

:poke:
 

Attachments

  • untitled.jpg
    untitled.jpg
    11 KB · Views: 2,260
He is having a problem getting the fan to blow in high , the resistor is for low speed. :D the resistor is fine. thump the relay and it works? I am off to find a diagram of how the S-10 is wired. BBL:D
 
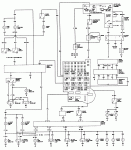
OK so hopefully this came through. the S-10 is, in fact a 3 speed motor with a duel split resistor for low and medium and a relay that connects the motor directly to the terminal block.:D
 

Attachments

  • s10 blower.gif
    s10 blower.gif
    134 KB · Views: 13,152
OK so hopefully this came through. the S-10 is, in fact a 3 speed motor with a duel split resistor for low and medium and a relay that connects the motor directly to the terminal block.:D
you may be able to save the image and move it to a program you can enlarge, the blower circuit is in the top right corner.
 

Jeep-CJ Donation Drive

Help support Jeep-CJ.com by making a contribution.

Help support Jeep-CJ.com by making a contribution.
Goal
$200.00
Earned
$25.00
This donation drive ends in
Back
Top Bottom