More Oil pan problems!!!!!! Help

More Oil pan problems!!!!!! Help

tonkatrucksryan

Active Jeeper
Posts
360
Thanks
0
Location
Waldorf, MD
Vehicle(s)
1975 CJ5 w 4.2 258.
2004 TJ Rubi
2011 Toyota Tundra
Well I finally got time to work on my baby. I pulled the oil pan off again and put a new gasket with a little Rtv on the front and back of the pan. I got it all bolted back up in and as soon as it warmed up it leaked out the back like crazy. So yesterday I ordered a new rear main seal and now I am nervous as S@##. I have never done this before and I am off this friday and hope to get this taken care of. Please let me know what I should expect and any pointers or advice? I want this leak to be a thing of the past. (I have a AMC 258 i6 / 4.2l and my baby is a 75CJ5


Thank you!!!!:notworthy:
 
I haven't as well. Please, pictures and a thread?:cool:
 
I just did my oil pan gasket in my 79 CJ5 with the AMC 258 i6 / 4.2l over the weekend. Went to change the rear main seal since everyone said just do it while the pan is off.
The rear bearing cover was on there pretty good, needed a breaker bar. Had to really push to get it off even with the bolts removed. Once that was off the bottom part of the seal was right there.
The top part was another story. Everything i read said use a tool to push one end out. I tried to get the top half of the seal out for a good amount of time and no matter what i tried i couldn't get it out. Eventually gave up and just put the new bottom half of the seal in and closed it all back up because i was out of time.

Sent from my DROID RAZR using Tapatalk 2
 
it sits in the rear main cap, makes sure you go in correct...and a tip i learn here at the dealer..i put a small zip tie between the seal 1/2 and the block to protect the seal from being cut on the way in...take your time and make sure to use sealer where needed
 
Kj,

You pulled your main bearing cap off with a breaker bar? The correct method would be that you first have a torque wrench and torque the cap to the correct torque / lbs rating just to see if it was loose. Then you take the cap off................in reverse you have to re-torque the cap to the correct torque rating............also most rear seals will not just push out , it normally requires that all the caps on the crankshaft are loosened which allows the crank to drop several tenths, then you sometimes can get the seal pushed up around the cavity in the block. Not an easy job if you have no experience.
 
Just put a new one in mine a few weeks back. Course mine was on the stand so it was much easier to access. Tarry is right, loosen all the main brg. caps slightly and then when your done torque them in a circular sequence, in stages. I'm thinking their torque is to be 80 (don't quote me) so I went 20 ft. lbs. at a time.
The rms in the block will be tight even then. Use an 1/8" drift punch, one hit at a time because if it bounces the next hit may be to the block and that's not a good thing. It may take a dozen hard hits but it will let loose. Then tap it till enough sticks up the other side to get a good hold with pliers and then pull the rest out.
A good gasket, I only use FelPro, will include a "shoehorn" with it which is just a small sliver of vinyl like paper, so that you don't shave the backside of the new seal putting it in. I believe a touch of oil or vaseline on the new one is recommended. Follow the directions for installation and where to put a dab of sealant at.
The hardest part will be working on your back with your hands in the air. Wear your safety glasses. Good luck.
The old seal is laying on the right side.
img2050f.jpg


The new one installed and cap on.
img2059we.jpg
 
Last edited:
Hmmm, they show up for me. It says they have been resized but you can click on the bar to see them full size. I did them the same as I always do. What are you seeing, anything you may have to click on? Can anyone else not see these, there's 2 pics?

I did these pics for someone else a few weeks back. Let me see if I can find that thread.

edit:
I didn't find my post but I did find some similar shots on rBagley's build thread, where he changed them out. Note the 2 gray dots on his new ones. That's where you need to set the punch to remove the old ones.
http://www.jeep-cj.com/forums/f98/82-cj7-frame-swap-lift-build-11952/index6.html
 
Last edited:
:confused: 5 lights?? you lost me.:wtf:
 
Nope, sorry. Never watched the newer version and very few of the old.
 
Kj,
Not an easy job if you have no experience.

Unfortunately that's exactly what i have...no experience. Haha

I wish I'd have known all this ahead of time. I did use the torque wrench to put all of them back to spec when i put the rear cap back on though.


Sent from my DROID RAZR using Tapatalk 2
 
KJ,

Well I'm glad to hear you did use a torque wrench..........keep an eye on that rear main as once you disturb them it may leak even more.
 
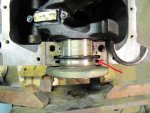
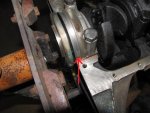
Where exactly is the rear main seal located? I know it is in the rear, but where?
 
It would be directly above the rear of the oil pan. That curve seals against the crankshaft cap (or rear main bearing cap) that covers the rear main seal. It's basically the seal around the crankshaft end where it exits the block and it bolts to the flywheel.
 
Where exactly is the rear main seal located? I know it is in the rear, but where?
Look at where the red arrows are pointing in the images below. I edited the pics PaRenegade posted earlier.

attachment.php


attachment.php
 

Attachments

  • rs1.jpg
    rs1.jpg
    46.5 KB · Views: 276
  • rs2.jpg
    rs2.jpg
    46.1 KB · Views: 247
Curious too, can you see those pictures now ttRyan? There are actually 4 now, 2 of which are "attached thumbnails".

Note the top pic has the top half of the seal laying off to the right side.
 

Jeep-CJ Donation Drive

Help support Jeep-CJ.com by making a contribution.

Help support Jeep-CJ.com by making a contribution.
Goal
$200.00
Earned
$25.00
This donation drive ends in
Back
Top Bottom