shackles

shackles

Hedgehog

Always Off-Roading Jeeper
Posts
9,370
Thanks
4
Location
Tucson/Marana Arizona
Vehicle(s)
-1975 Jeep CJ5, 360 V8, Headers, Duel Exhaust,T15 transmission, D-20 Transfer case, Twin Stick Conversion, Warn 8274 Winch
-1951 Willys Wagon, 4 cylinder, "F" head, little rust, very close to stock
There are some super strong looking shackles for shackle lifted CJ's, but I pulled the ones purchased with my jeep off and went with stock shackles. You know the ones with no side connecting cross piece in the middle, just two plates bolted on. They have worked as designed since, but lately the idea of something better has been eating at me.

So, I started to wonder if one that meets my needs could be made at home. Has anybody done anything like this?
 
Had to replace the front shackles on my first CJ back in the '80s (for some reason, don't even remember why). I was working in a metal fab shop at the time. Made a matching pair out of flat steel bar stock with C channel welded in for the horizontal support. They worked great and was still on it when I traded the CJ for a friggin' 4 cylinder "family" car :eek:.
 
The reason the factory ones work well, despite their chinsy look and thin sides is a couple of things. They are only 3" bolt to bolt which puts less stress on the sides to begin with. But the sides also have the dimples where the rounded ends of the factory rubber bushings go, which adds strength to an otherwise flat piece of metal.
The bolts are also press fit into the one side and welded so it keeps them perpendicular to the side. They also have a shoulder on the threaded end so the other sides gets clamped against it (with the nut) to keep it perpendicular as well. So the assembled shackle stays in a square/rectangular shape.
When you stretch the distance between bolts you add more stress to things via an increase in leverage force. Imagine using a stubby wrench to free a tight bolt vs. a longer wrench. The longer wrench will apply more force. So this is where stronger sides and a center support comes in to play. And if you get off road much the off camber terrain will add much more side or lateral loads to the shackles, acting as a lever which will also want to twist the shackle mounts which are a common failure point on Jeeps. So I always recommend replacing the mounts with a stronger designed aftermarket one if your going with longer shackles.

With all that being said, if your going to make your own I would use 3/8" sides and do as hdgapeach had done and welded a piece of C channel in the center. If welding is not an option you can get some 1"x1", 1/8" wall tubing to bolt through the center. I like square tube better then a round sleeve because it gives it more parallel surface to keep things square. Using bushings that use sleeves inside are even better, as it gives support at the ends as well,plus it keeps the spacing constant and prevents you from over-tightening the bolts and pinching the bushings, which gives a smoother ride and better flex.
 
I was about to embark on my own shackle making attempt. I was planning to use 2in by 1/4 flat stock. I was going to add an inch center to center for a 1/2" lift. I also plan to add a center bolt and tubing to space it out. I also plan to use urethane bushings.
 
I made both front and rear on mine and I've worked them hard with no issues. Just don't get silly with how long you make them and you'll be fine. Depending on your spring length (because that will control the angle of the shackle somewhat, you'll get a lift of about half of the length you increase the shackle over stock. I'd stay below 1" of lift or you asking for trouble. My opinion based on 30 years of driving things and building things in the Maine woods, nothing else.
516864a81174cb55c5181e7d7ce6768f.jpg
df0304bbf743cb88296605b54f572957.jpg
c9db57df954b4d4d6ee098ea8004f7b1.jpg
3a7682cc14ab91e3d24a918b1015692a.jpg
68382a7ca329388c45bf719c7d82e88d.jpg


Wooly
8d9a9eec529c3d84ca60dc24f1d07e65.jpg
 
Better beef up the OEM front frame hanger while your at it.
I have seen many of them crack at the clearance hole for the frame rivet.
Be aware, that any mod like a shackle lift WILL affect your front end alignment.
LG
 
When the jeep hit my driveway it had a big shackle lift on it. They were big and stout big stupid tall, so they were pulled and tossed into the parts bin. So, I got to thinkin' why not modify those. This morning I started the project and I must say it didn't start perfectly with some clearance problems with the center reinforcing block. After some reshaping and a little welding all is well. These bad boys are stiff, I like'em.
 
If you can-Please post some pictures when your done.
ALSO-Ck the front hangers for cracks.
LG
 
Better beef up the OEM front frame hanger while your at it.
I have seen many of them crack at the clearance hole for the frame rivet.
Be aware, that any mod like a shackle lift WILL affect your front end alignment.
LG


Both great points!


Wooly
 
Better beef up the OEM front frame hanger while your at it.
I have seen many of them crack at the clearance hole for the frame rivet.
Be aware, that any mod like a shackle lift WILL affect your front end alignment.
LG
I agree. As I mentioned above that's a common failure point on Jeeps. And since you have the welder out Hedge, it doesn't take much to fab some side webs to reinforce the curl.
But as far as effecting your front end alignment. It won't necessarily effect it negatively, and if it does it's an easy fix. Castor has a range, on later Jeeps it's 5-7* pos. So if yours happens to start at 6* and goes to 5* or even 4* you may not notice any change in steering. The further out of range the worse it will get. I had 1 1/4" lift shackles (5 1/2" c2c beefy Con-Ferr's) with 1 1/2" add-a-leafs on mine for 8-10 years with no steering problems. Once I changed the springs to a 2 1/2" lift set then I started seeing problems. A pair of steel degree wedges fixed the issue.
 
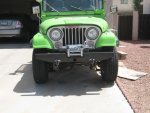
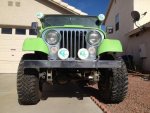
You can see the shackles I'm replacing here.

BumperFinishedFront.jpg

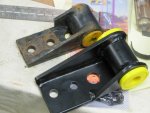
These are the ones I replaced and are being modified or shortened, with the shorter shackle the center reinforcing block needed to be modified to clear the top mount.

Earlyphoto2.jpg

I'm not actually lifting jeep at all, the shackles I got to replace the way to much lift shackles that came with the jeep are stock height, but VERY thin. They look like a weak point so I wanted to make something more substantial. Yes, I know, the short nature of the stock length shackle probably doesn't need extra strength, but I figure it can't hurt. I will check the hangers for cracks.

So, PaRengade - What are these "webs to reinforce the curl" you speak of? I'm always looking for something new to do with the CJ.
 
Last edited:
When the jeep hit my driveway it had a big shackle lift on it. They were big and stout big stupid tall, so they were pulled and tossed into the parts bin. So, I got to thinkin' why not modify those. This morning I started the project and I must say it didn't start perfectly with some clearance problems with the center reinforcing block. After some reshaping and a little welding all is well. These bad boys are stiff, I like'em.

I just picked up a 85 CJ7 with the exact same shackles for lift and I'm pretty sure they are the root of some major wandering problems. B2B is 6 1/2 in. Plan on taking them off and drill new holes and cut off the extra. Is that what you did? I figure I could take them off, drill em, cut off the extra, and have a pretty heavy shackle; looks like I can drill them to 4" B2B and drop a little over an inch.
 
They are just some 1/4" steel cut in a wedge shape with the front having a radius in it and welded fast. The one side needs to be cut short to accommodate the steering box mount. I believe the pass. side is okay unless you use a steering box brace, then it needs cut short too.
Heres a pic of my old ones along side my new MORE mounts.
 

Attachments

  • IMG_3362small.jpg
    IMG_3362small.jpg
    56.9 KB · Views: 179
wulfspark113 - Basically that is what I did. I made a mistake with mine though. I measured the spring curl, but never measured the top which is much bigger than the curl. Being committed I cut the center with a cutoff wheel, bent it down and welded the seam where the top met the bottom, then welded up the sides. The jeep ended up with about a little life, not much at all, maybe 1/2" or less. Those baby's are solid.

PaRenegade - I'm not clear on what you did, was it just adding a little triangle to the round part of the mount? If it is I can actually see where the addition of a small amount of metal would add a lot of strength.

edit: Okay I hit the image and it blew up nicely. Looks easy enough.
 
Yup-Pretty much what mine looks like also.
Hedge-Really like that green! :D
LG
 
Thanks for the tip Hedgehog, I'll tackle this next weekend and hopefully all goes well and lines up right
 
LG - thanks the paint job is a typical 10' job. Any closer and the quality goes down. When repaint time comes it will be the same color. I am constantly amazed with the number of people that really like that green. Matching it is the trick....

Wulfspark113 - one thing to watch out for, the steel these shackles are made of is VERY soft and pliable. make sure to check the bolt hole alignment frequently. I had to hammer mine back into alignment a few times. Make no mistake, these shackles are stiff, I'm impressed at the way the front end feels.
 
The reason the factory ones work well, despite their chinsy look and thin sides is a couple of things. They are only 3" bolt to bolt which puts less stress on the sides to begin with. But the sides also have the dimples where the rounded ends of the factory rubber bushings go, which adds strength to an otherwise flat piece of metal.
The bolts are also press fit into the one side and welded so it keeps them perpendicular to the side. They also have a shoulder on the threaded end so the other sides gets clamped against it (with the nut) to keep it perpendicular as well. So the assembled shackle stays in a square/rectangular shape.
When you stretch the distance between bolts you add more stress to things via an increase in leverage force. Imagine using a stubby wrench to free a tight bolt vs. a longer wrench. The longer wrench will apply more force. So this is where stronger sides and a center support comes in to play. And if you get off road much the off camber terrain will add much more side or lateral loads to the shackles, acting as a lever which will also want to twist the shackle mounts which are a common failure point on Jeeps. So I always recommend replacing the mounts with a stronger designed aftermarket one if your going with longer shackles.

With all that being said, if your going to make your own I would use 3/8" sides and do as hdgapeach had done and welded a piece of C channel in the center. If welding is not an option you can get some 1"x1", 1/8" wall tubing to bolt through the center. I like square tube better then a round sleeve because it gives it more parallel surface to keep things square. Using bushings that use sleeves inside are even better, as it gives support at the ends as well,plus it keeps the spacing constant and prevents you from over-tightening the bolts and pinching the bushings, which gives a smoother ride and better flex.

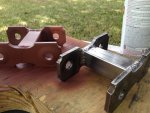
I used the original shackles, drilled out the original bolt holes to 1/2, and used AN-8 bolts with nyloc nuts from aircraft spruce company. Welded square tube in between plates for solidness side to side. I like the original shackles for reasons PA Renegade stated. The original bolt holes became elongated so I bored them out to make round again. I had to measure carefully for the square tube, theres no give when you try to jam them on over the poly bushings I fitted. I used lubriplate grease to get the bushing cup on. Also with AN 8 you can choose exact lengths, for the bolt bodies, so the threaded portion of the bolts don't ride in the shackle holes. With the nyloc nuts, you can tighten just right, without overtightening.
 

Attachments

  • IMG_5728.jpg
    IMG_5728.jpg
    94.6 KB · Views: 174
Nicely done!
LG
 
Yes, nice work James.:notworthy: I've never seen anyone modify the stock shackles before. That would also allow you to use greasable bolts if you wanted since they're drilled bigger.
 

Jeep-CJ Donation Drive

Help support Jeep-CJ.com by making a contribution.

Help support Jeep-CJ.com by making a contribution.
Goal
$200.00
Earned
$25.00
This donation drive ends in
Back
Top Bottom