• Hello Guest, we are proud to now have our Wiki online that is completely compiled and written by our members. Feel free to browse our Jeep-CJ Wiki or click on any orange keyword when looking at posts in the forum.

Sport Bar modification

Sport Bar modification

Hedgehog

Always Off-Roading Jeeper
Posts
9,370
Thanks
4
Location
Tucson/Marana Arizona
Vehicle(s)
-1975 Jeep CJ5, 360 V8, Headers, Duel Exhaust,T15 transmission, D-20 Transfer case, Twin Stick Conversion, Warn 8274 Winch
-1951 Willys Wagon, 4 cylinder, "F" head, little rust, very close to stock
A few months ago I started adding steel to my stock "Sport Bar". The metal work is finished, but it hasn't been painted yet. Several have asked to for photo's and here they are.

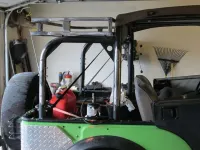
This is the rear end. Modeled more or less after a Wrangler or Land cruiser:

IMG_0120.webp

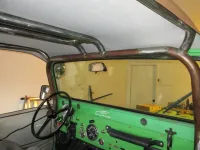
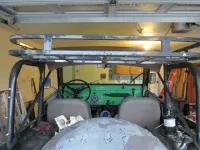
This is a view of the inside. Notice the bars are higher than the windshield, it's actually flat from the "Sport Bar" to the front, then turn down tot he front bar. This supports the bikini top and keeps it from flopping and has made it a lot quieter to ride in:

IMG_0122.webp

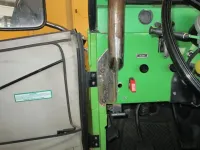
We all know how tight the doors are in a CJ5 to get your feet inside. I terminated the front bar at the dash to save some room. There will be a reinforcing bar behind the dash running down to the floor.

IMG_0127.webp

I installed a BUNCH of these. They are threaded points to attach items and brackets to for carrying things like an ax, shovel, chainsaw, boat rack etc.:

IMG_0124.webp

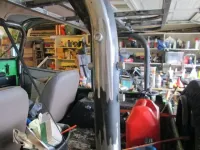
From the rear:

IMG_0123.webp

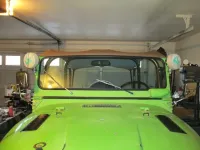
I love the Mohawk and eye brows viewed from the front"

IMG_0129.webp

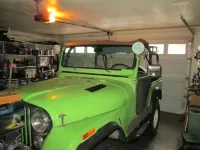
A different angle:

IMG_0130.webp


Not great pictures, maybe later a finish painted set will come.

I won't be leaving the rack on permanently, it's for lighter camping stuff and trail maintenance equipment.

All in all I'm very pleased with the way it turned out. Pay particular attention to the bends and angles that went in the top or roof bars. Also notice that some of the angles are gusseted for strength. The Bikini top straps won't stay the way they are. I need to get to a tend shop and have the buckle sewed in shorter so the straps can go straight down behind the center bar.
 
Last edited:
Nice work. Looks great. I see a torch in the back, did you do some brazing in your construction?
 
Does the soft top still fit?
You did a bunch of nice work.
The hood vents look good too.
May I ask, why you didn't run the front loop to the floor? :confused:
LG
 
PaRenegade - No brazing, all welded construction. The torch was for a little heat on a cup of grease.

Lumpy - Thanks. I do believe the soft top will still fit. Remember the center hoop is actually taller than the "Sport Bar" and the top pipe I used is parallel to the floor or ground then dips down to the front hoop. I believe there is enough give in the top material to take up what is lost right behind the windshield. Besides, I never run with a full top on.

As explained in the original post. A CJ5 has little extra room in the door to get your foot in the cab. The CJ actually had the front hoop installed with horribly welded pinkie Cepek stringers from the "Sport Bar" to the front hoop. This made it almost impossible to get in and out of the jeep. Almost immediately I cut the darned thing out. When I started this project I wanted a front hoop but nothing to get in the way of my feet while getting in. so I terminated the front hoop at the bottom of the dash. THis is a fairly strong part of the Tub, but I will be drilling the dash for 3/8" #8 bolts that will attach to a plate mounted behind the dash that will run to the floor. Sure it will be a bit of a dog leg arrangement and not as strong as a straight pipe, but remember way back to earlier discussions. This is not a roll cage, even though it looks a lot like one. I will be mounting a roof top boat rack to the front tubes, the threaded mounting points are there for that along with a set at the rear of the "Sport Bar". ...... and lets stop fooling around, this thing might not be a true roll cage, but it is one hell of a lot safer than what I had before.

IOPort51 -I will extend a heavy steel support behind the dash all the way to the floor. I will also be using the stock holes originally used for a stock door hinge. So the front hoop will be supported by the door jam, the steel running to the floor which will be bolted to the side of the tub. All in all a fairly strong well supported pillar of sorts. Yes, I know a straight tube all the way to the floor would be stronger, but I can definitely get my feet in the CJ with minimal trouble. Also, one more time for clarity's sake, this is not intended to be a Roll Cage. It will serve several purposes, it will hold up a roof top boat rack, the center tubes will allow mounting of several different things like radio's, rifles, shotguns a clip for sunglasses and it will keep the top from flopping. The back will add versatility the original angled pipe never would have allowed. Basically these modifications will add far greater versatility to my cramped little CJ5 .
 
Last edited:
May I ask, why you didn't run the front loop to the floor?

Read more: http://www.jeep-cj.com/forums/f7/sport-bar-modification-24593/#ixzz3UwOke2IT


because you bang your knee on it and it makes it harder to get in and out. MY 2c. And no matter what, it is still just a sport bar. and you did well I very much like the threaded inserts.:cool:

Hav'n survived 2 roll overs-I'll stick with the floor mount. :chug:
My concern with the 2, 1/4" screws hold that bracket(without the added bracing you speak of HH), is even in a mild tip-over. They very well may pull out and then that bracket becomes useless to dangerous.
LG
 
Those are truly temporary, I used them during construction to hold the front hoop in place. As written above they will be drilled out to 3/8" to hold #8 bolts that will be in a threaded plate running to the floor. ...... I hear yeah Mr. Lumpy, we are on the same page here.
 
Those are truly temporary, I used them during construction to hold the front hoop in place. As written above they will be drilled out to 3/8" to hold #8 bolts that will be in a threaded plate running to the floor. ...... I hear yeah Mr. Lumpy, we are on the same page here.

:notworthy: :chug:
LG
 
Hey HH, could/would you post more info on the thread inserts you used?
LG
 
This one is my disk brake Dana 30 , front of course. It's sitting on saw horses right now.

The grease is a bit of a funny story. After posting about this and how to find decent patterning grease I decided to make my own with white lithium grease and chalk dust. I couldn't find yellow chalk dust so settled on orange. Then while working on the carrier and talking with the neighbor's mother I lost my tube of lithium grease, we looked everywhere for it, finally I asked her, "Do you have any Crisco?" "No, but I do have lard." So, we mixed up a batch of orange chalk and lard. It worked fairly well too. But while mixing the chalk and lard she found my lithium. So, I mixed up another batch. Both worked fairly well.

Limpy, pictures of the threaded mounting points, sure thing. If you look closely at the pictures you'll see lots of these points all around the new and old parts of the bar. For the threaded portion 3/8" coupling nuts were used, they are a 5/8" nut about 1" long. Then drilled a slight interference sized hole in the tubing leaving about 1/4" sticking out. I actually welded up and drilled a pattern so the holes were uniform, after tapping the nut in the hole they were welded all around. A flap wheel was used to grind off the part sticking out to leave a smooth surface. The sharp edge of the threads didn't look professional so a step drill was used to counter sink the hole. A tap cleaned the threads up. I got to thinking about water getting inside the tubing so I got some 3/8" allan head set screws that would bottom out on the back inside of the tubing with some lock tite the set screws act as a plug preventing water from getting inside my "Sport Bar". I've got about 28 points in the bar and keep thinking of more places to put them.
 
Allot of work and I really like that idea!
Thx for the detail.
LG
 
Not intending to start a pissin contest but the 2 1/4"-20 grade 5 bolts have a combined shear or a little over 7000 pounds not allowing for friction between surfaces which would increase that significantly. reinforcing the cowl side is an excellent idea IMHO. If I thought I was going to hit the wall at highway speed I would perhaps think of this differently but once again the main purpose of the sport bar is to help a grey headed old fat guy hoist himself in and out of the little vehicle. If I was really worried about things going wrong I would put a diagonal in the top corners of the front hoop to keep it square on a rolling side load. I still think you did a good job and this will improve your driving experience in a big way. and the top rack looks way cool.:cool:
 
Those bolts on the front bars could easily be opened up to a 5/16" and use grade 8 bolts. By that time the body becomes the weak point. I don't think using combined shear strength numbers for determining bolt sizes is a very good idea. Those sport bars also come in handy for tipping over a CJ back on its wheels. My $.02
 
Lumpy - It probably took longer to write up how I did it than it actually took to do it ... well it did take longer, but none of it was difficult or time consuming. Well worth the effort adding versatility to the bar/cage.

About those silly bolts. Man I knew this would happen. :) This weekend the holes will be drilled and bigger bolts will take the place of those little dash bolts. I might not get the steel pillar in this weekend, but the big bolts will be there to very solidly attach the bar/cage to the dash/body ... more the body, the dash is just sheet metal.

The dash is something else, there is another dash sitting in the garage and plans are being worked out to modify it with a pop out and removable instrument cluster. Nothing fancy for the instruments though. Mine look good enough. ..... maybe a new autometer tach. I've got a big one attached to the steering column right now and use it a lot, it's like a second speedometer for me. The smaller ones in the dash look nice though.
 
Last edited:
Not intending to start a pissin contest but the 2 1/4"-20 grade 5 bolts have a combined shear or a little over 7000 pounds not allowing for friction between surfaces which would increase that significantly. reinforcing the cowl side is an excellent idea IMHO. If I thought I was going to hit the wall at highway speed I would perhaps think of this differently but once again the main purpose of the sport bar is to help a grey headed old fat guy hoist himself in and out of the little vehicle. If I was really worried about things going wrong I would put a diagonal in the top corners of the front hoop to keep it square on a rolling side load. I still think you did a good job and this will improve your driving experience in a big way. and the top rack looks way cool.:cool:

Ain't worried about the bolts-:eek:
It's the grade 1 sheet metal, they're screw'd into :laugh:
Also-Unless you know the source of the fasteners. Don't trust the markings on the stuff you get a Home Depot/Lowe's etc.
:chug:

LG
 
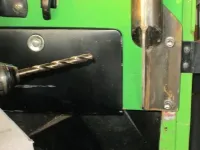
Okay guys, I went right home, grabbed the drill, opened the holes up to 3/8" and found that I'm out of #8 hex head bolts, but there are a ton of 3/8" stainless steel allen head bolts and some #8 nuts. Good enough for now:

IMG_0138.webp


One thing is for sure, everything is tighter now. It was only assembly tight before.

The nuts are far closer to the side than I had hoped, due to the metal being far thicker than expected. I thought I had the pillar behind the dash figured out, but now I'm not sure how it's going to go.
 
HH-GOOD JOB:notworthy: How about run'n a 'doubler' behind that dash area to reinforce those bolts.

LG
 
yes, something like that.
 
Hedge unless you indeed plan on being upside down in the near future, I personally would call the area where the cage meets the dash DONE. I wouldn't add anything else.

With the specs IO gave plus friction plus the angle and subsequent surface area of what is bolted to its fine for trail use, at least my kinda trail use.


Sent from my iPad using Tapatalk
 

Jeep-CJ Donation Drive

Help support Jeep-CJ.com by making a contribution.

Help support Jeep-CJ.com by making a contribution.
Goal
$200.00
Earned
$0.00
This donation drive ends in
0 hours, 0 minutes, 0 seconds
  0.0%
Back
Top Bottom