• Hello Guest, we are proud to now have our Wiki online that is completely compiled and written by our members. Feel free to browse our Jeep-CJ Wiki or click on any orange keyword when looking at posts in the forum.

Electrical Bright lights not working, any thoughts?

Electrical Bright lights not working, any thoughts?

totalpackage

Jeeper
Posts
36
Thanks
0
Location
Kingston,TN
Vehicle(s)
81 and 79 CJ 5, (sold) , 83 CJ 7 Laredo current
After turning on the light switch, i then press the foot switch and the lights turn off and only the parking lights are on. Press the foot switch again and the normal lights come on. Am i missing something? Is there a common issue that i may need to check?
 
searching on this will bring you to a lot of people that needed to replace the dimmer switch. they don't hold up well to things that cause corrosion and are often fail because of it
 
Probably a bad ground. That's what was wrong with mine. Thought it went bad replaced it and same problem. Added a ground wire after cleaning the mounting area and all worked well

Sent from my E7110 using Tapatalk
 
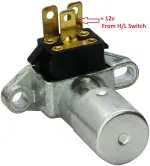
It is very common for the dimmer switch and/or the electrical plug on the switch to fail. If the headlights work on low beams and stop when switched to high beams, then you have power from the headlight switch going to the dimmer switch on the floor (center wire in the electrical connector). All the dimmer switch does is switch the +12V from the center pin in the plug (coming from the headlight switch) to either the left or the right pins in the plug, which then go to the low beam wires or the high beam wires. So a few possible failure points:

1. The dimmer switch itself
2. The electrical plug on the dimmer switch
3. The bulkhead connector on the back of the fuse panel and inside the engine bay
4. The actual wiring to the headlights

Start by a visual examination of the dimmer switch and plug contacts. Look for corroded or burned areas. Then use an electrical meter or test light to confirm +12V on the center pin (must be there since your low beams work) and then confirm on the left pin and the right pin when you switch between low and high beam. If that's all good, then in the engine bay, use the meter or test light and confirm +12V on the pins in the bulkhead connector that go to the headlights. Facing the firewall from under the hood, the low beam pin in that connector is the top right pin. The high beam is the 2nd in from the right on the third row. If that all checks out, then trace wires from there to the headlights. Here's a layout of the bulkhead connector from the engine bay side (I have a few added items, so disregard those).

bulkhead.jpg

CJs use wiring and connectors that are not really up to snuff in terms of the dimmer switch connector. The full current the headlights draw goes through that wiring and switch and that is what causes common issues here. A common mod is to install relays into the circuit so that the headlight current draw no longer goes through the dimmer switch. You wire it up so that the dimmer switch only switches on or off a pair of relays (very low current draw). Then the relays handle the actual headlight power. Kits are available to do this. But you can do it yourself for about $10 for two 30A automotive relays, some electrical plugs, and some wiring - all readily available at the local auto parts store. Here's a post on doing that: Wiring headlight dimmer with relays
 
Probably a bad ground. That's what was wrong with mine. Thought it went bad replaced it and same problem. Added a ground wire after cleaning the mounting area and all worked well

Sent from my E7110 using Tapatalk
Figured i start there and took it out, i assume the dimmer housing must be grounded better, looked like they had rhino lined the floor with that dimmer switch removed and put back in place...but upon spraying switch and receptacle with wd-40, i placed on floor hooked up with alligator jumper on a good ground to housing and pressed and POOF, my grounded jumper burned in half.. . hope my lights are ok, headed to parts store!
 
Figured i start there and took it out, i assume the dimmer housing must be grounded better, looked like they had rhino lined the floor with that dimmer switch removed and put back in place...but upon spraying switch and receptacle with wd-40, i placed on floor hooked up with alligator jumper on a good ground to housing and pressed and POOF, my grounded jumper burned in half.. . hope my lights are ok, headed to parts store!
The dimmer switch does not use a ground connection. It only switches the +12V from the center pin (coming from the headlight switch) to either the left or right pin to go to the low or the high beam connections. Being bolted to the floorboard, and obtaining any ground connection to the housing, has nothing to do with it. If you burned up your jumper wire, it would seem that perhaps your wire was touching one of the pins that the +12V was on and it created a short circuit. A good working dimmer switch will work fine hanging in the air by the wiring connector. Bolting it to the floor is just to keep it in place so you can press it.
 
The actual floor dimmer switch does not use a ground. It simply routs + 12v to the correct low beam or high beam filament in the head light. It does not even need to be bolted to the body to test. It can just hang.

WD40 can conduct voltage so should not b used as a contact cleaner.

Use a VM or DVM to check continuity or voltage. There should be zero conductivity between the three prongs and ground with the wires disconnected.

dimmer.webp
 
After turning on the light switch, i then press the foot switch and the lights turn off and only the parking lights are on. Press the foot switch again and the normal lights come on. Am i missing something? Is there a common issue that i may need to

The actual floor dimmer switch does not use a ground. It simply routs + 12v to the correct low beam or high beam filament in the head light. It does not even need to be bolted to the body to test. It can just hang.

WD40 can conduct voltage so should not b used as a contact cleaner.

Use a VM or DVM to check continuity or voltage. There should be zero conductivity between the three prongs and ground with the wires disconnected.

View attachment 75756
So on the way to parts store i rolled my eyes thinking about it. the bulbs are grounded up by the radiator. I understood how the top terminal provides 12v when you pull the light switch on. Then the dimmer, transfers it to the terminal it needs, the switch has proper short from center terminal to bottom left and upon pressing, nothing seems to change. I did not think wd40 was conductive, ive used it years and seen it used on items that did not appear to hurt but in this case my tiny alligator clip died. :)
Just metered the new one and see that both will sort when pressing but man is there not much difference in brightness. will have to check at night.
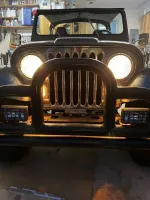
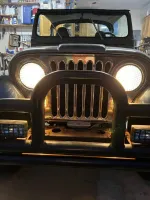
....well cant say i feel like i accomplished much. Here is a pic of dim and the not so dim (bright). very hard to tell, i assume now that why the fog lights were installed. Did learn a bit , it was the dimmer, saw that on my Fluke. Thanks for all the tips, hope i provided some Tool Time laughs! :)

IMG_2320.webp

IMG_2321.webp
 
Agree no noticeable difference low vs. high. What type headlamps (original type, halogen, H4 conversions, etc)? Perhaps time for some LEDs.
 
Agree no noticeable difference low vs. high. What type headlamps (original type, halogen, H4 conversions, etc)? Perhaps time for some LEDs.
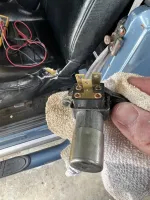
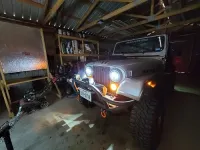
Here is what the old dimmer looked like, replaced with one from Auto Zone. Not sure, have not taken out on the lights, im guessing original, i could tell a difference on what they project on, i should have took pics of that instead...but still not much difference. Im up for recommendations for new ones that have the original style/look.

IMG_2310.webp
 
The terminal connectors on that one look OK. Must be the switching mechanism inside is messed up and would no longer switch back and forth. In terms of headlight replacement recommendations, I love my LED replacements. You said you wanted something that has the original look, and mine don't. Mine are quite bright, draw less power (LEDs), and are very noticeable high vs. low though. Here's what I used (about $75 on Amazon for both). Amazon link

led_headlights.webp headlights.webp

In terms of something that looks more stock, I think most of the H4 conversion kits are nice. You replace the existing bulbs with a new housing, and then you can use standard replacement H4 bulbs in them. But the lenses and reflective housings look pretty stock (of course you can see the H4 bulb inside when you look closely).
 
The terminal connectors on that one look OK. Must be the switching mechanism inside is messed up and would no longer switch back and forth. In terms of headlight replacement recommendations, I love my LED replacements. You said you wanted something that has the original look, and mine don't. Mine are quite bright, draw less power (LEDs), and are very noticeable high vs. low though. Here's what I used (about $75 on Amazon for both). Amazon link

View attachment 75762 View attachment 75763

In terms of something that looks more stock, I think most of the H4 conversion kits are nice. You replace the existing bulbs with a new housing, and then you can use standard replacement H4 bulbs in them. But the lenses and reflective housings look pretty stock (of course you can see the H4 bulb inside when you look closely).
Thanks
 
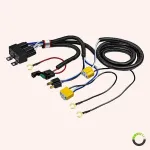
I agree with TSB8C with both the H4 upgrade and that the wiring isn't up to snuff. With all of the current running through the wiring directly through the pancake switch on the dash, it's a fire waiting to happen.

I bought a pre-made H4 relay harness and grafted it in to my system, if it's something you think you're comfortable doing;

I didn't buy this exact one, but something similar, there are lots of them out there and they're only ~ $25 - $50 a piece.

https://www.amazon.com/Negative-Swi...0240&sprefix=H4+headlight+rela,aps,252&sr=8-4

71Ilti5I-0L._AC_SX679_.webp
 
Work the floor switch a bunch of times to clean the contacts
 
I saw a YouTube video on that setup. I’m going to check the difference straight from battery on each terminal to verify it’s not the same output for me.
 
Im up for recommendations for new ones that have the original style/look.
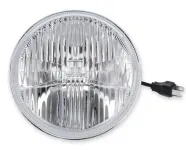
I did install the low/high beam relays thinking I'd be going to H4, but would really like LED. The problem is that all of the LEDs look like they came off the set of Star Trek.

I noticed that Holley came out with a set of "retro" looking LED, 7" headlights. $200 each... pretty expensive.
lfrb135_01_close.webp

https://www.holley.com/products/electrical/led_lighting/retrobright/parts/LFRB135

The other thing I don't like about LEDs is that most of them are running between 5000k to 6000k which is really blue.

The set I've linked to is only 3000K. While not the original amber white, they are closer to a halogen (neutral white).
 

Jeep-CJ Donation Drive

Help support Jeep-CJ.com by making a contribution.

Help support Jeep-CJ.com by making a contribution.
Goal
$200.00
Earned
$0.00
This donation drive ends in
0 hours, 0 minutes, 0 seconds
  0.0%
Back
Top Bottom