• Hello Guest, we are proud to now have our Wiki online that is completely compiled and written by our members. Feel free to browse our Jeep-CJ Wiki or click on any orange keyword when looking at posts in the forum.

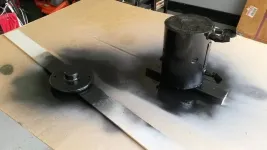
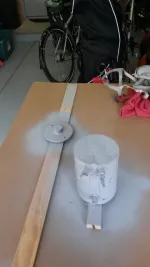
Did some sand blasting and painting

Did some sand blasting and painting

Hedgehog

Always Off-Roading Jeeper
Posts
9,370
Thanks
4
Location
Tucson/Marana Arizona
Vehicle(s)
-1975 Jeep CJ5, 360 V8, Headers, Duel Exhaust,T15 transmission, D-20 Transfer case, Twin Stick Conversion, Warn 8274 Winch
-1951 Willys Wagon, 4 cylinder, "F" head, little rust, very close to stock
Sent some parts off to sand blast, then paint, I used Hammer Forged Paint on the Roll Bar and rack

IMG_0213.webp

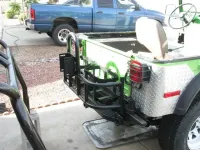
1/4" steel Rear Bumper with Tire/Gas swing out carrier. Also replaced the stock cross member behind the bumper. No, the bumper is not supported buy the cross member, there is substantial bracing going up the frame. If you look closely you can see the heat wrap on the exhaust. I couldn't get the required 3" clearance to the poly gas tank so for safety the exhaust pipe needed to be wrapped The cages for fuel cans came from Smitty Built. This thing is heavier than I expected it to be:

IMG_0214.webp

IMG_0216.webp

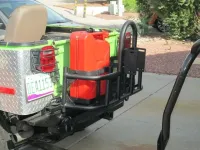
Great double tapered bearing a fellow CJ-Forum member sent to me a long time ago. I bet he thought I forgot about him. Nope, it just took a long time to get to the bumper. With the carrier fully loaded with tire, 5 gallons of gas and 3 gallons of water the thing swings like butter. I need to get a cap for it.

IMG_0218.webp

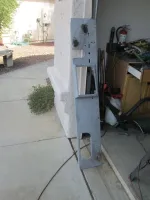
I have a dash project going. Had that sand blasted too. Welded up some PO holes. Can't quite see it, but the instrument panel is elevated and angled to make it easier to see the gauges.

IMG_0217.webp

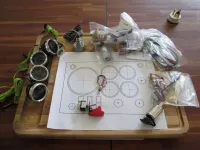
And here are most of the gauges (Speed Hut: Oil Pressure, Water Temp., Fuel, Volts) with layout diagram. The speedometer is delayed by Speed Hut, it will go in the upper left. There are also switches for extra lights, and the E-locker. Along with a couple power ports (cig. Lighter), a light to tell me the locker is on, Speedometer pulse generator and old fashioned bullet light. The panel id removable for maintenance.

IMG_0221.webp

So, have I been sitting on my hands .... no I have not :)
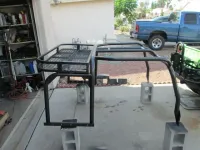
 
That really looks good! :notworthy:
That hammer-tone finish is going to work very well with your green, :chug:
May I suggest, some type of 'cap' to cover that open bearing area on the swing away. Looks like it will fill with water/sand PDQ without be'n cover'd.......
LG
 
Great double tapered bearing a fellow CJ-Forum member sent to me a long time ago. I bet he thought I forgot about him. Nope, it just took a long time to get to the bumper. With the carrier fully loaded with tire, 5 gallons of gas and 3 gallons of water the thing swings like butter. I need to get a cap for it.
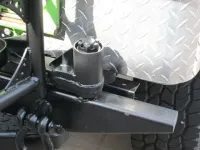
Mr. Grits - I've mentioned most of these "Projects" in the past this brings all of them together. You are right about needing the bearing cap .... I even mentioned it in the original thread. :)

I hope the paint is durable. I'm not really looking for much. While bouncing my options around with some friends at the office one of them, Chris, said that he really liked this paint. It's made for lawn furniture so what the heck. With the newly sand blasted surface it sure as heck should stick well enough.

Now for the dash!
 
Last edited:
In the end a lot more work than anticipated, but it was also a great deal of fun. Especially since most of it worked the first time exactly as expected. Even the occasionally much vilified HF pipe bender. I lost two pipe bends and that was because I used a 1 1/2" die rather than the 1 1/4" die that was supposed to be used. I was tired and should have quit earlier for the day.

What surprised me was the price of steel. Just for the bumper (without the tire rack) I spent $247. Granted it was 1/4" steel tubing, but for a similar project 2 years ago (the front bumper) using 3/8" tubing the bill came out to ~$AMC 150 . There was more to this one, but I expected the bill to be no more that $180. Expendables pushed the bumper way over $300. Again, I truly enjoy doing this type of work, I can't help but think, "No wonder after market bumpers cost what they doo."
 
Tucson/Marana Arizona. I've been using Industrial Metal Supply, a true BIG BOYS metal working toy store with great selection generally decent prices.

I was raised in the Adirondacks/Lake Champlain in New York, in many ways I truly miss living in the east. My grandfather was a Forester and loved his Jeeps, I caught the bug from him. A good man in a country full of good men, I miss them all.
 
I spent about 4 years on the Vermont side in Burlington right out of college in WV. Beautiful country. I love Maine but I have a feeling I'd like it out your way and am hopeful that I'll be able to visit sometime. The heat would probably kill me! It was high 80's here today and I thought I was going to burn up :)

Everything has gotten expensive. Your build looks great.

My moms side of the family worked in the woods here, tough as nails from what I can tell. My great grandfather died in the woods cutting out an infected tooth with a jack knife.......no room for BS back then.


Wooly
 
My great grandfather died in the woods cutting out an infected tooth with a jack knife.......no room for BS back then.


Wooly

That's one tough man right there. :eek:
 
Very jealous. Would love to have such a nice setup on mine. Really like the paint as well. Very impressive. :chug:
 
:) all it takes is money my friend and even doing it yourself a surprisingly large pile of it. You aren't horribly far from here, maybe I can help in some way.

Not so sure about the paint. It's still somewhat soft, better than brittle I suppose. In a week or two the story will be told there, at least it will stop rust from taking hold.
 
In a week or two the story will be told there, at least it will stop rust from taking hold.

Rustoleum seems to take a longer time to harden than any of the other 'rattle can' types of paint. I just painted my Warn 8274 motor with Rustoleum Engine paint:

20150704_121742_zpsbzhxujhk.webp

I put the top coat over their Industrial Primer after sand blasting:

20150704_110925_zpsrwe1oe7s.webp

And it's taken 11 days to harden to the point my thumbnail won't dent it. I do need to wet sand the end cap and spray another coat on it due to some orange peel.

Get back with us in a couple of weeks about the Hammer Finish, I'm thinking about using that on the winch cases.
 
I used Rustoleum as well, their automotive primer and the blackish, not really black, hammered finish. The tire rack is the same primer with a Krylon rust inhibitor Semi Flat Black paint. I've noticed that the new Rustoleum rattle can paint dries much faster than it used to. The Krylon seems to be quite hard already. Lets hope it won't be brittle later on. This is both a wait and see AND a fully committed type situation.
 
With just a few more days of curing the Hammer paint sure has changed (not really surprised). It went from what best could be called dry paint with a softness almost a fleshy feel to it, to paint that feels thinner and rock hard.

I know that about any paint will take a beating under a Bikini Top, they lay right on the roll bar and flap away. Would it be a good idea to find some Teflon tape to put between the top and the sport bar's? (Grits - the sticky part of the tape will be towards the bar or down)
 

Jeep-CJ Donation Drive

Help support Jeep-CJ.com by making a contribution.

Help support Jeep-CJ.com by making a contribution.
Goal
$200.00
Earned
$0.00
This donation drive ends in
0 hours, 0 minutes, 0 seconds
  0.0%
Back
Top Bottom