Louver Install
Hedgehog
Always Off-Roading Jeeper
- Posts
- 9,370
- Thanks
- 4
- Location
- Tucson/Marana Arizona
- Vehicle(s)
- -1975 Jeep CJ5, 360 V8, Headers, Duel Exhaust,T15 transmission, D-20 Transfer case, Twin Stick Conversion, Warn 8274 Winch
-1951 Willys Wagon, 4 cylinder, "F" head, little rust, very close to stock
Have you noticed the newer jeeps with what looked like factory louvers in the hoods? This started me thinking about how hot the engine compartment is in the CJ. So, I did a search and found that adding louvers to your jeep isn't a new thing, as a matter of fact it's not difficult and can be inexpensive.
The trick is to use the right words in your search. I started by using "Vent" in my search. This quickly showed that using the word "Louver" got more results. Several styles started to show up. First were the 1950's style punched louvers. While being effective I have never liked the looks of punched style louvers. Then similar style precut louver panels showed up in my searches. These are very similar to the 1950's louvers and come in various styles, some were very expensive, some were less expensive. While doable I still didn't care for the punched look.
Example from Somedude922:

Lumpy Grits has something very similar:

Then a whole different solution popped up on one of the jeep boards. Interestingly enough it was our own BusaDave9 (he posted hem here as well) that posted his louvers on another board that caught my eye. He used almost the same search I used, but he added "Marine" to the search. Using "Marine Louvers" as a search showed a much larger and more interest selection that proved to be FAR less expensive to boot. While the automotive selections were generally +$100 with some going in the +$200 range, the marine/boat louvers were often in the ~$25 range. I liked several of them.
Here's BusaDave9's louvers:

Another cool Louver suggestion came from gutthans, I must say these really turned my head:

They turned my head, but I'm a realist in my abilities and liked the look of BusaDave9's louvers. Naturally I couldn't do exactly what BusaDave9 did. His 5 louver set is peaked in the middle. The set I chose are flat on top and have 6 louvers. All in all though they are very similar. Total cost delivered to my door was less than $50.00.
It seems that these Marine Louvers come in only two flavors. Black or off white plastic and very shinny stainless steel. Mine are American made stainless steel. For me shinny simply won't due so, before instillation, they were painted satin black.
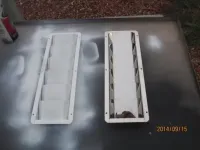
Here one is untouched and the other is primer painted. Yes, white primer was all I had:

Next came the hard part, where to put the louvers in the hood. I was going to follow BusaDave9's location, but reconsidered and placed them as far back on the hood as physically possible. This proved to be a bit of a mistake.

First I trusted the hole cut measurements on the package. Only a before cut check fit saved me from a mistake. Notice the extra line, in real life the louvers were 1/4" thinner than the instructions said they were.
Sheet metal workers say a square corner leads to tearing, so holes were drilled in each corner before cutting. I should have stopped with the cutting wheel right there. To my surprise amount of body filler on the hood. Soldering on with a nice fresh cutting disk in the grinder I took a deep breath and started cutting:

First off, the hood was MUCH thicker than expected. Evidently in '75 they made their steel to last. Thick metal gets HOT. Body filler hates hot and peals back along with the paint. Fortunately this louver design has a decent flange around the circumference so once again I soldiered on. The holes were cut, cleaned up and painted:

This is where I noticed why it is a mistake to place the louvers as far back as possible. Notice the tape on the battery. Yes, I admit it. The tape is covering two nice round holes. This was a big time "DARN IT all to he..." moment. I figure the battery is done for, but out came the plastic welder and the holes went away. I do fear the metal dust and chips that undoubtedly trickled into those holes. So far the battery is holding up though.
Under the hood:

Almost done, but the rivets need attention:

Not bad at all:


There were some things learned and to watch out for.
- Don't use a cutting wheel on your hood, it's not hard to cut a straight line, but the wheel is far to hot for decent paint to stand. Tape the area off and use a jig or reciprocating saw. It would jump and possibly damage your paint without a decent tape job.
- Know what you might be drilling or cutting into under the hood. Yes, this should be obvious, but I was sure I'd miss the battery. In reality I didn't miss the battery.
- These louvers are wide open affairs. When sitting in the front seats it's easy to see into the engine compartment. There is also added engine noise. Neither of these bother me, but it might bother someone else. One thing is for sure, you won't miss an engine fire.
- The louvers look crooked and it will always drive me crazy, but they are square to the back edge of the hood. This is an optical illusion, doesn't matter it'll still drive me nuts.
- So far the jeep has only been driven once, but from that drive I can guarantee you that heat boils out with authority. In my book this is a good thing.
The trick is to use the right words in your search. I started by using "Vent" in my search. This quickly showed that using the word "Louver" got more results. Several styles started to show up. First were the 1950's style punched louvers. While being effective I have never liked the looks of punched style louvers. Then similar style precut louver panels showed up in my searches. These are very similar to the 1950's louvers and come in various styles, some were very expensive, some were less expensive. While doable I still didn't care for the punched look.
Example from Somedude922:

Lumpy Grits has something very similar:

Then a whole different solution popped up on one of the jeep boards. Interestingly enough it was our own BusaDave9 (he posted hem here as well) that posted his louvers on another board that caught my eye. He used almost the same search I used, but he added "Marine" to the search. Using "Marine Louvers" as a search showed a much larger and more interest selection that proved to be FAR less expensive to boot. While the automotive selections were generally +$100 with some going in the +$200 range, the marine/boat louvers were often in the ~$25 range. I liked several of them.
Here's BusaDave9's louvers:
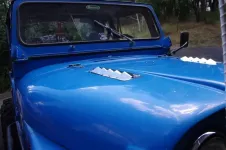
Another cool Louver suggestion came from gutthans, I must say these really turned my head:

They turned my head, but I'm a realist in my abilities and liked the look of BusaDave9's louvers. Naturally I couldn't do exactly what BusaDave9 did. His 5 louver set is peaked in the middle. The set I chose are flat on top and have 6 louvers. All in all though they are very similar. Total cost delivered to my door was less than $50.00.
It seems that these Marine Louvers come in only two flavors. Black or off white plastic and very shinny stainless steel. Mine are American made stainless steel. For me shinny simply won't due so, before instillation, they were painted satin black.
Here one is untouched and the other is primer painted. Yes, white primer was all I had:
Next came the hard part, where to put the louvers in the hood. I was going to follow BusaDave9's location, but reconsidered and placed them as far back on the hood as physically possible. This proved to be a bit of a mistake.
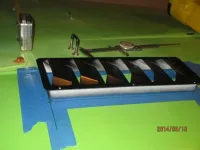
First I trusted the hole cut measurements on the package. Only a before cut check fit saved me from a mistake. Notice the extra line, in real life the louvers were 1/4" thinner than the instructions said they were.
Sheet metal workers say a square corner leads to tearing, so holes were drilled in each corner before cutting. I should have stopped with the cutting wheel right there. To my surprise amount of body filler on the hood. Soldering on with a nice fresh cutting disk in the grinder I took a deep breath and started cutting:
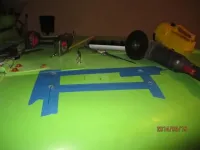
First off, the hood was MUCH thicker than expected. Evidently in '75 they made their steel to last. Thick metal gets HOT. Body filler hates hot and peals back along with the paint. Fortunately this louver design has a decent flange around the circumference so once again I soldiered on. The holes were cut, cleaned up and painted:
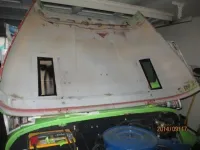
This is where I noticed why it is a mistake to place the louvers as far back as possible. Notice the tape on the battery. Yes, I admit it. The tape is covering two nice round holes. This was a big time "DARN IT all to he..." moment. I figure the battery is done for, but out came the plastic welder and the holes went away. I do fear the metal dust and chips that undoubtedly trickled into those holes. So far the battery is holding up though.
Under the hood:
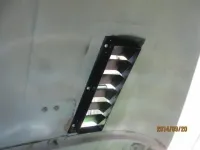
Almost done, but the rivets need attention:

Not bad at all:
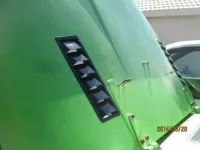
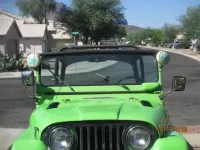
There were some things learned and to watch out for.
- Don't use a cutting wheel on your hood, it's not hard to cut a straight line, but the wheel is far to hot for decent paint to stand. Tape the area off and use a jig or reciprocating saw. It would jump and possibly damage your paint without a decent tape job.
- Know what you might be drilling or cutting into under the hood. Yes, this should be obvious, but I was sure I'd miss the battery. In reality I didn't miss the battery.
- These louvers are wide open affairs. When sitting in the front seats it's easy to see into the engine compartment. There is also added engine noise. Neither of these bother me, but it might bother someone else. One thing is for sure, you won't miss an engine fire.
- The louvers look crooked and it will always drive me crazy, but they are square to the back edge of the hood. This is an optical illusion, doesn't matter it'll still drive me nuts.
- So far the jeep has only been driven once, but from that drive I can guarantee you that heat boils out with authority. In my book this is a good thing.
Last edited:


