So I bought a 79 CJ-7 with a new uninstalled fiberglass body

So I bought a 79 CJ-7 with a new uninstalled fiberglass body

Rescue Diver

Full Time Jeeper
Posts
1,782
Thanks
0
Location
Kansas City
Vehicle(s)
1979 CJ-7 with a fiberglass body and 1982 wide track axles, 258 I-6 with a 1995 4.0 head, HEI distributor, Motorcraft 2100 Carb, T-18 wide ratio tranny, Super Lift Springs and 33s, a 1997 BMW 328i, and a 2010 REDLINE CONQUEST TEAM Cyclocross Bike. :)
The project has begun. I picked up one of the many in progress projects you see advertised so often. It's a 79 CJ7 with an already sandblasted and painted very solid frame, a newly rebuilt 304, a 4 speed with a new clutch and pressure plate, and new axle bearings all the way around. The motor and drive train are already mounted in the frame and the tub is just sitting on it right now. I've been doing a lot of research on mounting the fiberglass tub and everyone seems to say that rubber bushings are the only way to go with fiberglass. It didn't come with a body mount kit or instructions. I'm good at fabricating brackets etc... so I plan to just buy the rubber bushing kit and hit up the local hardware store for the bolts, and make all the brackets myself. To be on the safe side, I just ordered the installation DVD from 4wd.com . As soon as my 69 Vette sells, I'll be buying the Black Imron paint and ordering the lift kit, tires and wheels.
Besides the tub mounting kit, it looks like I have just about everything else to put her back together.

This will be my third CJ7 restore project, but my first with Fiberglass. After all the rust repairs from my last two CJs, I'm really looking forward to not having to worry about that any more. Any suggestions or advice would be much appreciated!
 
Good luck on your new project. If I were you I would buy the long tube of bushing mat. I found that for some reason I needed some of the bushings to be longer than others. Being able to cut to the lenght you need is a good thing.
I also made drill bushings to fit the hole in the body mounts so the holes were centered for the bolts.
The hardest thing is cutting & drilling the holes in the firewall, if you don't have the old tub to make a templet from it might be fun.:eek:

Someone mentioned the long tube of bushing mat in something else I read. What it is, a rubber cylinder with a hole down the middle for custom making bushings?

Unfortunately the olt tub has already been removed, so figuring out where to put all the holes is going to be fun. The good news is that the shifter plate and steering column holes have already been cut. I just need to worry about the heater hose, throttle cable, heater blower motor, clutch, brake and wiring holes. Maybe I can find someone local with a CJ that I can look at. It amazes me how many people decide to do things like fiberglass conversions or even building kit cars and they realize they're in way over their heads. Fortunately I'm not one of them! :)

I'll have this thing together, painted and running in under a month. :D
 

Thanks!

Any idea why every factory replacement type rubber bushing kit I see advertized says in bold letters, "Not for fiberglass bodies"????

I've read plenty of threads that say rubber bushings are the only way to go and to never use urathane, then when I find rubber bushings for sale, they say not for fiberglass. I'm confused.......

Does anyone actually sell a set of rubber bushings that say they're made for fiberglass? If so, what if anything is different about them?
 
Someone mentioned the long tube of bushing mat in something else I read. What it is, a rubber cylinder with a hole down the middle for custom making bushings?

Unfortunately the olt tub has already been removed, so figuring out where to put all the holes is going to be fun. The good news is that the shifter plate and steering column holes have already been cut. I just need to worry about the heater hose, throttle cable, heater blower motor, clutch, brake and wiring holes. Maybe I can find someone local with a CJ that I can look at. It amazes me how many people decide to do things like fiberglass conversions or even building kit cars and they realize they're in way over their heads. Fortunately I'm not one of them! :)

I'll have this thing together, painted and running in under a month. :D

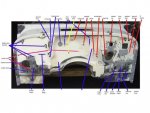
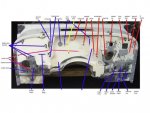
Maybe this can be of some use to you...
c72f6e5b.jpg
 
Thanks!

Any idea why every factory replacement type rubber bushing kit I see advertized says in bold letters, "Not for fiberglass bodies"????

I've read plenty of threads that say rubber bushings are the only way to go and to never use urathane, then when I find rubber bushings for sale, they say not for fiberglass. I'm confused.......

Does anyone actually sell a set of rubber bushings that say they're made for fiberglass? If so, what if anything is different about them?

I have no idea. I got my rubber from the same place I bought my body AJ's but they are no longer in bussness. It has fibers in the rubber.
 
Maybe this can be of some use to you...
c72f6e5b.jpg

Thanks a lot! I printed out a copy and used it all weekend. It's would have been great if I had a large enough printer to make a full sized template, but even a small copy really helped! I owe youy a beer! :chug:

Any chance someone can post a pic of the bracket settup under the dash that the upper part of the steering column and brake peddal assembly bolt to? I have the brake/clutch peddal assembly and the bracket that attaches the steering column to the firewall, but there's something missing near the top of the column that the two bolts go through.

It's been 15 years since I built my last jeep and I'm a little fuzzy on what brackets are under the dash. It would help a lot if I could find someone local with a CJ I could look at and get pictures.

I'll be posting a thread in the classified section with a short list of what I'm missing at this point.
 
Good luck on your new project. If I were you I would buy the long tube of bushing mat. I found that for some reason I needed some of the bushings to be longer than others. Being able to cut to the lenght you need is a good thing.
I also made drill bushings to fit the hole in the body mounts so the holes were centered for the bolts.
The hardest thing is cutting & drilling the holes in the firewall, if you don't have the old tub to make a templet from it might be fun.:eek:

I received the video. It was $20 with shipping and after watching it I'm thinking a single page of instructions would have showed me just as much. I ordered the 24" rubber tube to make the bushings. What did you use to cut it? Also, what washers and other hardware did you use with the self cut bushings. It seems to me that without something to keep the bolts centered in the larger holes in the frame brackets that the body could shift around a half inch or so.
 
I figured out the under dash bracket issue. I was just being brain dead. The bracket that holds the top of the steering column is part of the brake and clutch pedal bracket. I already have it. Last night I picked up a steering box, front wiring harness, and an emergency brake pedal assembly from a guy that was parting a Jeep on the KCJeepClub forum.
 
I got my rubber from the same place I bought my body AJ's but they are no longer in bussness. It has fibers in the rubber.

What I got was already cut, 3/8" thick or so. I made up some spacers to level it all out. Thats why I figured it would be better to be able to cut it to size.
 
Here's a pic of my work in progress.
 
what washers and other hardware did you use with the self cut bushings. It seems to me that without something to keep the bolts centered in the larger holes in the frame brackets that the body could shift around a half inch or so.

I used 1/2" bolts with bushings I made to fit the hole in the frame mounts, so it couldn't shift.
 
I used 1/2" bolts with bushings I made to fit the hole in the frame mounts, so it couldn't shift.

What did you make the bushings out of? I was thinking about tack welding a fender washer to the under side of the frame mount and putting a large washer on the top, then bushing then body with another fender washer on top of the floor board.
 
What did you make the bushings out of? I was thinking about tack welding a fender washer to the under side of the frame mount and putting a large washer on the top, then bushing then body with another fender washer on top of the floor board.

LOL I spent a couple saturdays in the shop making mine. They are made of 6160-T6 alum. the top one is a 2 dia. that is the size of the rubber on top with a threaded shank the size on the hole in the frame. It screws into the botton half that fits in the underside of the frame mount. It has a 1/2" hole thru the center for the bolt.
Sometimes I have to much free time to over think things.:D


No kidding! I'd say you really don't have to worry about the tub shifting on you! :eek:
 
Geezum - there's a fair amount of time at the lathe, turning 2" 6061 down to 5/8", too... :)
 
I found one of the proto types that the unthreaded shank was to long on. I don't have any of the "nuts" left. Heres a pic.

The large dia. is 2 3/8" and the shank is 1 5/16" to fit the frame mount hole. It gives me my 1" body lift.
Remember you will only use something like this on the front mounts and the rear mounts. The two center mounts will not line up right. You use the piece that bridges the mounts for them.
I hope that make since.
 
That's about... lessee. 10tpi? Looks like.

EDIT: Nope, looks more like 8tpi.

EDIT II: You TUMBLED it, too, didn't you? Or sandblasted it. Them. :)
 

Jeep-CJ Donation Drive

Help support Jeep-CJ.com by making a donation.

Help support Jeep-CJ.com by making a donation.
Goal
$200.00
Earned
$10.00
This donation drive ends in
Back
Top Bottom
AdBlock Detected

I get it, I'm a Jeep owner and ad-block detectors kinda stink but ads are needed on this site. This is a CJ site, all the ads are set for autos (some times others get through.) I cannot make them just for Jeeps but I try.

Please allow ads as they help keep this site running by offsetting the costs of software and server fees.
Clicking on No Thanks will temporarily disable this message.
I've Disabled AdBlock    No Thanks