• Hello Guest, we are proud to now have our Wiki online that is completely compiled and written by our members. Feel free to browse our Jeep-CJ Wiki or click on any orange keyword when looking at posts in the forum.

Doing front disc brake conversion issue: one brake pad tight squeezed between rotor

Doing front disc brake conversion issue: one brake pad tight squeezed between rotor

76cj7chick

Old Time Jeeper
Posts
1,235
Solutions
1
Thanks
8
Location
WA
Vehicle(s)
1976 CJ7 Jeep with a engine/tranny/wiring harness out of a 1988 s10 blazer 4.3l v6 with th700r4 automatic tranny and a cj7 Dana 300 transfer case with Novak adapter.
Complete wiring harness from the s10 blazer. Painted with HOT PINK Pearl paint with standard sized metallic halographic pink flakes. Painted by me -a newb. New rear, front and side three wire LED lights, New parts, new custom dash-by me And a lot of guidance from fellow jeepers and lots of prayers etc.... :p
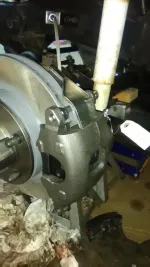
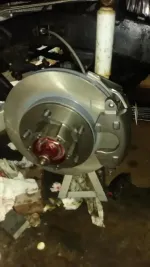
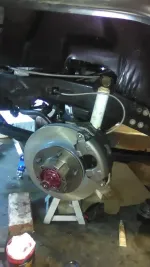
Hey guys I am in the middle of converting my front drum brakes to disc brakes and I am almost finished with the driver side but when I try to install the caliper on the bracket with pads I can't get the loaded caliper on due to the one pad is too tight of a fit and won't let the rotor turn and won't go on)
The other (outer) pad has extra room.

I can get everything to fit if I don't install the one pad that is too tight.

To get the other pad to fit, should I grind down the one pad, install a spacer between the caliper bracket and rotor (if yes, which spacer) or bend back the caliper bracket to allow more even space for the pads?

Or am I not installing correctly? (I believe I am, but may as well ask, just in case). Do the slider pins sit on outside or inner of the caliper?

Thanks. Hope to get the brakes done soon.

IMG_20181021_180241.webp

IMG_20181021_181918.webp

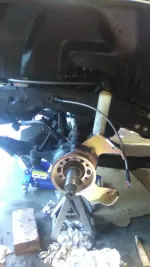
IMG_20181020_164133.webp
 
Where did you order your kit from? My first call would be to wherever you got it from.

If it's a kit, the chances of them sending you the wrong size pads are very small...a possibility, but small...which is why you need to call them and find out what pad thickness it's supposed to be.

You also might want to make sure that the pad retaining clip is seated properly on the pad (on the piston side). If not, it'll create some extra space and make it tough (if not impossible) to slide the whole caliper on the rotor. If you don't know what that is, it's a clip that goes on the back side of the pad that installs on the piston side to keep it in place. I've had to bend a few in the past to get them to seat properly.

Whatever you do, do not grind down the surface of the pad to make everything fit. If you're having trouble installing (especially if it's a kit...which it looks like), then there's a problem with the hardware you have, or it's operator error. Call the company up and walk them through your issue.

I converted my '76 CJ5 to front discs a couple months ago and I love it. I ordered a kit from Horsepower Sales, LLC and I couldn't be happier. I'm having a minor issue with braking power, but that's because my new master cylinder doesn't like my brake booster. Taking care of that problem this week.

Don't forget that you're going to need a new master cylinder designed for disc/drum brakes and a new proportioning valve...if you haven't thought of that stuff already.

When I did mine, I ran all new brake lines too.

One more thing...make sure there's enough slack in those new flexible brake hoses you have on there. It's tough to tell in the picture, but it almost looks like they're not going to be long enough...going to be catastrophic if they're too short and they get ripped out when you hit a big enough bump.

Take the caliper off and show us how the pads are installed...that will help with troubleshooting.
 
I read your post one more time...a little more carefully this time...

Sounds like you have the caliper on...you say there's space between the outer pad and the rotor, but no space between the inner pad (installed on the piston) and the rotor...

That's normal...kind of. When you connect the brake line and get to bleeding your brakes, the pressure will push on the piston and slide the caliper over to put equal pressure on both pads on each side of the rotor.

As long as you tightened the caliper bolts correctly (usually 20-25 lb-ft), and they're seated all the way, you're fine.

That's why the caliper bolts don't thread through the pads...so they can 'slide' along the bolts and create equal pressure. Kind of a rudimentary explanation, but hope it helps.

So, you may not have anything wrong if you installed properly.

Still, I'd call the manufacturer...or whoever you ordered from.
 
Open the bleed screw on the caliper, and push the piston back inside the caliper as far as it will go.
Use copper anti-seize on the caliper mounting bolts and torque to specs.
LG
 
Hey guys thanks for the suggestions.

Looks like you're both right.😀
First the anti-rattle clip wouldn't keep the brake pad in the piston hole so I had to take it off and readjust it so it would. And it looks like it may help if I bleed the brakes because the piston my be out slightly.


Also, taking a closer look at why to inner pad won't fit, It appears the bracket is slightly bent. I checked with my (oh so cute) angle finder and the bottom bracket mounting tab is in more than the top one.

What is the best way to bend it out a little. Can I take it off and bend it with the vice-grip, or can I hit it with a hammer. 😬

Thanks again for the help. 😋
 
Please don't use a hammer! Best option is to out it in a bench vise. Next best option is a vise grip.

If it were me...because I'm stubborn...I'd call the folks that I bought it from to get a replacement.

Good luck!
 
Upon further inspection. Looks like the bottom tab may have gotten bent when I installed as it is hitting the knuckle housing.
So probably was fine when bought. But makes me worried perhaps something is wrong with my axle? There is plenty of room on the top portion and none on the bottom between the knuckle and caliper bracket tab. (see photos of the lower caliper bracket tab hitting against the knuckle)

I will probably take the caliper bracket out, cut the piece off that interferes with the knuckle then bend it out using the bench-vice then reinstall. Or just see if I can bend it out without cutting.

I'll let you all know if it works out. 😯
 
Please don't use a hammer! Best option is to out it in a bench vise. Next best option is a vise grip.

If it were me...because I'm stubborn...I'd call the folks that I bought it from to get a replacement.

Good luck!

Don't worry cglax6, I won't use a hammer. 😉
 
Second thought,
After I straighten the tab out, can I clock the bracket at 2 O'clock if things fit, or could it be dangerous or less effective? (Directions say clock at 3 o'clock.

I'd ask the seller but they are away until tomorrow.

Thanks
 
OH MY! SUCCESS!

once I took the bracket off and clocked it at 2 o'clock it fit perfectly. Also, after doing so for some reason everything was spaced evenly (no bent bracket)
Don't know what type of anomaly I got mixed into but seems to work fine now.
However, please let me know if the bracket is not supposed to be at 2 o'clock.

🙆 AGAIN, THANKS GUYS FOR YOUR HELP!
 
However, please let me know if the bracket is not supposed to be at 2 o'clock.

🙆 AGAIN, THANKS GUYS FOR YOUR HELP!

Did you get everything as a kit? Or did you source all the parts yourself? If it was a kit, then did it not come with instructions?

To be honest, I don't think it'll matter...as long as it fits and the brakes work as they should.

Also, make sure the bleeding nut is pointed up and higher than your banjo fitting. It's easy to mix up left and right calipers.

Looking at your pics, I think you're fine.

Let's see pics of the finished product!

Hey cglax6,

I got the parts from horseman sales and the jeep guy and a few other sellers. They are all the correct parts. Saved $300 by self sourcing. But if I could do again, I would get as a kit since it was a process and time consuming to figure out what parts I needed.

I did get the instructions sheet for the calipers and bracket (it said to install my driver bracket at 3 o'clock as I have the Dana 30 with open knuckles. But for some reason it didn't work. 😯

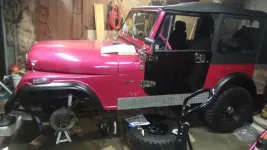
Anyways thanks for the help and I posted a photo of the driver side. Excuse the messy shop. 😳

IMG_20181022_191746.webp

IMG_20181022_174332.webp
 
Last edited:
That's interesting...I have the same axle/knuckles and used the same parts that you did and everything fit just fine at the 3 o'clock position. Just make sure that you have clearance to the stops on your steering. If not, you'll want to adjust your stops.

And before you put fluid in those lines, make sure your flexible brake hoses don't rub on the tires through your whole steering range. If they rub, you'll have to disconnect them and give them a twist to get them out of the way.

Glad you got it figured out.
 

Similar threads

  • Question<br> <font color=black> Reply's are voted<br> on for best answer</font> Question
    Reply's are voted
    on for best answer
Replies
3
Views
74
  • Question<br> <font color=black> Reply's are voted<br> on for best answer</font> Question
    Reply's are voted
    on for best answer
Replies
7
Views
139
  • Question<br> <font color=black> Reply's are voted<br> on for best answer</font> Question
    Reply's are voted
    on for best answer
Replies
6
Views
1,440

Jeep-CJ Donation Drive

Help support Jeep-CJ.com by making a contribution.

Help support Jeep-CJ.com by making a contribution.
Goal
$200.00
Earned
$25.00
This donation drive ends in
0 hours, 0 minutes, 0 seconds
  12.5%
Back
Top Bottom