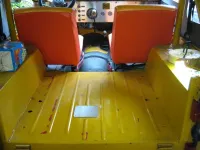
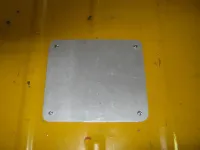
fuel gauge sending unit access panel
IOPort51
NOT the voice of reason Jeep-CJ.com
- Posts
- 13,956
- Featured
- 5
- Media
- 458
- Thanks
- 15
- Location
- Garland Texas
- Vehicle(s)
- 1977 cj-5
4.2 W/MC2100 carb, 4.0 head W/3 angle valves,SS Header,TFI ignition with MSB-6 offroad module,CS144 140 amp RPS alternator with remote regulator T-150,d-20,Dana 44 with OX lock and disk brakes. D-30 with Spartin locker,
skyjacker 2.5 lift?nitro shocks,31" BFG A/T off road.8000 lb Warn winch, original owner.=^)
2006 Toyota Tacoma
A little back ground: I replaced the sending unit /fuel pick up when the tank was replaced with a poly (plastic) fuel tank. Lesson learned, always check function of electrical parts before they are installed, this goes double if you are going to bury that part deep in the machine. Kind of like the fuel gauge sending unit.
Ordinarily I am not a big fan of cutting on CJ bodies. Although cutting fenders and hood vents can be a good thing, these they are things I would have to think about long and hard. So believe me when I say that I was really not looking forward to dropping the tank just to swap the sending unit. This is compounded by the fact that in the future the only replacement for this is made by a manufacturer/distributor in whom I have very little faith. The sending unit itself requires about 5 minutes to swap if the tank is setting on a bench. The tank takes several hours to drop and reinstall. This is made even more fun by the laying on your back trying to avoid the little pockets of dirt that are in every cranny that can be positioned over your face.

this is the sending unit as mounted in the poly tank. Six sheet metal screws, two wires and two hose clamps.

there is a flat place in the back floor of my CJ5 that is very close to directly over the sending unit. I suspect that an access panel may have been used in some incarnation of the CJ. I say it is close and I guess close is a relative term, it's close enough to work. I am wondering if the original steel tank was any closer to the center of this area. Here I have laid out the area I an going to remove.

I like round corners, they are not as likely to have sharp edges and they are less prone to stress cracking and I think it makes it look like you have a clue what your doing, in this case it will make it easier to put a gasket on the edge . I would like to avoid having mud and water find their way into the back, sometimes I carry things that I would like kept dry and clean.

Now it's just a game of connect the dots. If your using a saber/jig saw be aware of how long the blade is, it would be very easy to saw off a fuel line. This may not be the perfect job to try the new plasma cutter and abrasive cut off wheels may require a lot of wet rags in the hole.

this is a straight down shot to show how "close" the sending unit is to the right place. You may ask why I didn't just move the hole toward the rear. answer being that there are a couple of reinforcement channel/angle structures that you would be cutting into. I decided that was not a good idea.
Now I have a working fuel gauge and easy access to the sending unit. Now all that I need is a polished stainless cover and some edge molding and this is a dun deal.
On a related subject, when the TBI becomes a reality I am thinking about an aluminum or maybe stainless fuel tank with a JK sending unit with in tank pump. I have always thought in tank pumps were a very bad idea when it came time to replace one but I can't say I am all in favor of a pump mounted to a frame rail either. If I build the tank I can put the sending unit/fuel pump right under the access panel.
Ordinarily I am not a big fan of cutting on CJ bodies. Although cutting fenders and hood vents can be a good thing, these they are things I would have to think about long and hard. So believe me when I say that I was really not looking forward to dropping the tank just to swap the sending unit. This is compounded by the fact that in the future the only replacement for this is made by a manufacturer/distributor in whom I have very little faith. The sending unit itself requires about 5 minutes to swap if the tank is setting on a bench. The tank takes several hours to drop and reinstall. This is made even more fun by the laying on your back trying to avoid the little pockets of dirt that are in every cranny that can be positioned over your face.
this is the sending unit as mounted in the poly tank. Six sheet metal screws, two wires and two hose clamps.
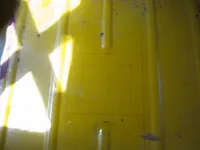
there is a flat place in the back floor of my CJ5 that is very close to directly over the sending unit. I suspect that an access panel may have been used in some incarnation of the CJ. I say it is close and I guess close is a relative term, it's close enough to work. I am wondering if the original steel tank was any closer to the center of this area. Here I have laid out the area I an going to remove.
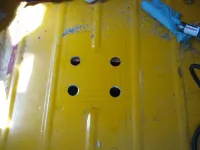
I like round corners, they are not as likely to have sharp edges and they are less prone to stress cracking and I think it makes it look like you have a clue what your doing, in this case it will make it easier to put a gasket on the edge . I would like to avoid having mud and water find their way into the back, sometimes I carry things that I would like kept dry and clean.
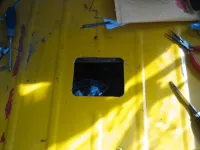
Now it's just a game of connect the dots. If your using a saber/jig saw be aware of how long the blade is, it would be very easy to saw off a fuel line. This may not be the perfect job to try the new plasma cutter and abrasive cut off wheels may require a lot of wet rags in the hole.
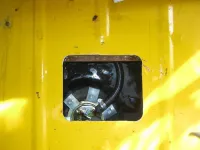
this is a straight down shot to show how "close" the sending unit is to the right place. You may ask why I didn't just move the hole toward the rear. answer being that there are a couple of reinforcement channel/angle structures that you would be cutting into. I decided that was not a good idea.
Now I have a working fuel gauge and easy access to the sending unit. Now all that I need is a polished stainless cover and some edge molding and this is a dun deal.
On a related subject, when the TBI becomes a reality I am thinking about an aluminum or maybe stainless fuel tank with a JK sending unit with in tank pump. I have always thought in tank pumps were a very bad idea when it came time to replace one but I can't say I am all in favor of a pump mounted to a frame rail either. If I build the tank I can put the sending unit/fuel pump right under the access panel.


