Is my frame modified or is this original

Is my frame modified or is this original

FiNorman

Senior Jeeper
Lifetime Supporter
Posts
589
Thanks
0
Location
Orlando, FL
Vehicle(s)
1985 CJ7, AMC 360, lunati cam, AX15, Affordable Fuel Injection, edelbrock performer manifold, 21 gallon fuel tank, Old Man Emu 2.5 inch lift, 1 inch body lift, tie rod flip, HMMWV H1 steering box, rear disc brake conversion, Dana 44 rear, YJ to CJ tub conversion, still working on 33 inch tires, Metallic dark blue paint.

Scrambler Project, cosmetically taking it back to the 80's- 1984 Scrambler, Laredo. 258cc, Holley Sniper EFI, 30in tires on Laredo polished wheels, Dana 44 rear, OME 2.5 YJ springs/lift, HMMWV steering box

Previously owned cj 7, 1979, Renegade, 258 and a '89 wrangler
We ran into a little problem that maybe someone can give me advice on. I ordered an Old Man Emu suspension with the new shackle hangers. As attempted to fit the new shackle hangers on I couldn't quite figure out how to make them fit. They didn't seem to fit any of the existing holes. As I inspected the front of the frame where the bumper goes it occurred to me that there are a couple of pieces of metal that I'm starting to think don't belong there, like they were attached by the PO to fit the oversized bumper that was on the jeep. Can someone please look at this and tell me if this is an aftermarket bracket that I can cut off to get the hangers to fit or are is this the way everyones frame is?

The second problem I have is more of a question. While I was prepping the frame for painting I laid it flat on my drive way and noticed the 4 points of contact, being the 4 internal shackle hangers do not touch the ground evenly. Sort of like when you have a table that has one leg too short and it moves, so you stuff a napkin underneath to even it out. It is off by about and inch or inch and a half. Does this mean the frame is bent and should I take it to a body shop to have them attempt to straighten in or is a certain amount of play acceptable.

Read more: http://www.jeep-cj.com/forums/f98/father-son-project-orlando-15078/index6.html#ixzz25YciwS8z
 
Thats some add on stuff.
 
So I should be able to cut off the welds and end up with an original frame...thanks for the quick reply, I was getting really frustrated trying to figure out how to make it work.
 
Yup just run you a cut off wheel on those welds a little at a time and pry them off.
 
That looks like an aftermarket 3 pc. winch mount, but just the side pieces. Some folks say that you should remove the frame rivet and move the shackle hanger forward 1/2" using that hole, due to the Old Man Emu springs being 1" longer than CJ springs. Assuming they are springs for a wrangler YJ since that's all that is offered anymore. Are you doing the conversion or are these old springs from when they did offer Jeep CJ springs? If your shackles are longer than stock (3" centers) than you may not have to move it forward.

As for the frame, it seems to be tweaked a bit if it's an 1 1/2" difference. A half inch would be no big deal. Spin the frame 180 degrees to make sure it's not the surface your on that's un-even.

I bought and just had delivered the entire set of new OME springs, shocks, bushings, shackles, spring axle plates, U bolts, shackle hangers, brake line extensions, 1" body lift and stainless swaybar disconnects... I figured I needed the new hangers because the YJ springs are a little wider than the CJ. I was a little surprised when the order arrived in about 7 different deliveries with no instructions on what when where. I guess I will work on it to figure it out but a picture would have been nice.

There are two different sizes of shackles, two different shackle hangers, I can't tell which way the springs are supposed to face and which is front and back. If anyone has a picture of their OME setup it would be a tremendous help.
thanks again
 
Who put the package together? Was it a Qtec package? Was this a "conversion" package or just a lift kit for a wrangler? The springs should have a large + mark on one end. This goes to the stationary end (the rear of the front and the front of the rear). The shackles should be the same, both for 2 1/2" wide springs and 3" bolt hole centers.
Can you post up a picture of the parts?

It was from Rocky Road Jeep CJ OME lift
I will get better pictures tonight of all the components.
thanks again
 
That looks like an aftermarket 3 pc. winch mount, but just the side pieces.

As for the frame, it seems to be tweaked a bit if it's an 1 1/2" difference. A half inch would be no big deal. Spin the frame 180 degrees to make sure it's not the surface your on that's un-even.

:agree:
 
Who put the package together? Was it a Qtec package? Was this a "conversion" package or just a lift kit for a wrangler? The springs should have a large + mark on one end. This goes to the stationary end (the rear of the front and the front of the rear). The shackles should be the same, both for 2 1/2" wide springs and 3" bolt hole centers.
Can you post up a picture of the parts?

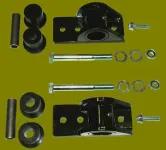
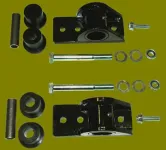
So here are the pictures. The body mount I have figured out because it came in a box marked "body lift".
I'm not sure which shackle hangers go to the front and which is right and left. (I didn't picture one of the hangers in the second pic because it's identical to the one pictured.

there are also hangers that are a different size. I think the bag of bolts is the bushings for the hangers and the smaller bag are the bolts to attach the hangers. If someone can confirm this please do.

Am I missing something?
 
springs.... the first two are identical and the second two are identical, turned on their side. I didn't include the U bolts in the picture but I do have them. Am I missing something?
thx
 
Well let me see if I can help some. I'm not real familiar with Rocky Roads kit because I've never heard anything good about it, but I have no personal experience with it either.
These would be your rear shackle hangers.
cj_shacklemount_med.jpg

Your second picture then shows your front ones. My guess is the vertical tab to the one side goes to the outside of the frame. But your steering box mount is going to determine that, if it's in the way.

They claim it's a 3-3.5" lift, yet the OME springs are only 2.5" lift springs. I can't read the numbers because of the sticker but they say CS0??. I have the CS036 springs which are the YJ rear, heavy load springs and I'm using them at all 4 corners because of my hardtop and winch/bumper. My point is the additional lift height they claim must be coming from their shackles, because they are longer than stock, which have 3" center to center bolt holes. But personally I don't care for any shackle beyond stock that doesn't have a steel block welded between the shackle side to prevent racking and keep the sides parallel. Shackles do 2 things, they provide a pivot point to allow leaf springs to flex (actually to get longer and shorter), and they keep your axles position located properly, in reference to the rear wheels and frame. Slight movement for off camber surfaces is provided by the bushings at all these connections. If the shackle sides are not kept parallel this allows much more movement, which translates to a loose front end and steering geometry issues. If you look at the stock shackles you'll see the studs are welded to the one side and the studs have shoulders that the other sides plate rests against when bolted together. That keeps everything parallel, bolts and sides.
Now the difference in length could be to compensate for the front shackle hanger, which looks to hang lower than stock or other aftermarket hangers do. So I'm thinking the shorter shackle goes in front.

As for the spring plates. In your picture starting in the upper right corner. It's slotted, as is the lower left. They'd be the rear ones and should be identical to the ones on it now, unless they're skid plates which I don't think they are. The lower right plate is the passenger side front due to it's 2 holes that are wider than the rest. This is for the one larger sized u-bolt which goes over the axle housing on the Dana 30 CJ axle. The other bolts only go over the axle tubes. Which leaves the upper left for the drivers side front. But I did notice the bottom stud for the sway bar would then be to the rear. My 82 sway bar, and I believe yours as well, mounts to the front of the plate. The rear holes would be for the old style shock mounts prior to the wide axles in 82.

I would definitely call that company and demand some installation instructions. And let us know how the installation does go.
 
I got them to email me these instructions today, not very detailed and the pictures that came with them are very difficult to see.

Doesn't address which direction the rear shackle hangers go and where the longer hangers go...

Once I get the disc brake issue hashed out I will give it a whirl.


Jeep CJ Spring Hanger, 1976 and up
Thank you for your Rocky Road,llc purchase! We value your business and appreciate any input you might have on this product and/or its installation. Read these instructions thoroughly before beginning installation. If you ever have any questions on this or other modifications to your 4WD vehicles, please do not hesitate to give us a call, 435-654-1149 or email… gwbuild@ rocky-road.com

Place a floor jack under rear differential and raise vehicle until the tires are about a foot off the ground.
Place jack stands under frame in front of the rear springs. Now lower jack, you want to have your suspension hanging so that your tires are about an inch or two off the ground.


With vehicle properly supported pick a side to start on & place jack under axle on that side, now slightly jack up axle so it is supported. Remove the bolt that goes through the shackle and the factory spring hanger. If you need to lower the axle so you have room to work you may do so at this time.
Remove factory bolts holding stock spring hanger in place.(Bolts are re-used, remove with care! They can be rusty, we recommend soaking them with penetrating oil several days before installation. Be careful not to break any of the bolts, or it’s a whole bad can of worms to deal with!). With the factory hanger removed time to mount the heavy duty replacement. The new hanger basically just bolts back in the stock location. The extra hole in the front of hanger gets the 3/8 self threading bolt provided in kit, For this you will need to drill a 5/16 hole in the bottom of your frame. Make sure you drill a clean straight hole (do not wobble drill or enlarge the holes, or self-threading bolts will not work properly!)
When installing self threading bolts you may have to tap the head of the bolt with a hammer while turning to get the bolts to catch and thread in. Also be careful not to over tighten these bolts and strip out the new threads. Our spring hanger comes with new hardware to mount shackles. Depending on the shackles you have, you may have to drill out the upper hole on your shackle to a 14mm or 9/16 for our hardware to work. (you must use our hardware )
Repeat on other side. Grease bushings via grease zerks, Also coat the outside of bushings with grease ( polyurethane bushings should be greased with a synthetic lithium based grease(SUPERLUBE), lubrathane with Teflon, or a quality moly lube. Also coat the 14mm bolt with grease or anti-seize.
Photo shows properly installed greaseable shackle mount.


CJ OME spring conversion lift kit

Thank you for your Rocky Road,llc purchase! We value your business and appreciate any input you might have on this product and/or its installation. Your OME conversion kit is one of the best off-road mods you can make to your CJ. Read these instructions thoroughly before beginning installation. If you ever have any questions on this or other modifications to your 4WD vehicles, please do not hesitate to call us.
This suspension is an off-road suspension system. Modification of vehicles for off-road use, especially suspension modification & oversized tires, will affect the center-of-gravity & steering or handling of your vehicle. By the sale of these products, we are neither recommending that you modify your vehicle, nor are we assuming any responsibility for the consequences of such modifications. Summit Off-road llc/Rocky Road Outfitters, has no control of how these component parts are installed or utilized in the operation of a vehicle on which they are installed. We, therefore assume no liability for any circumstances connected with their use. The purchaser of these parts should be aware that he or she acquires, installs and utilizes these parts at his or her own risk, and agrees not to hold Rocky Road Outfitters/Summit Off-road llc, responsible. By installation of our products, you are agreeing to the above. This suspension system should be installed by those 4 wheelers experienced enough to be able to perform their own mild level of fabrication, or a professional installation shop. Particular interest should be paid to such systems as brake lines, steering, shocks, drive lines, & other components which may be affected by large amounts of wheel travel.
This kit is for spring under applications. For the rear you will just be replacing your stock springs with the OME lifted springs.


STEP1:
Place jack under rear axle and raise vehicle until tires are about a foot off the ground. Then support frame with jack stands and leave jack under axle so you can move axle up and down as needed to remove and replace springs. Remove tires, then remove springs (with a bolt on each end and Ubolts at the axle). Also remove shackles.

STEP2:
The rear springs require no adaptor brackets. Install new OME springs with new shackles and new u-bolt skid plates as pictured above.

STEP3:
Install the rocky road 804 shocks in the rear or the OME N34L.
Torque all bolts to factory specs. Double check all your hardware for proper tightness. Replace rear tires, remove jack stands and lower vehicle. Now for the front

STEP4:
Place jack under front axle and raise jeep so the tires are about a foot off the ground. Support frame with jack stands. Remove front wheels, shocks, and disconnect your sway bar links. Unbolt and remove stock front springs from the Jeep. Save all nuts, bolts, hardware.

STEP5:
Remove stock spring hangers and replace with the new spring hanger and hardware. YOU WILL BE REUSING THE STOCK HARDWARE AND MOUNTING LOCATIONS SO BE VERY CAREFUL REMOVING THE STOCK BOLTS, THEY CAN BE RUSTED AND HARD TO GET OUT. SOAK WITH A GOOD PENETRATING LUBE FOR SEVERAL DAYS BEFORE ATTEMPTING INSTALL IF YOUR BOLTS LOOK LIKE THEY COULD BE RUSTY/STICKY.
STEP6:
With the stock hangers removed, hold new hangers in position with the stock mounting holes and mark the hole in the front for the extra bolt. Remove bracket and drill ½” hole. Now install bracket using stock bolts in the stock location. Install the ½”x 1.25” (BOLT B) bolt from the kit in the new hole. Insert bolt with washer from top and use the thin ½” nylock with washer inside bracket. Use the ½”x 1.5” (BOLT A) bolt, washers, and nylock on the side of bracket thru the frame

STEP7:
With new YJ conversion hangers installed, you can now install shackles and YJ springs. If you have a spring under and have rocky road’s u-bolt skid plates then make sure you have the plates oriented properly ( they are side specific) the sway bar mount is the one that sticks out and should be in front and facing out toward tire. The shock mount is in the rear and depending on your year and model of CJ, It may or may not be used. Some CJ’s have the shock mount on the axle and some are studs coming off the u-bolt plate. You will have to check your suspension travel to determine which setup you should use (use the axle mount if you have it!)
STEP8:
Install brake line extensions and bleed brakes as per vehicle service manual.
STEP9:
Pictured above. Install Transfer Case lowering kit. To do this simply place jack under Transfer Case remove hardware and lower Transfer Case until you can slide spacers between frame and cross member. Use new hardware from kit and tighten.

You will need to get a professional alignment after performing lift. Double check all hardware (especially the u-bolts) after the first off road adventure or the first couple hundred miles, whichever comes first, and as routine maintenance after that. Custom shims are available if you need to adjust pinion angle. We offer a few different length shackles to adjust ride height if necessary. You may also want our rear heavy duty spring hanger, for the ultimate Bolton setup on the market today!!
[/COLOR]
 
"Doesn't address which direction the rear shackle hangers go and where the longer hangers go..."

I'd say the rear hangers go with the 2 holes towards the rear, 1 to the front. Take your front hangers and hold them along side your existing front hangers on the Jeep and I'm betting the bushing tube hangs a bit lower. Do the same with the back too. Whichever new mount hangs the lowest probably gets the shorter shackle plates.

Thank you... I will get that metal cut off the frame and mounted get some pictures this weekend... thanks for all your help
 
This is likely the first time during this entire build that something has taken me less time than I thought it would... I cut a little into the weld, tapped it with a hammer and it fell to the floor. The hanger fits perfectly into the slot... now if I could just find the bolts that attach the hanger.

Should I also get the hangers welded once I put the bolts in?
 
cj_shacklemount_med.jpg

Your second picture then shows your front ones. My guess is the vertical tab to the one side goes to the outside of the frame. But your steering box mount is going to determine that, if it's in the way.

They claim it's a 3-3.5" lift, yet the OME springs are only 2.5" lift springs. I can't read the numbers because of the sticker but they say CS0??. I have the CS036 springs which are the YJ rear, heavy load springs and I'm using them at all 4 corners because of my hardtop and winch/bumper. .

I got a better picture of the springs, thanks for your help I think your clues are getting me there.... 4 leaf springs in the front, six leaf springs in the rear. The plus points to the middle of the vehicle.
 
I wouldn't worry about welding those hangers on, the bolts should be enough, provided they are grade 8 bolts. Use some anti-sieze compound on your bolt threads, you'll thank yourself in the future.
I'll tell you who could help you on matters of the springs. Call ARB and ask for TR. He's the OME guy there. arbusa.com Toll Free: (866) 293-9078

thanks again... I feel much better about this now.
 
Your Welcome.
Btw, your CS037R springs are light load rear yj springs and the CS014F are heavy load fronts for a yj. (type in those numbers on Quadratec's website) I'll assume you don't use a hardtop and that's why they gave you light rears. Both are 2.5" lift springs so anything additional is coming from your shackles and mounts.
 

Jeep-CJ Donation Drive

Help support Jeep-CJ.com by making a donation.

Help support Jeep-CJ.com by making a donation.
Goal
$200.00
Earned
$25.00
This donation drive ends in
Back
Top Bottom