• Hello Guest, we are proud to now have our Wiki online that is completely compiled and written by our members. Feel free to browse our Jeep-CJ Wiki or click on any orange keyword when looking at posts in the forum.

1" Body Lift concerns

1" Body Lift concerns

gadawg31

Jeeper
Posts
111
Media
5
Thanks
0
Location
GA
Vehicle(s)
1979 CJ-5
258cu in 6cyl
T-150 3 speed Transmission
Dana 20 Transfer case
Dana 30 Front axle (almost 100%)
Fiberglass Tub
Ok, just recevied the Daystar 1" body mount lift kit and I am a little puzzled on one area. All of the body mount points are self explanatory; however it does not look like there is anything in this kit that will raise the radiator/front piece. Has anyone used this type of a kit and if so, how did you raise the front so it doesn't droop/slope down. If I don't raise the front piece, then the hood and fenders will be lower. Hopefully I am missing something very simple. Any ideas. Thanks.

JD
 
I'll have to check my kit, which is still in the box. It's the new mounts with 1" added to them. There should be a larger 7/16" bolt with a different mount included for the front grille location. This is one of the only kits that include a new sleeve and washer for the front grille mount I believe. You need to re-use the old one for the rest (or find a new one). But then again mine is for an 82 CJ7 also.
I'm not sure if this is the part number you have but it shows having one included. I would call them if it's not in there.
http://www.daystarweb.com/attachments/instructions/JEEP INSTRUCTIONS/KJ04503BK.pdf
 
Thanks PaRenegade. I have not gotten mine yet, but from looking at the pictures, it didn't look like anything was in there for the grill area. I just wanted to put some feelers out to see if anyone had already run into this problem. I'll let you know as soon as it comes in. Should have it today or tomorrow.

JD

The only reason you'd need to lower the radiator after the BL is if the fan is into the shroud. Usually the stock shroud has enough clearance to accomodate 1".

If not, just go to the HW store and buy a strip of sheet metal, cut it into 2" pieces, drill two holes in each one, and use that to lower the radiator accordingly. Or you can just redrill the grille too.
 
The only reason you'd need to lower the radiator after the BL is if the fan is into the shroud. Usually the stock shroud has enough clearance to accomodate 1".

jdarg, I don't need to lower my grill/radiator. I was asking if anyone had every used this product, since I didn't see anything in the picture that would raise my grill/radiator. If I raise the body 1" all the way around, it would seem that I would need to raise the grill/radiator as well. I got the kit in on Friday and was not able to open it until last night. I will just have to see how the pieces turn out. Thanks.

JD

Gotcha. Then there should be an uneven number of spacers in the kit then, 11 IIRC. I've never seen a BL kit that didn't include a spacer for the grille - its a "must have".
 
I believe it does. I went thru the kit over the weekend and the instructions are very weak. There are 10 spacers, two of them have a metal spacer already on them and the other eight appear to be the same size. Then there is one odd ball spacer, which I presume is the grille. I am a little dissappointed in the quality of work for this kit. Eight of the spacers have metal sleeves and when you place the sleeves in the spacer, they are some what smaller and wiggle a lot inside the hole. I would think that they should be a snug fit, but this is the first kit I have ever purchased. We will see this weekend how it all works out. I hope to get the body down sometime this weekend. I let you all know how it fits. Thanks for the feedback.

JD
 
I wouldn't worry about the wiggle room. It's there on purpose for adjustment, just as the captured nuts on the body are. No two Jeeps are the same. The frame has a hole that holds the spacers in one spot. The body nuts would have to line up perfectly if the bolts were stationary too (snug fit). The large washers spread the load to the mount even if the bolt is off center.
 
That makes sense, thanks for the nugget.

JD
 
Any updates on this? Just getting ready to install one on the wife's Jeep. There is a separate bolt and bushing for the front mount in this one!
I'll be out there today. Soaked everything in PB Blaster last night.
 
Well as expected the bolts are breaking and/or just spinning. I have some access to some of them, but the one that broke off in the rear has no access. Any ideas? I'm about to break out the cutting torch! :eek: No, not really. I knew this was going to be an issue and the reason I'm not using any air tools. But it doesn't appear to matter! :(
 
Can you send a picture? This sounds like quite a time consuming job. I think you should go ahead with the body lift though.
 
Here are some pics Torx.
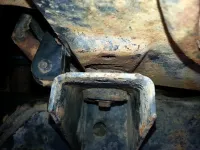
What I was working with...
20140204_092321.webp

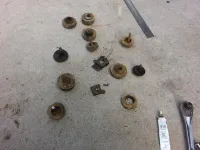
The carnage...
20140204_115845.webp

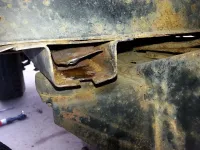
One that broke off and spinning...
20140204_102739.webp

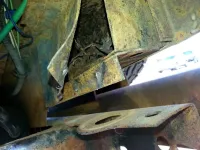
Here was the one in the rear. I was going to cut the sheet metal, then decided on the air chisel. :)
20140204_115754.webp

In the carnage photo you can see my tube of copper anti-seize and my flat stock to replace the ones that broke off.
Too late to look back now! :D
 
the ones in the very back broke loose on mine too and I peeled open the pannel about like you did. The blind ones in the bed, I used a 1" hole say from the top. be very careful where you drill so you are as close to the "nut" as possible then you can soak them in PBB or remove them altogether and replace them with a nut and flat washer. when you are done you can plug the hole with an electrical panel cap.:D

If you cut them off a bit below the body mount you can remove the rubber and spray the nut, you will have a much better chance of getting it loose with vice grip.:cool:
 
Thanks IO. I like the idea of the hole from the top thing.
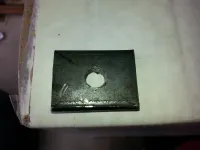
I got them out and made my own...
20140204_124023.webp
I made them bigger than the originals so hopefully they can grab on better without spinning! :)
Here it is installed
20140204_124716.webp

As for the height, 1"? What were the originals before the decomposing? lol These things look huge in height.
 
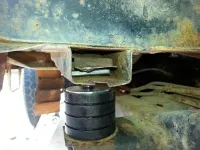
Thanks for sending those pics. The way I have mine is done by leaving in the rubber spacers and adding in a 1" puck. The way you have it shown, There is no shock absorbing as with those pads whether rubber of neopreme. On mine in that location, I installed an aluminum spacer in the channel as mine had collapsed. It does appear you are on your way to making it work. I would like to send in a pic, but I just got a windows 8 setup and am still figuring things out.
 
Thanks for sending those pics. The way I have mine is done by leaving in the rubber spacers and adding in a 1" puck. The way you have it shown, There is no shock absorbing as with those pads whether rubber of neopreme. On mine in that location, I installed an aluminum spacer in the channel as mine had collapsed. It does appear you are on your way to making it work. I would like to send in a pic, but I just got a windows 8 setup and am still figuring things out.

Thanks Torx.
I know all about the Windows 8 thing. No one likes it. I'm getting it, slowly though.
The passenger side was no problem! :) They all came out without issue. I will post a pic of the front mount though. It appears the front of the grill is bowed out and needs to be pushed back in for me to get the holes to line up. There is also a weld that broke... if it was actually suppose to be welded. :eek: I'll get the pic up tomorrow and maybe someone can steer me in the right direction as to what I'm looking at.
 
I had the same issue and I just went to the hardware store and bought a couple rubber washers and made a homemade body bushing. It's never failed and is essentially the same thing but mine cost $2, a fraction of the cost for new ones.
 

Jeep-CJ Donation Drive

Help support Jeep-CJ.com by making a contribution.

Help support Jeep-CJ.com by making a contribution.
Goal
$200.00
Earned
$60.00
This donation drive ends in
0 hours, 0 minutes, 0 seconds
  30.0%
Back
Top Bottom