• Hello Guest, we are proud to now have our Wiki online that is completely compiled and written by our members. Feel free to browse our Jeep-CJ Wiki or click on any orange keyword when looking at posts in the forum.

Driveline popping/binding sound with video

Driveline popping/binding sound with video
I can certainly try that, if I can find something the right diameter. That snap ring is about 3 inches in diameter. I was pretty spent when I tried it last. You know a nights sleep can sometimes fix problems. I haven't tried it since then. I'll let you know.
 
Pull outwards on the shaft while you try to seat'n that ring on.
Good luck!

LG
 
Just a quick update. Having a bit of difficulty getting the pinion cage back on the reduction side. That snap ring is up on there but can't get it fall into the groove and lock it on. Like there isn't enough room. I had to take break and hopefully get it on sometime soon. I'm heading out of town for a week on Friday, so might be weekend of 12/10 before I can work on it again.

Thanks for all the advice and I'll post results once I can test drive it.

OUTPUT SHAFT COUPLER


If you do not have a reduction unit, you will have an output shaft coupler.

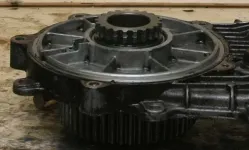
1_zps0mhohbnm.webp

The sprocket gear protrudes like this.

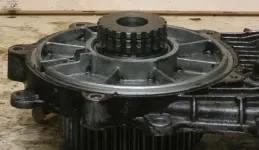
2_zpsybfj0vmj.webp

Place the output shaft gear on top of the drive sprocket. Line up the gears.

Note the snap ring groove in the sprocket drive gear.

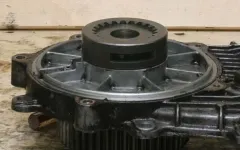
3_zpsyrbe3rgd.webp

Place the coupler (with the snap ring inside!) on top and slide it down so that it mates completely

with the sprocket gear. The snap ring should set into the groove. Install the cover now to protect the assembly. You can also pull up on the coupler gear with a screw driver if needed.

Hope this helps some. Keep at it, you're almost home.
 
Thank PB. I DO have the reduction unit, so there is that pinion cage that fits over the sprocket and locks into that grove that the reduction side sprocket has. Same one you're referring to, just the cage assembly instead of the coupler.

Here are some pics. Not very good ones, but you can see what I'm talking about.

1st pic - rear cover installed, ready to pinion cage assembly installation
2nd pic - close up of pinion cage assembly with snap ring laying there staring at me
3rd pic - the pinion cage before I removed the snap ring
4th pic - A picture of the gear showing the groove that the snap ring fits into.

I know you know all this PB, but in case anyone is reading and isn't sure what I'm referring to.

I can get that snap ring up on the gear and it alllllllmost wants to slide into that groove. I'm pretty sure it will go eventually just not much play to work with. I've lightly tapped the pinion cage with a rubber mallet so I'm fairly sure it is seated all the way as far as it will go making the most room for the ring to fall into the groove. If I find any tips for getting it in there I'll post.
 
I see. You've already have the above done. You're trying to attach the Pinion Cage. This side is attached to the Transmission . You may need to adjust you jack and the level of the Transfer Case to get extra room. You can try to lift it as much as possible with a screw driver, just be careful. I never had a problem getting the pinion cage on. What you are actually working with is the rear Transmission shaft. I would suggest putting the Transmission in neutral, remove the rear cap on the low range unit so that you can turn the inner workings to line all the gears up easier.
 
Last edited:
Hey Guys,

I just wanted to post an update. It's not much of an update, since I have been out of town the last couple weeks. I had some time to take another look at the pinion cage install last night and I got it on there in about 5 mins. Amazing what taking a break does and looking at a problem with fresh eyes.

I was able to pull the reduction gear side out a little. There was about 1/4" of play from front to back and it just happened to be exactly the width of the groove that snap ring needed to seat. So once I was able to get the gear extended as far as possible towards the rear I was able to slide the pinion cage onto the gear and pull out on the gear at the same time. So as you can imagine that gave me just enough room to get that snap ring to seat. I was pushing both in last time and that was just enough to cover the groove that snap ring needed to have exposed.

So anyway, pinion cage is on, reduction unit is back on. Getting the reduction unit back on was a little tricky, but by turning the rear driveshaft output yoke at the same time I was able to get the gears to mesh and eventually got it slid on there completely. I've gotten everything back on, and the low range shifter seems to work properly and it shifts as expected.

I'm ready to reattach the rear driveshaft and put fluids in and give it a test. I think I will get all 4 wheels off of the ground for starters and test in 2wd first with an idle to make sure everything seems to be turning properly without binding. Then I will test the 4wd engagement switch and make sure the front axle turns as expected. Then I'll test the 4wd low range and make sure the reduction unit shifts as expected.

If all looks good I'll road test and report back on the popping noise under a load. Hopefully it doesn't pop and slip and we're on to the next, more fun projects like getting it trail ready with suspension upgrades, etc. Will probably do testing Friday so I'll have more information then.

Sorry for the long, uneventful post but didn't want you guys to think I abandoned the thread after all the help I've received.

talk to you soon.
 
Thank you for letting us know.
Best of luck!
LG
 
Glad you got it back together. Let us know if that resolve all of the problems? Great Job!
 
Soooo... of all the stupid things holding me up from a test drive is putting fluid back into the Transfer Case . The reduction unit has a separate fill plug and it fairly easy enough to get to , but the main body of the case has a larger, hard to get to fill plug.

I decided to button everything back up before I put fluid in the TC, mainly because I was concerned about the angle the case was dropped down to while I was working on it. So, I reinstalled the crossmember/skid plate and bolted it all back up and now I can't get to the fill plug of the TC very easily. I'm thinking I'm going to have to resort to trying to find a female pipe plug socket large enough to fit that fill plug.

For those that don't know, it's a large square headed pipe thread plug. It would need a female socket and with the crossmember installed, which is what supports the weight of the TC and Transmission , there isn't enough room to get an adjustable wrench on there on it. Honestly, it's right beside the reduction unit and there might not even be enough room to turn the plug all the way so you can remove it.

PB or anyone with a QT TC... is that what you had to do to remove fill plug? I might could create a bunch of work for myself by dropping crossmember back down and unmounting TC and Transmission from that crossmember and trying to get a cresent wrench on it, but I'm not sure it's worth the risk or going through all of that and then still needing a pipe plug socket.

Pic from the manual of the location if case you're not familiar with it.
 
Do you have a crowfoot wrench that will fit?
LG
 
I don't have any of those, but that's a dang good idea and probably easier to find that a square pipe plug socket. Thanks for the idea! I might swing by advance today and see if I can find one that is the correct size.
 
I've had this set for almost 45 yrs.
Sears.com

LG
 
I have the same set as well.

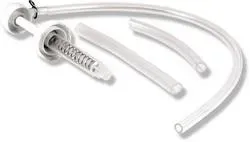
Filling made easy,
37905_700x700.jpg


For the trails, or when your away from home.

w1139.webp
 
Last edited:
A 12 point socket will work also. The device POSI showed you works good when you buy the right size container for it to fit. There are several different but same idea items to use. All gear boxes are hard to fill. You definitely need some type of pump. Here is a similar device from Amazon: https://www.amazon.com/Plews-55001-Lubrimatic-Standard-Bottles/dp/B000BQW5LK

Almost anything with a long hose attached to it that will push heavy fluids will work. You may also need it for the axles, depending on how much room you have. Lets get this thing fired up and running. I want to see if you actually fixed the initial problem.
 
I use the type Peanut Butter and the bottom one Posi listed. They come for the large gallon containers and for the quart size. Be careful to get the right one for your needs. I made the mistake of getting the bigger one, it worked, but when the store opened the next day I was glad to get the right size too. You don't have to rely on Amazon for it though they are generally available at your local auto parts supplier. (sorry for the minor rant that follows) Buy local if you can, it's good for your local buisnesses and some of your taxes will stay to keep your local town, village, town or city going. Everybody complains about potholes in the roads, but it seems like nobody wants to pay for them to be repaired.
 
hey guys, sorry for the late response! with Christmas and some of the usual crazy family :dung: that follows I'm back on it! I ended picking up a set of craftsman "multi use sockets" and the 3/4" size with a long extension took it right off. yes, I actually drove down to the local sears and bought it, after calling several local shops asking for recommendations on where to find a pipe plug socket.

PB... thanks for the link, I bought the exact same one. fits inside the quart container and works great. I'm pumped with fluids at this point, which I have to say was a larger obstacle than I expected.

road test tomorrow! my wife would kick my *** if I fired that jeep up and took off in the snow of Colorado right now.

I'm posting pics of the socket I used. PB already put a link to the pump I used, and it worked great. I recommend it, expecially something the fits into the container you're pumping from.

fingers crossed that the popping is gone and replaced by a quiet smooth running and shifting TC!

here's the socket. I got a 12piece, each of SAE and metric including the wrench, 1/2" drive for $45. worth it IMO in case it comes in handy next time I need a weird socket.
 
here are the pics, and a shameless pic of the jeep, as well as my next project.

rubicon express 4.5" lift w/o TC drop... which will prob mean longer shafts and some caster angle adjustments. not sure if there is even a market for the upgrade on this sute, but I plan to start a new thread for the upgrade just to document it and hopefully post good information and measurements for anyone else considering the same upgrade.
 
here are the pics, and a shameless pic of the jeep
I plan to start a new thread for the upgrade


That a good looking Jeep. :D The underside was very clean too. ;) I think you have a very good starting point. From here you can make it the Jeep that you want. :) I'm looking forward to further updates in a build thread. :popcorn: When you start your build thread you'll need pictures of the inside and of the motor too. Good luck, you can feel proud that you've crossed a few big hurdles already. :chug:
 
Never seen Craftsman sockets like that. Mine are 8 point for sq bolts etc.
LG
 
Sears tools aren't what they used to be. Lots of different options. And the prices aren't what they used to be. I picked up a couple tool sets a couple weeks ago and paid far less than expected. Hope they are decent. Originally I was just going to pick up a couple wrenches I was needing for my "Professional" tool set. Nope, they don't make that EXCELLENT Snap-On quality tool anymore. Errrrrrr! Like the ratchet set I got though.

Hope your troubles are over and you can play with confidence.
 

Jeep-CJ Donation Drive

Help support Jeep-CJ.com by making a contribution.

Help support Jeep-CJ.com by making a contribution.
Goal
$200.00
Earned
$25.00
This donation drive ends in
0 hours, 0 minutes, 0 seconds
  12.5%
Back
Top Bottom