Build Thread Mike's 1986 CJ7 (Mid Year) Rebuild

Build Thread Mike's 1986 CJ7 (Mid Year) Rebuild
I'm gonna hafta do this just so I can have a melted butt seam - sound cool!!

I can't take credit; God was first with the melted butt seam…
 
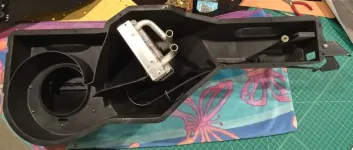
Working on rebuilding the entire heater system. I've got the lower unit ready to reassemble. I'm still thinking of sealing up the cowl vent. After looking at it, the only thing the upper heater unit does is send fresh air to the lower heater unit, provide a cable linkage to the fresh/recirc air damper, and drain off the rain water. It also sends water behind my dash and onto my feet.

I don't have a top or doors so all of the intake can be had through the recirculating air intake vent below the glove box.

The plan is to rebuild the upper heater unit, lube/repair the cable linkage, and make a new water seal at the cowl. I want it to operate as it did originally. Then I'll cut a piece of black Kydex to fit inside the cowl grille cover and seal the assembly down to the cowl with some weather stripping. This way I can always go back to the original operation.

Side Note: Since I won't need the window defrosters, I'm thinking of making some black Kydex deflectors that will mount somehow to the existing defrost ducts to redirect heat to the driver and passenger.
 
Last edited:
Side Note: Since I won't need the window defrosters, I'm thinking of making some black Kydex deflectors that will mount somehow to the existing defrost ducts to redirect heat to the driver and passenger.

Curious why you don't need or use the defroster? I almost never use my top either, but because of year around humidity and sometime rain I get moisture in some of my gauges and the defroster dries them out in no time and I'm sure that's the reason they all work and are not Rusty. Just wondering.
 
Curious why you don't need or use the defroster? I almost never use my top either, but because of year around humidity and sometime rain I get moisture in some of my gauges and the defroster dries them out in no time and I'm sure that's the reason they all work and are not Rusty. Just wondering.

The flex duct that runs from the heater to the defrost plenum was rotten when I got the Jeep and was never reinstalled after painting. So I've never had a defroster and I've never had moisture in the gauges. We've driven in a few bad rainstorms too. Curious as to how the defroster dries out your gauges.

I do get rain oozing through the windshield seal… new glass and new seal and it is tight as a drum (no gaps that I can see). I've got water coming up from around the defroster ducts too… even though there is a new cowl seal. No idea how that is happening.
 
Must be the humidity down here, because it happens a lot. The metal dash gets very hot with the defroster on and it dries the gauges within 10-15 minutes. Mainly during very humid damp warm days going from a dry cooler garage to outside. I use the defroster a lot more here than the heater. Problem does not happen here in the winter because it is usually cool an dry vs the warm/humid times.
 
MDeluca - just read through your thread. Crikey is that Jeep beautiful. All that said, you have no business driving that puppy in the rain - hence, no need for defrosters!

Shopping for a CJ7 . Need your luck in finding a star.

Ray
 
MDeluca - just read through your thread. Crikey is that Jeep beautiful. All that said, you have no business driving that puppy in the rain - hence, no need for defrosters!

Shopping for a CJ7 . Need your luck in finding a star.

Ray
Thanks… Rain is okay… salt is not...
 
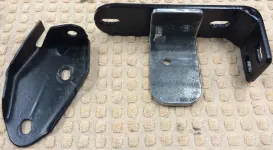
Rear bumpers have been a pain in the neck… finally got the passenger side tie-in bracket mounted. Had to grind the body mount washer to get it to fit. The frame bolts were too short.

Went to install the drivers side and encountered the tailpipe hanger bracket.

Decided to fab a new bracket out of some 1/4" steel angle. Tapped a hole in the tie-in bracket to replace the tang in the OEM bracket.

Painted it a couple of days ago and will mount it today.

Jeep_Bumper_05.jpg
 
Last edited:
So now the spare tire hits the bumper. Saw where a guy modified his spare tire rack and raised the spare tire mounting box by 1.5".

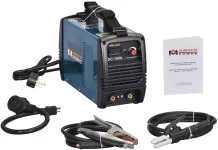
A good excuse to finally buy a welder (Amico DC-160A) I've had my eye on. I've got a cheap Harbor Freight MIG, but really want to use 7018 for the welds due to the stress resistance to cracking. Most of the bracketry back there is 1/8"… right at the thinnest you probably want to stick weld.

61nyp6DpYML._AC_SL1200_.jpg
 
Last edited:
Man that bumper looks good


Sent from my iPhone using Tapatalk
 
Looks great!!


Sent from my gas grille using Tapatalk
 
Working on heater rebuild…

  • Fan Motor: Napa BK 6551039
  • Spring: Ace #102
  • Foam: McMaster #86225K53 1/4" w/adhesive (24" square)
  • Foam: McMaster #86225K57 1" w/adhesive (24" square)
  • Rubber firewall washers: 20Pcs Heathkit Radio Cabinet Case Feet Riser Black Rubber Bumpers J9B4
  • Firewall Hole Saw: Irwin (mandrel type) 3 5/8" diameter
  • Metal Paint: Rustoleum Satin Black Professional
  • Plastic Housing Paint: Dupli-Color low gloss engine enamel (wipe with lacquer thinner first to promote bonding)
Here are some progress shots:

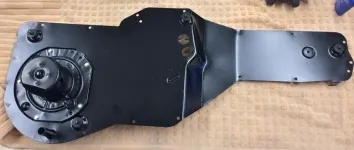
CJ7_Heater_Rebuild_31.jpg
Lower heater box back panel painted and new motor installed. Used the rubber feet listed above for the firewall washers.

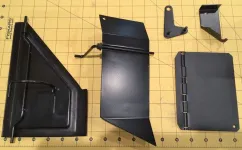
CJ7_Heater_Rebuild_32.jpg
Painted dampers.

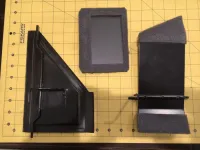
CJ7_Heater_Rebuild_33.jpg
1/4" foam on dampers. Make template before removing old foam. Scratch an awl line on damper before removing to use as a guide in placing new foam.

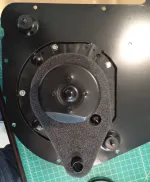
CJ7_Heater_Rebuild_34.jpg
New 1" foam gasket (bandsaw worked great, coping saw on large inside hole, 3/4" hole punch").
Laying out holes required some drafting skills, and a compass. Laid it out on the paper backing (make sure to lay it out in reverse).

CJ7_Heater_Rebuild_35.jpg
Inside heater box; pre-assembly.

My blog with more pictures and explanations (will do a separate thread here once I am finished).

.
 
Last edited:
Man that’s cool


Sent from my iPhone using Tapatalk
 

Jeep-CJ Donation Drive

Help support Jeep-CJ.com by making a contribution.

Help support Jeep-CJ.com by making a contribution.
Goal
$200.00
Earned
$25.00
This donation drive ends in
Back
Top Bottom