What did you do to or with your CJ today?

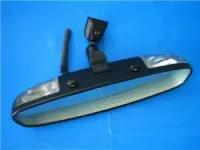
With a soft top, I have no dome light. I wanted a rearview mirror with map lights in it. My criteria was to have the map lights available individually using buttons on the mirror, or have them come on together with the under dash courtesy lights when you used the headlight switch. So I located a mirror in the local pick-a-part from a 2005-2010 Chevy Impala. Also cut the wiring to keep the connector plug on the back of the mirror and about 6 inches of wiring harness. Replaced the bulbs with Sylvania 194 LED bulbs. Next was wiring the CJ. I drilled a 1/4" hole in the underside of the top of the windshield frame just above where the mirror is glued on and another under the driver side base where the wiper motor mounts. I then used a bent metal hanger to fish three wires inside the windshield frame from the bottom up to the top through those holes. No exposed wiring going up the side of the windshield. Using a multi-meter I figured out which pins in the connector on the mirror I needed to use for my purposes. Then I simply connected the always-on +12V and the switched ground from the courtesy lights under the dash, along with an always-ground under the dash. A glob of mirror adhesive from the auto parts store to mount it to the windshield, and viola. So in the end, the three wires going up to the mirror are (pin 1) always-on +12V, (pin 2) always ground, and (pin 3) switched ground from the headlight switch. The always-on +12V and always ground provide the mirror with constant power regardless of the key on or courtesy lights on so I can use the two buttons on the mirror to turn on/off the maps lights individually (one side, the other, or both). Just don't accidentally leave on and drain your battery. The switched ground from the courtesy lights (switched using the headlight switch) means that when I turn on the courtesy lights (manually with the headlight switch or from the alarm system) both map lights in the mirror come on automatically.

mirror.jpg

20211021_084307[1].jpg
 
With a soft top, I have no dome light. I wanted a rearview mirror with map lights in it. My criteria was to have the map lights available individually using buttons on the mirror, or have them come on together with the under dash courtesy lights when you used the headlight switch. So I located a mirror in the local pick-a-part from a 2005-2010 Chevy Impala. Also cut the wiring to keep the connector plug on the back of the mirror and about 6 inches of wiring harness. Replaced the bulbs with Sylvania 194 LED bulbs. Next was wiring the CJ. I drilled a 1/4" hole in the underside of the top of the windshield frame just above where the mirror is glued on and another under the driver side base where the wiper motor mounts. I then used a bent metal hanger to fish three wires inside the windshield frame from the bottom up to the top through those holes. No exposed wiring going up the side of the windshield. Using a multi-meter I figured out which pins in the connector on the mirror I needed to use for my purposes. Then I simply connected the always-on +12V and the switched ground from the courtesy lights under the dash, along with an always-ground under the dash. A glob of mirror adhesive from the auto parts store to mount it to the windshield, and viola. So in the end, the three wires going up to the mirror are (pin 1) always-on +12V, (pin 2) always ground, and (pin 3) switched ground from the headlight switch. The always-on +12V and always ground provide the mirror with constant power regardless of the key on or courtesy lights on so I can use the two buttons on the mirror to turn on/off the maps lights individually (one side, the other, or both). Just don't accidentally leave on and drain your battery. The switched ground from the courtesy lights (switched using the headlight switch) means that when I turn on the courtesy lights (manually with the headlight switch or from the alarm system) both map lights in the mirror come on automatically.

I like it. I thought about doing this a few years ago, but always have a more pressing project. Having interior lighting would be nice though.

Congrats on a quick win project!
 
Next will be LED bed lighting in the back. I'm thinking of small LEDs under the side "lips" of the tub (like where the captive nuts are for a hard top or the rails for the soft top) and a switch somewhere to turn them on/off. Just a high-level thought right now.
 
Ugly and hair pulling rattle, I found you!!!

My battery hold down came loose. All this time. Grrrr
 
It really does.

Years back I had a similar gremlin. And this one almost made me throw in the towel. The hood hinges were worn out and had a lot of play. lol
 
With a cold front coming thru this afternoon, I went ahead and swapped the soft top for the hard top. Gave it a spruce up coat of satin black paint so I’m ready for cold weather.....

094a7456eeff25113e7963fbc473ce07.jpg


621461d3cb0ca63e63ecae5c404567cd.jpg


Sent from my iPhone using Tapatalk
 
Finally installed the new shocks. The Rough Country 4" lift kit came with shocks, but that was years and miles ago. Plus, those are not really the best shocks for my needs. But with the 4" lift, no stock length shocks would work. Had to shop around a bit to find what would meet my needs, my length, and my mounts. Ordered some Skyjacker 7000 series shocks. But when they arrived, discovered they were :dung:. Basically no "shock absorbing" action at all. They were easily compressed and extended by hand with little to no resistance, offered no "spring back" after being compressed, and were more or less like driving with no shocks at all. I decided I needed some spring assisted load balancing shocks, especially because I do tow from time to time. Returned those and got a set of Monroe 58647.
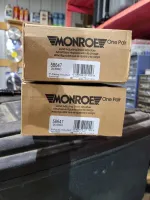
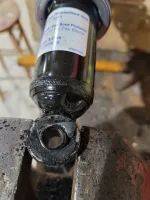
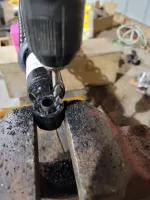
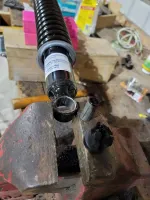
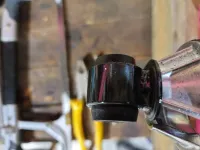
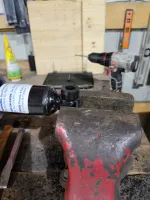
They come in a 2-pack, so ordered 2 sets to get 4 shocks. Local auto parts store wanted $170 a set. Amazon had them for $90 per set. Now these were the correct length I needed with the lift, but the mounts were wrong. They have eyelets with rubber bushings and sleeves for 1/2" bolts. My '84 CJ7 uses 5/8" bushing mounts both top and bottom in the rear and top in the front. The 1/2" sleeved eyelet was correct for the lower part of the fronts however. I don't like the rubber bushings and prefer the polyurethane instead. So no problem. Ordered a set of poly bushings with 5/8 ID to replace what was in the shock mounts. If you've never replaced bushings in shocks before, especially ones that are still new and tight, there's a great trick that makes it easy. Simply cut off with a hacksaw the protruding portion of the rubber that is flared out on the side of the shock eyelet. Then use a 1/4" drill bit to drill a series of holes in the rubber between the eyelet and the metal sleeve in the center. Then with the shock supported (in a vise or on a block) use a punch and hammer to drive out the bushing with the sleeve still in it. This took about 2-3 minutes per sleeve and I had six to do (top/bottom of both rears and top of both fronts).

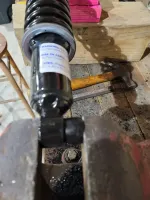
Now to install the new poly bushings, a little grease in the outside of the bushing and then simply used the vise to press them in. Now the vise won't get them fully pressed in before they start squishing, so a few taps with the hammer on one side to get them centered into the shock eyelet. Now since I prefer the poly bushings over rubber, I went ahead and also replaced the lowers on the two front ones even though the 1/2" sleeve in the bushings is what I needed anyway. Once the new poly bushings were installed, I used two of the metal sleeves I saved from the originals and simply pressed them into my new polys using the same vice method.

Some grease in all the bushings and sleeves and they were ready for install. Removing the old ones was easy enough. PB Blaster and elbow grease and a small prybar did the trick. Lifting the frame of the Jeep on a jack to let the axles hang provided the needed spacing to get the new ones in without having to compress them much. Haven't hitched the trailer with a load yet, but already an improvement in the stability and ride over the mushy and worn out Rough Countries I removed. Total time start to finish was about 3 hours last evening.

20211026_184430.jpg

20211026_184549.jpg

20211026_184639.jpg

20211026_184719.jpg

20211026_184357.jpg

20211026_184747.jpg

20211026_184812.jpg
 
Pulled the choke , started it up and went for breakfast, heat was working! Next week its fix the hedder leak and valve cover leak, and back to stock intake manifold.
 
Took the lame nerf bars off and put some rock sliders on in their place. Nice clean look with a strong mounting. I feel much better about any side impact that may come our way.

20211108_164357.jpg

20211108_162639.jpg

20211108_162625.jpg
 
Took the lame nerf bars off and put some rock sliders on in their place. Nice clean look with a strong mounting. I feel much better about any side impact that may come our way.
We are set up about the same in terms of lift and tires and all over Moab last spring I had ZERO hits on my slider's and mine are almost exactly like yours.
 
I'm pretty stoked on the fit and look. This is a good addition to my dd as the impacts that I fear most will come from fellow road occupants with less than stellar driving abilities. I have no doubt about the trail protection. These run the whole side and are rugged. The sides of our vehicles offer very little in the way of intrusion protection and the nerf bar was definitely not going to slow anything down. Perhaps the sliders aren't much better in the long run but I feel way better with them. Bent metal, on a 38-year-old jeep, is getting harder to replace and my old bones don't mend as quickly anymore either.
 
Here in south Texas, it's back in the 80's. Top and doors back off. Time for inspection and to renew registration, so new wipers installed. Nothing like driving in mid-Dec with the top off and tunes cranked up.
 
At 14 degrees no block heat, pulled choke and it fired right up, 3 mins idle time and it ran with no choke unlike when the high flow Clifford was there. Went to the local road kill diner for breakfast.
 
I got her torn down for the Holley Sniper EFI install. 4 barrel intake installed, TB installed, new hyperspark distributor installed - ready for wiring and exhaust. Doing inside frame exhaust with new ceramic headers. Sniper will control timing, and fans now. Hoping to clean some stuff up in there while I'm at it.
 
I finally gave in and replaced the leaf springs. The springs that came with it when I bought were supposedly 4” lift springs. They were already tired, as the shackles were closer to horizontal than not. Got to the point that every time I turned right, the left rear tire rubbed the exhaust on that side. Soooo, swapped em out yesterday. I reassembled the suspension probly three years ago, and it’s been on the road two. Two bushing sleeves had already rusted to the bolts despite the use on anti-seize. Had to cut them off . But - new springs and shocks makes it ride MUCH better. I have a before pic, so I’ll take an after tomorrow.


Sent from my iPhone using Tapatalk
 
Found so good Chi-Com metal ?
 
We’ll see how “good” it is, but I found a guy bout 45 minutes from sellin a full 4” lift from rough country for 200 bucks. Bought it for a CJ then decided to leave the Jeep on his Dad’s farm. Said he was tired of movin the kit around. I figure I should be able to get a couple hundred bucks use out of em.


Sent from my iPhone using Tapatalk
 
They are not called Rough for nothing.:poke: Be good to hear a first hand experience with them. Will be expecting a report after 6 months. :drive::drive:
 

Jeep-CJ Donation Drive

Help support Jeep-CJ.com by making a donation.

Help support Jeep-CJ.com by making a donation.
Goal
$200.00
Earned
$25.00
This donation drive ends in
Back
Top Bottom