• Hello Guest, we are proud to now have our Wiki online that is completely compiled and written by our members. Feel free to browse our Jeep-CJ Wiki or click on any orange keyword when looking at posts in the forum.
    To dismiss this notice
    click the top right X.

Build Thread CJ7 restoration in progress- Advice please

Build Thread CJ7 restoration in progress- Advice please
Project Dash Cleanup is complete. Took 2 days because I took my time to get it done right. Came out pretty good too.

The first couple pics show how much dirt and dust and :dung: was on the floor and on the air ducts. The wires were a mess as well.

I cleaned all the surfaces and wiped the wires clean with a damp cloth and some foam vinyl and carpet cleaner. 3 buckets of dirty water later, I moved on to the wires.
 
After wiping the dust off with the damp cloth, most of the wires still had crusty electrical tape remnants hanging from them and the sticky residue that all the dirt sticks to.

I'm sure WD40 would work as well, but I had some of the Goo Gone and it worked great. Made all the wires look like new again.
 
After getting the wires clean, I then used some crimp tools to reconnect loose wires and clean everything up. Rolled electrical tape over all the new connections.

From there it was just bunching everything together in the right clusters then zip tying it all together.
 
I was surprised to discover this though. No idea what happened! The Jeep has never been in a accident either. It looks like it is a clean break too.

Good thing is that it's still functional. Gonna leave it just like it is.
 
Forgot the Before and After


Before:

2270d1265352739-cj7-restoration-progress-advice-please-img_1046.jpg


After:

2279d1265353757-cj7-restoration-progress-advice-please-img_1068.jpg
 
great post, I am inpressed and I am an commercial electrician. I do have one bit to add, you talked of crusty electrical tape, well there is some tuff, sold at Lowes and Home Despot, called liquid tape. Use it to seal electrical splices and protect from corosion, also go to radio shack and get the tubing to put around those wires to protect them and organize them, it is pricey, but with such a fine job you have done, it will trick it out
 
great post, I am inpressed and I am an commercial electrician. I do have one bit to add, you talked of crusty electrical tape, well there is some tuff, sold at Lowes and Home Despot, called liquid tape. Use it to seal electrical splices and protect from corosion, also go to radio shack and get the tubing to put around those wires to protect them and organize them, it is pricey, but with such a fine job you have done, it will trick it out

Thank you! I saw that liquid tape at ACE actually when I bought the wire tubing you suggested but went with the mechanical connectors instead. I am waiting to put tubing on until I am ready to put the dash back together in case I need to make any adjustments, etc. Plus, I plan on rewiring the stereo.

I went with butt connectors (?) You strip each wire and insert each into each end of the connector tube then crimped it down. I then wrapped with electrical tape. I don't think those connections are coming loose anytime soon.

I really wanted to use those sleeves that you put on before you connect the wires then you pull it over the connector and hit it with a heat gun and it shrink wraps the connection. But they did not have any and Radio Shack is a while away from me...

ACE has 3/8" tubing 6 bucks for 10'.
 
A small drop of the li quid tap in the end of those butt connectors will make them bullet proof, remember electricity runs down the outside of a conductor, and any corrosion inhibits it's flow. I have used the shrink wraps and find they are not up to the task. I do not have it bookmarked but there are a few internet places where you can get such stuff dirt cheap.
I commend the electrical post again, good stuff.
 
Worked on getting seats mounted to new brackets for the last couple days. The bolts connecting the seats to the brackets seized and all the heads broke off. So I spent some rather frustrating times drilling out bolts.

I really, really hate drilling bolts. Especially grade 8's. But I did get them out and the seats mounted to the new stainless mounting brackets.

They look better against the black carpet.
 
Work in progress, but I wanted to see what it would look like.

Not 100% sure I like the brushed stainless look or maybe just not stand alone, but it was still cheaper than getting the original dash blasted and repainted.
 
I don't know how I missed the license plate before and maybe you mentioned it, but where in MA are you? I am right over the border in NH...

cb
 
Worked on getting seats mounted to new brackets for the last couple days. The bolts connecting the seats to the brackets seized and all the heads broke off. So I spent some rather frustrating times drilling out bolts.

I really, really hate drilling bolts. Especially grade 8's. But I did get them out and the seats mounted to the new stainless mounting brackets.

They look better against the black carpet.


Where did you buy those bitchin stainless steel brackets from?
 
Slowly getting the dash put together. Switched out all the dash light bulbs with new ones since I had the chance and a spare $15 bucks...

Replaced old heater/vent/air control pull cables with new replicas from Omix-Ada. Not sure if I am going to keep the cable knobs. Might go with a custom look?

Replaced all 6 dash light indicators. Those were tough to slide into and click into place.

Excellent suggestion on Certifiablejeep's web page to hang the dash panel for ease of installation and reconnecting wires, etc. Thanks for that one.
 
I have had a lot of people use that technique... all with good results.
My first one I didn't do that and it made such a diference each one after that.

cb
 
Got roll bar, doors, and mounting brackets for rear seat back from blasting.
$295 total, tax included. I think this was a very fair price and they do great work.

Specialty Stripping
Plastic Media and Sand Blasting
60 Lafayette Road
North Hampton, NH 03862
603-964-6693

Took them to the shop to get everything painted. Having them spray POR15 in the door guts and on the pads of the roll bar and and rear seat mounting brackets.

Hopefully they will be back here at end of week or early next week.
 
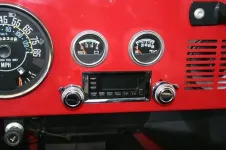
After switching out old dash for new stainless steel, I forgot that original dash was cut to mount aftermarket radio so I either need to cut the new dash or get a new radio that fits the factory opening. The current head unit has a cassette player, "so I might as well..."

5 most expensive words ever.

But seeing that the dash is still hanging and easy to get back there, now is the time to wire it in.

This is what I am putting in:

Retrosound Model One


The Model One looks like an old-fashioned radio, but it offers all the modern conveniences. You can connect your iPod, MP3 player, or portable satellite radio to the front or rear auxiliary inputs. Hook up a thumb drive loaded with music files to the rear USB input, and you'll be able to view track info on the LCD screen. The Model One also offers excellent AM/FM reception.
x068RETRO1B-f_mt.jpeg


Retrosound Model One Digital media receiver for classic cars — available in black and chrome at Crutchfield Signature

Best of all, it fits the factory location without cutting.

This is what it's supposed to look like...I picked black knobs instead of chrome though.

3756395779_d2516f3bf4.webp

So getting the dash fully back together is on hold until later this week whenever it arrives and I get it in.
 
Last edited:

Jeep-CJ Donation Drive

Help support Jeep-CJ.com by making a contribution.

Help support Jeep-CJ.com by making a contribution.
Goal
$200.00
Earned
$100.00
This donation drive ends in
0 hours, 0 minutes, 0 seconds
  50.0%
Back
Top Bottom