• Hello Guest, we are proud to now have our Wiki online that is completely compiled and written by our members. Feel free to browse our Jeep-CJ Wiki or click on any orange keyword when looking at posts in the forum.
    To dismiss this notice
    click the top right X.

Build Thread Mike's 1986 CJ7 (Mid Year) Rebuild

Build Thread Mike's 1986 CJ7 (Mid Year) Rebuild
Team Rush parts arrived... BWD baby,,,
 
So, a while back I discussed the steering stabilizer mounting bracket moving around between the springs and axle. Tried to tighten the u-bolts with a 24" breaker and no go. I then decided to get new u-bolts; figuring that the threads got flattened from rubbing on the springs while being loose so no threads to suck it up. Tried to remove the u-bolt nuts and no go. Dammit.

Decided to go for a ride yesterday with Mary, but the new bolts hadn't arrived so, in an effort to keep mama happy, applied liquid wrench to the nuts, then heated them with a heat gun... and they gave way. Had to reheat several times on the way off to keep them turning.

(Thanks to Peanut Butter for some procedural advise.)

Ran a die down the u-bolts and chased the threads on the nuts.

Reinstalled them and they sucked right up, locking the stabilizer tang right down. I'm beginning to take on a "don't screw with me" attitude with the Jeep. It will not win.

We went for about an hour ride last night around town and it just ran great, but then....
 
Got home from the ride and noticed that brake fluid was leaking pretty good from the cap. I could move the lid with the bale engaged so decided to bend it to get a tighter seal.

I've read various threads on this issue and decided to see if the brake fluid would geyser up from the MC on the second pump and it does. Hit the hood... rinsed that :dung: off quick, but noticed that it had eaten some of the paint on my steering shaft. Rinsed all of that off. So now I've got to figure out what to do.
I've read that if it geysers, it could be the proportioning valve, some other valve at any of the wheels, or an incorrect rod length due to the reman. procedure. If it is the rod length, I may just go buy a new Napa unit for $35. If it is a valve at the wheels or the proportioning valve, I'm not sure how to test.

How do you guys recommend to proceed?

In the meantime I've bent the bale so it will compress tighter and now the lid is locked down tight. Am about to go out for a ride to see if it seals, but would still like to address the geyser issue.

It is my understanding that the brake pedal can be depressed multiple times with the cover off while bleeding...
 
That is awesome. Hope you continue to have fun with it.
 
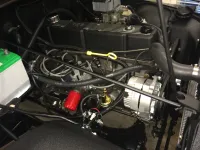
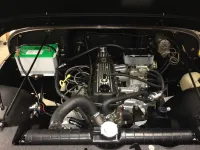
State of the engine compartment address...

Team Rush installed... Much smoother accel response, less ping, easier starts in first... worthwhile.

Team Rush BWD distributor cap adaptor, BWD dist. cap, BWD rotor, Motorcraft 8mm wires for 1982 Ford F150.
Still want to run some loom brackets.
CJ7_Jan_21_2017_05.jpg

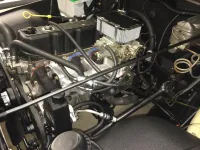
O2 sensor plug, EGR gone...
CJ7_Jan_21_2017_06.jpg

Old school valve cover breather, hose eliminated to air filter, new water pump bypass hose, new heater hose running behind breather.
Starting to clean up...
CJ7_Jan_21_2017_07.jpg
 
Last edited:
Have the brake fluid about 3/16-1/4" below the top of the MC reservoir.
CK the seal for splits etc.
With the cover spring in the vertical, without the cover, push down in the center to increase clamping force onto the lid. I have to use a screwdriver as a 'pry-bar' to release the cover on mine(mine don't leak).
LG
 
That engine compartment is beautiful !!!!!!!!!
 
Have the brake fluid about 3/16-1/4" below the top of the MC reservoir.
CK the seal for splits etc.
With the cover spring in the vertical, without the cover, push down in the center to increase clamping force onto the lid. I have to use a screwdriver as a 'pry-bar' to release the cover on mine(mine don't leak).
LG
Thanks, LG. I already had compressed the "v's" at either end of the bale and it is holding down now. Still have to do a test drive, but I think I've got that sorted now. I'll use your method next time.

That engine compartment is beautiful !!!!!!!!!
Thanks…

Very nice inside and out!
Thanks…

Very nice looking CJ
Thanks...
 
Yesterday I decided to change the fluid in the Transfer Case and Transmission . Got under there and the access hole in the belly plate does not align with the Transfer Case drain plug. I watched a youtube video and the guy said you had to remove the belly plate so I set about removing it. Got down to the one bolt on either end of the plate and the body mount. Took one of the remaining plate bolts off and the tranny/case sagged down. Scared the :dung: out of me. Glad I left on the loosened body mount nut in the center of the plate.

Centered my floor jack on the plate and raised it up to get the bolts back in. Called Adam and he said to use a block of wood and support the bell housing with the floor jack, then remove the plate… so I'll be doing that this morning.

Thinking about enlarging the access hole in the plate so that next time I can get to the Transfer Case drain plug.

ouch that could have really hurt.... that skid plate is the only thing holding the Transmission and Transfer Case in the Jeep...
 
Got the TC and tranny drained and refilled. Used 80w-90 in the TC and DEXIII in the tranny.

The old oil was translucent in the TC with no filings… just the smallest amount on the magnet. The tranny was not clear, but clean as well.

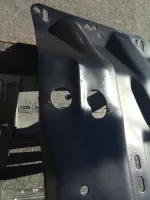
I marked and enlarged the access hole in the skid plate so that next time I don't have to drop it… came out alright and lines up perfect now.

CJ7_Jan_24_2017_01.jpg

Off for another test drive to see if the new power steering pump cap and master cylinder still leak… maybe stop at Outback for some protein...
 
Last edited:
Got down to the one bolt on either end of the plate and the body mount. Took one of the remaining plate bolts off and the tranny/case sagged down. Scared the :dung: out of me. Glad I left on the loosened body mount nut in the center of the plate.
I would suggest purchasing a factory service manual, or at least a Chilton/Haynes manual. Feel free to post up to ask questions before working under your CJ.
 
:agree: 110%

Make sure the fan didn't contact the radiator.
LG
 
Do NOT use Dex or any ATF in that T-5 tranny-AMC learn'd that along time ago. ATF Killed a bunch of'em. This was AFTER Borg/Warner said, 'don't do it'.
Valvoline oil has an excellent syn tranny oil for the T-4 /T-5 .
This is what I have used since it came out.
Valvoline SYNCHROMESH - Manual Transmission Fluid | O'Reilly Auto Parts

LG

Dammit… now I've got to drain it again… I'll pick some up this week and drain it again.

I would suggest purchasing a factory service manual, or at least a Chilton/Haynes manual. Feel free to post up to ask questions before working under your CJ.

I've got the factory service manual, but to be honest, I don't understand most of it. I guess I need something a little more layman oriented. My Harley service manual is more user friendly. I did rebuild the top end on it and its lasted 35k miles on that build.

:agree: 110%

Make sure the fan didn't contact the radiator.
LG

It sagged maybe an inch or two… no damage to the firewall or radiator. It was still secured from one side.

Thanks for the help.
 
Last edited:
After a test drive, the new power steering cap is keeping the fluid in. Found a Dorman 82581 (replaces GM 2006-61). It is virtually identical (including the level indicators) except for the vent hole in the cap. The level indicator is hollow and a hole could be drilled through the cap if the vent is necessary. The guy at Advance said he wouldn't drill it if I don't need to. What do you guys think?

Master cylinder is still leaking from the cap. Drove over to Adam's and he told me it was a new remanufactured unit from Advance. I just ordered a new master cylinder and two new rear cylinders from Napa. Also ordered a new set of brake springs and a set of spring pliers. Adam said he'd buy the reman. back from me and he's going to help me install the MC then we're going to bleed the entire system. If that doesn't work, my next step will be to rebuild the front calipers. Adam did say the rear shoes looked good when he had it apart and the front pads are good.
 
Last edited:
Just a note-The World Class T-5 you find in muscle cars uses ATF.
The T-5 used buy AMC used a special brown 'stink oil' that was high in sulfur.
Did a good job of lube'n the tranny. But, turned the seals hard and they would then crack.
I have used the Valvoline I told you about without issue, my Jeep sees temps from the teens to +115*. Shifts smooth and easy when cold or hot.
:chug:
LG
 

Jeep-CJ Donation Drive

Help support Jeep-CJ.com by making a contribution.

Help support Jeep-CJ.com by making a contribution.
Goal
$200.00
Earned
$25.00
This donation drive ends in
Back
Top Bottom